Author: wlpmcxg9e4hb

  • bubblelife

    bubblelife

    A 3D interpretation of Conway’s Game of Life.

    Made with bubbles! 💬


    demo.mp4


    Usage

    You can use Go or a container engine to run this project.

    Container

    Run it:

    # Assuming X11 compatible host
    docker run --rm -v /tmp/.X11-unix:/tmp/.X11-unix:rw -e DISPLAY=$DISPLAY ghcr.io/braheezy/bubblelife:v0.1.0

    Go

    You need the dependencies that go-gl has. That’s a C compiler, and on Debian flavors, the libgl1-mesa-dev package.

    Then:

    go install github.com/braheezy/bubblelife@v0.1.0
    bubblelife

    Keybindings

    Action Keybinding Description
    Quit Esc Closes the window/application.
    Toggle UI menu Tab Toggles the visibility of the UI menu.
    Navigate UI (down) Down Arrow Moves down through UI options.
    Navigate UI (up) Up Arrow Moves up through UI options.
    Adjust Pillar width Left/Right Arrow (when option 0) Adjusts the pillar size N (min 2).
    Adjust Pillar height Left/Right Arrow (when option 1) Adjusts the pillar size M (min 2).
    Enter seed 0-9 (when option 2) Enters numerical input for the seed.
    Delete last seed digit Backspace Removes the last digit entered for the seed.
    Confirm seed Enter Confirms the seed input.
    Adjust Generation Speed Left/Right Arrow (when option 3) Adjusts the generation speed.
    Camera movement (forward) W Moves the camera forward.
    Camera movement (backward) S Moves the camera backward.
    Camera movement (left) A Moves the camera to the left.
    Camera movement (right) D Moves the camera to the right.
    Unlock cursor Left Shift Unlocks the cursor and allows free cursor movement.

    Design

    After completing the LearnOpenGL tutorial series, I wanted my own project to use some of the skills I learned. For graphics concepts, I use:

    • a cubemap to create the background from. The cubemap is computed and created at runtime from an HDRi image.
    • instanced rendering of points for good performance. Several other attempts before this tried to render spheres with vertices and there was poor FPS when viewing 2000 bubbles
    • text rendering! which means opentype font parsing. always tricky
    • hand-crafted UI system with input handling
    • Blinn-Phong shading. And the entire sphere is “faked” in the fragment shader

    The size of the pillar is chosen and the seed value is used to set the initial alive/dead population state. The Game is then set into motion. To extend to 3D, I check more neighbors than the original rules used for 2D. The Game algorithm does wrapped boundary checking, treating the pillar as a torus essentially.

    For fun, related neighbors are given the same color. This is done by selecting cells, doing a BFS search to find neighbors, and labelling that group with an ID to enforce a different random color later. This works out quite nice.

    Credits

    I got the HDRi file for the background from here.

    The font is freely available online.

    Visit original content creator repository
    https://github.com/braheezy/bubblelife

  • mashup

    INTRO

    One of restrictions assumed here was to use JDK only but no other 3PP library for the main code.
    This impacted a lot of the code (for example we can not use 3PP for parsing JSON so we depend on specific version of JDK).

    REQUIREMENTS

    I developed this software using Oracle JDK jdk1.8.0_121.
    It also passed successful tests with Open JDK 8u111-jdk (as verified in Dockerfile below).

    To run this software you need at least Oracle JDK 1.8.0_60, the best is to use latest one available – 1.8.0_100 or higher!
    If you use older version then not everything might work because I rely on some latest feature (functions parts of Javascript
    scripting engine shipped with JDK) to implement JSON parsing without using any 3PPs.

    These are not specific to Oracle JDK, these features are standard features of any JDK implementation.

    Usually I would not depend on latest JDK version but in order to avoid writing my own JSON parser I decided to do so.

    In order to support older versions of Java I would have to write my own JSON parser, deal with ASTs and different corner cases
    and it that itself would easily take me few days to implement.

    I chose to depend on JDK 1.8 (and not earlier version of Java) because it has functional features similar to Scala.
    Depending on specific version of dependency is not a problem anymore in the world of microservices and containers (Docker)
    where every microservice can choose its own dependencies without affecting others as long as APIs it exposes are stable
    and versioned.

    CONFIGURATION

    It is MANDATORY to change first two configuration values in file src/main/resources/mashup.properties

    twitter_auth_key (Twitter consumer key)

    twitter_auth_secret (Twitter consumer secret)

    You have to do this BEFORE building and running software.

    Other configuration values can also be modified but this is optional.

    HOW TO BUILD SOFTWARE?

    Before building software make sure you configured it properly. See previous step.

    You have to have Maven 3.3.3 or later in order to build this software. Maven must be available on the PATH.

    To build software execute (this will also execute JUnit tests):

    mvn clean package

    HOW TO RUN SOFTWARE?

    To run this software you first have to build it. See previous step.

    There are two ways to run this software:

    1. Using Docker on Linux

    If you do not want to install specific version of Java then you can run this inside Docker. Assumption is that you have
    one of latest Docker version and Linux installed. This software was tested with Docker 1.12 and Ubuntu Linux.

    Execute following commands (in the root of project):

    ./buildDockerImage.sh
    ./runDockerImage.sh

    This will bring you to mashup app where you can enter keywords to be used for searching Github and Twitter APIs.

    1. Not using Docker

    Appropriate version of Java must be available on the PATH (see above for required Java version).
    If Java is not on the PATH then please modify startMashup.sh script and put absolute path to correct Java binary there.

    Execute this to run the application (in the root of project):

    ./startMashup.sh

    If shell scripts can not be executed on your system (maybe you use Windows) simply copy paste command from
    startMashup.sh into your terminal (command line).

    TESTS

    JUnit tests are executed automatically during Maven build.
    Ideally there should be much more JUnit tests but I was able to achieve only ~60% of coverage.
    Few more hours of work should be done to add extra tests and maybe refactor a thing or two while writing tests.

    We would also have to add integration tests and system tests. Those tests would test network failures, problems with DNS, problems with
    slow responses from remote dependencies etc. This can be done by mocking dependencies using some kind of embedded Jetty etc.

    We would also have to add stress tests, concurrency, stability and reliability tests – but this would make sense mostly if this was not
    single-user console only application, like it is today.

    If, for example, this application exposed some RESTful APIs to others then we would have to treat it differently than how we treat it now.

    POTENTIAL IMPROVEMENTS

    • Introduce 3PPs and reduce code doing plumbing things like: JSON parsing and conversion, caching, metrics, retries.

    • Introduce proper monitoring and expose internal metrics. Some 3PPs would be useful to do this or maybe internal libraries in your company.

    • Introduce proper system testing using Docker and some scripting language (like Groovy)

    • Introduce some kind of failure injection for more robust system tests (like ChaosMonkey)

    • Do local performance (and stress) testing and watch how JVM behaves (GC, hotspots etc). Try to optimize most obvious problems. We can use jvisualvm for this.

    • Use SLF4J for logging for improved performance and richer feature set than what JUL is giving us. Again JUL is used because of limitations of this task

    • Probably move configuration to Zookeeper or Consul maybe – currently using property files is not flexible enough, especially for distributed systems.
      If we decided to move configuration to centralized location then application should fetch its configuration when needed and not only at startup like
      it is doing today.

    • If we decided to use Java only we could implement a lot of crosscutting concerns (like logging or exposing metrics) as annotation-based API so that
      it is easier to focus on business logic only. Either use 3PP for this or some internal libraries already available

    OTHER THINGS THAT SHOULD BE PART OF PRODUCTION READY SOFTWARE BUT I DID NOT MANAGE TO DO THEM

    • Documentation, especially if we are exposing APIs remotely or exposing some client library.
      This is currently not the case for this project but it could expand.
      If we are providing user library then API should be clearly separated (separate jar) from implementation jars.

    Visit original content creator repository
    https://github.com/hepeknet/mashup

  • OTPTextField

    OTPTextField

    Build Status codebeat badge Swift Version LISENCE

    Overview

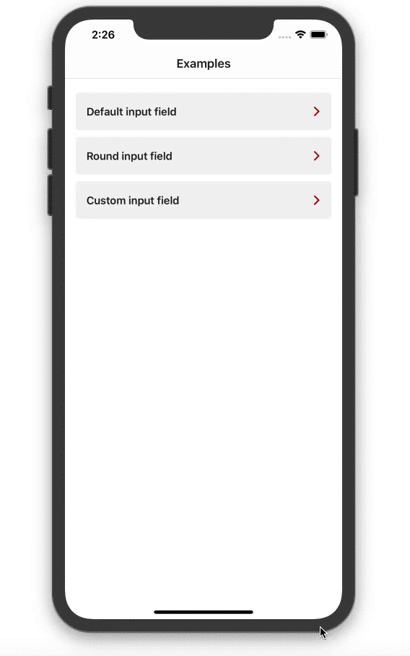
    This library provides the ability to quickly implement the SMS input field. By default it supports the ability to automatically insert OneTimeCode into the field.

    Features:

    1. Two default input fields
    2. The ability to make your own design
    3. Ability to animate an input indicator
    4. Ability to handle error state

    Installation

    CocoaPods

    CocoaPods is a dependency manager for Cocoa projects. For usage and installation instructions, visit their website. To integrate OTPTextField into your Xcode project using CocoaPods, specify it in your Podfile:

    pod 'SFOTPTextField', '~> 1.0.0'

    Usage

    Default Usage

    In order to add a default field:

    1. Create instance of OTPTextField
    2. Add to your ViewController
    3. Implement handlers

    Custom Usage

    In order to implement cutom field:

    1. Create your own pinView and implement protocol PinContainer
    2. Create your own adapter class and implement protocol OTPTextFieldData
    3. Add instance of OTPTextField to your ViewController
    4. Set your own custom configuration and implement handlers
        func configureOtpField() {
            let configuration = OTPFieldConfiguration(adapter: CustomFieldAdapter(),
                                                      keyboardType: .namePhonePad,
                                                      keyboardAppearance: .light,
                                                      autocorrectionType: .no,
                                                      allowedCharactersSet: .alphanumerics)
            otpField.setConfiguration(configuration)
            otpField.onBeginEditing = {
                print("Handle Begin Editing")
            }
            otpField.onEndEditing = {
                print("Handle End Editing")
            }
            otpField.onOTPEnter = { code in
                print("Handle OTP entered action")
            }
            otpField.onTextChanged = { code in
                print("Handle code changing")
            }
        }

    License

    OTPTextField is released under the MIT license. See LICENSE for details.

    Visit original content creator repository https://github.com/fixique/OTPTextField
  • awesome-3D-gaussian-splatting

    Visit original content creator repository
    https://github.com/MrNeRF/awesome-3D-gaussian-splatting

  • stringbar

    stringbar

    Crates.io Version GitHub Actions Workflow Status GitHub License

    A dwm-style status bar (sets X root window name).

    Features

    • Configurable layout
    • Hot config reloading

    Runtime Dependencies

    • xsetroot

    Installation

    Using cargo

    Execute cargo install stringbar

    From source (x86_64 Linux only)

    Build Dependencies

    Building

    Execute just release and copy the resulting ./stringbar binary to a directory in $PATH.

    Configuration

    • Start stringbar once to generate the default configuration file.
    • Edit $XDG_CONFIG_HOME/stringbar/config.ron

    Available modules

    Name Description
    CpuUsage Cpu utilization in percent
    MemoryUsage Memory usage out of total
    SwapUsage Swap usage out of total
    Timestamp A custom formatted timestamp
    ProcessCount Number of processes running
    DiskUsage Amount of space used out of total on a specific disk
    DiskUsageTotal Total amount of space used out of total on all storage devices

    Example

    #![enable(implicit_some)]
    #![enable(unwrap_newtypes)]
    #![enable(unwrap_variant_newtypes)]
    (
        separator: " | ",
        update_interval_ms: 1000,
        decimal_data_units: false,
        sections: [
            (
                module: MemoryUsage,
                decoration: (
                    before: "dram ",
                    after: None,
                ),
            ),
            (
                module: DiskUsage(
                    name: "/dev/sda",
                ),
                decoration: (
                    before: "sda ",
                    after: None,
                ),
            ),
            (
                module: DiskUsageTotal(
                    include_removables: false,
                ),
                decoration: (
                    before: "total ",
                    after: None,
                ),
            ),
            (
                module: Timestamp(
                    template: "%d/%m/%Y %H:%M",
                ),
                decoration: (
                    before: None,
                    after: None,
                ),
            ),
        ],
    )
    Visit original content creator repository https://github.com/sysrqmagician/stringbar
  • LedController

    USB LED Controller

    USB controller for my monitor LED strip.

    Device Firmware

    • Warm/Cool/Brightness control
    • Persistent storage in flash
    • Timed protection from extended high power use
    • Control via a USB HID device
    • Mbed 6.x
    • STM32F3
    • Light and Gesture Sensor: APDS 9960

    Host App

    • LED warmth control based on time of day.
    • Match LEDs to PC Sleep and Inactivity states.
    • Tray Icon & Flyout
    • WinUI 3 XAML UI
    • Windows App SDK Packaged App

    Development

    Testing

    Linux

    Permissions

    # Setup permissions
    sudo tee /etc/udev/rules.d/60-leds.rules <<'STOP'
    # HID for LEDs (not used in container)
    KERNEL=="hidraw*", SUBSYSTEM=="hidraw", ATTRS{idVendor}=="16c0", ATTRS{idProduct}=="05df", \
        TAG+="uaccess"
    
    # STLink v2
    # From https://github.com/stlink-org/stlink/blob/master/config/udev/rules.d/49-stlinkv2-1.rules
    # Used in container, no acl (uaccess)
    SUBSYSTEMS=="usb", ATTRS{idVendor}=="0483", ATTRS{idProduct}=="374a", \
        MODE:="0666", \
        SYMLINK+="stlinkv2-1_%n"
    
    SUBSYSTEMS=="usb", ATTRS{idVendor}=="0483", ATTRS{idProduct}=="374b", \
        MODE:="0666", \
        SYMLINK+="stlinkv2-1_%n"
    
    SUBSYSTEMS=="usb", ATTRS{idVendor}=="0483", ATTRS{idProduct}=="3752", \
        MODE:="0666", \
        SYMLINK+="stlinkv2-1_%n"
    STOP
    
    # Reload
    sudo udevadm control --reload-rules && sudo udevadm trigger
    
    Start / Suspend

    sudo tee /etc/systemd/system/leds-on.service <<'STOP'
    [Unit]
    Description=LEDs on
    After=suspend.target
    After=hibernate.target
    
    [Service]
    Type=oneshot
    StandardOutput=journal
    ExecStart=/usr/bin/python3 /home/haves/Projects/LEDs/led_controller/misc/usb_test.py on
    
    [Install]
    WantedBy=multi-user.target
    WantedBy=suspend.target
    WantedBy=hibernate.target
    STOP
    
    sudo tee /etc/systemd/system/leds-off.service <<'STOP'
    [Unit]
    Description=LEDs off
    Before=suspend.target
    Before=hibernate.target
    Before=poweroff.target
    DefaultDependencies=no
    
    [Service]
    Type=oneshot
    StandardOutput=journal
    ExecStart=/usr/bin/python3 /home/haves/Projects/LEDs/led_controller/misc/usb_test.py off
    
    [Install]
    WantedBy=suspend.target
    WantedBy=hibernate.target
    WantedBy=poweroff.target
    STOP
    
    sudo systemctl enable --now leds-on
    sudo systemctl enable leds-off
    
    Tests

    # Turn on
    hidapitester --vidpid 16C0/05DF --open \
        -l 17 --send-output 0,1,0x90,0x12,0xE7,0x66,0x00,0x00,0x00,0x00,1,0,1,0xFF,0xFF,0xFF,0xFF \
        -l 16 --read-input 0
    
    # Get
    hidapitester --vidpid 16C0/05DF --open \
        -l 17 --send-output 0,0,0x90,0x12,0xE7,0x66,0x00,0x00,0x00,0x00,1,0,1,0xFF,0xFF,0xFF,0xFF \
        -l 16 --read-input 0
    
    # Notifications
    hidapitester --vidpid 16C0/05DF --open \
        -l 16 -t 10000 --read-input 0
    
    # Set Light Sensor Range
    hidapitester --vidpid 16C0/05DF --open \
        -l 17 --send-output 0,2,0x00,0x80,0x00,0x40,0,0,0,0,0,0,0,0,0,0,0 \
        -l 16 --read-input 0
    

    Device

    Container

    Launch and build directly from vscode.

    ST-Link

    1. Jumpers in normal position:
      1. JP1 removed.
      2. ST-LINK both populated.
      3. JP5 populated in 2-3 (E5V).
    2. Connect main USB port & power supply.
    3. LD3 solid, LD1 blinking.
    4. Connect USB debug CN1.
    5. Device reset and LD1 solid.

    Upload

    Use cmake flash-leds target, or copy to storage device.

    Console UART

    screen /dev/ttyACM0 115200
    

    Links

    Visit original content creator repository
    https://github.com/javs/LedController

  • php-gramer

    PHP Gramer

    Php için türkçe gramer yardımcısı
    İyelik Ekleri
    Bu repoda sadece türkçe kullanım için uygun olduğundan metinler türkçedir.
    This descriptions turkish language because of lib just for using on turkish language.


    Kurulum

    composer require atiksoftware/php-gramer

    Kullanım

    include '../vendor/autoload.php';
    
    use Atiksoftware\Gramer\Iyelik;
    
    
    echo Iyelik::Ek('Reşat','in') . " sesi kısıldı \n"; 
    echo Iyelik::Ek('Mansur','in') . " sesi kısıldı \n"; 
    echo Iyelik::Ek('Ahmet','in') . " sesi kısıldı \n"; 
    echo Iyelik::Ek('Ömür','in') . " sesi kısıldı \n"; 
    echo "\n";
    echo Iyelik::Ek('Hanzade','e') . " borç para verdim \n"; 
    echo Iyelik::Ek('Mustafa','e') . " borç para verdim \n"; 
    echo Iyelik::Ek('Kemâl','e') . " borç para verdim \n"; 
    echo Iyelik::Ek('Nazlı','e') . " borç para verdim \n"; 
    echo Iyelik::Ek('Güllü','e') . " borç para verdim \n"; 
    echo Iyelik::Ek('Mattö','e') . " borç para verdim \n";  
    echo "\n";
    echo Iyelik::Ek('Erkan','i') . " aradınız mı \n";  
    echo Iyelik::Ek('Furkan','i') . " aradınız mı \n";  
    echo Iyelik::Ek('Mücahit','i') . " aradınız mı \n";  
    echo Iyelik::Ek('Umut','i') . " aradınız mı \n";  
    echo Iyelik::Ek('Gamze','i') . " aradınız mı \n";  
    echo Iyelik::Ek('Hatice','i') . " aradınız mı \n";  
    echo Iyelik::Ek('Ayşe','i') . " aradınız mı \n";  
    echo "\n"; 
    echo Iyelik::Ek('Ahmet','de') . " bizimle gelecek \n";  
    echo Iyelik::Ek('Ali','de') . " bizimle gelecek \n";  
    echo Iyelik::Ek('Kemal','de') . " bizimle gelecek \n";  
    echo Iyelik::Ek('Oğuz','de') . " bizimle gelecek \n";  
    echo Iyelik::Ek('Azat','de') . " bizimle gelecek \n";  
    echo Iyelik::Ek('Patron','de') . " bizimle gelecek \n";  
    echo Iyelik::Ek('Usta','de') . " bizimle gelecek \n";  
    echo "\n";   
    echo Iyelik::Ek('Ahmet','den') . " şikayetçi oldular \n";  
    echo Iyelik::Ek('Nazlı','den') . " şikayetçi oldular \n";  
    echo Iyelik::Ek('Kemâl','den') . " şikayetçi oldular \n";  
    echo Iyelik::Ek('Nil','den') . " şikayetçi oldular \n";  
    echo Iyelik::Ek('Hadi','den') . " şikayetçi oldular \n";  
    echo Iyelik::Ek('Sefa','den') . " şikayetçi oldular \n";  
    echo Iyelik::Ek('Ömer','den') . " şikayetçi oldular \n";  
    echo "\n";   
    echo Iyelik::Ek('Ahmet','ile') . " görüştük \n";  
    echo Iyelik::Ek('Cemâl','ile') . " görüştük \n";  
    echo Iyelik::Ek('Nazlı','ile') . " görüştük \n";  
    echo Iyelik::Ek('Mansur','ile') . " görüştük \n";  
    echo Iyelik::Ek('Murat','ile') . " görüştük \n";  
    echo Iyelik::Ek('Harun','ile') . " görüştük \n"; 

    Sonuç

    Reşat'ın sesi kısıldı 
    Mansur'un sesi kısıldı 
    Ahmet'in sesi kısıldı 
    Ömür'ün sesi kısıldı 
    
    Hanzade'ye borç para verdim 
    Mustafa'ya borç para verdim 
    Kemâl'e borç para verdim 
    Nazlı'ya borç para verdim 
    Güllü'ye borç para verdim 
    Mattö'ye borç para verdim 
    
    Erkan'ı aradınız mı 
    Furkan'ı aradınız mı 
    Mücahit'i aradınız mı 
    Umut'u aradınız mı 
    Gamze'yi aradınız mı 
    Hatice'yi aradınız mı 
    Ayşe'yi aradınız mı 
    
    Ahmet'te bizimle gelecek 
    Ali'de bizimle gelecek 
    Kemal'da bizimle gelecek 
    Oğuz'da bizimle gelecek 
    Azat'ta bizimle gelecek 
    Patron'da bizimle gelecek 
    Usta'da bizimle gelecek 
    
    Ahmet'ten şikayetçi oldular 
    Nazlı'dan şikayetçi oldular 
    Kemâl'den şikayetçi oldular 
    Nil'den şikayetçi oldular 
    Hadi'den şikayetçi oldular 
    Sefa'dan şikayetçi oldular 
    Ömer'den şikayetçi oldular 
    
    Ahmetle görüştük 
    Cemâlle görüştük 
    Nazlıyla görüştük 
    Mansurla görüştük 
    Muratla görüştük 
    Harunla görüştük
    

    Visit original content creator repository
    https://github.com/atiksoftware/php-gramer

  • your_own_git

    Migrate To Your Own Git Server: 30 Mins – 1 Euro:

    Is it worth it to sell your data for just a f*!*ing 1 Euro/Month?

    NO.

    As you know github is sold to MS. If you don’t want to use it anymore for various reasons, this repo will help you to create your own git server and migrate your repositories from github under 30 mins with a 1 Euro VPS provider. At the end of this, you will have an Let’s Encrypt SSL Certified git service which runs with Nginx Web Server, Go Language and based on Gitea.

    Prerequirements:

    • Own a VPS, We don’t recommend you arubacloud but it is the cheapest VPS(1 Euro/Month), but some process like creating and initializing your VPS sometimes takes over 30 mins, no problem during the running state.
    • Choose your favorite GNU/Linux distrubition, this documentation explain concept over Ubuntu 16.04 because of it’s simplicity.(Does not mean that Ubuntu is our favourite distribution).
    • A database server : We prefer Postgresql in this step.
    • Optional: Own a domain.

    Setup:

    • Connect your VPS over SSH and than sudo apt update && sudo apt upgrade.
    • Create a user, let’s call it ‘git’, sudo adduser git than sudo adduser git sudo.
    • Change to that user, sudo - git
    • After update and upgrade complete, install postgresql with following command sudo apt-get install postgresql postgresql-contrib
    • After postgresql installation done, install nginx server with following command sudo apt-get install nginx
    • We are almost done, now lets download the binary for Gitea run the following command wget -O gitea https://dl.gitea.io/gitea/1.3.2/gitea-1.3.2-linux-amd64 and be sure that you are in /home/git directory.
    • After download opperation, give permission to it: chmod +x gitea
    • After this step, lets make necessity configuration in Nginx, sudo nano /etc/nginx/sites-available/gitserver and paste the following lines with editing <ip_or_domain>(domain adress or public ip adress)

    server {
        listen 80;
        server_name <ip_or_domain>;
        location / {
            proxy_pass <ip_or_domain>:3000;
        }
    }
    
    • Make a link for sites-enabled directory, to activate vhost file, run following command :sudo ln -s /etc/nginx/sites-available/gitserver /etc/nginx/sites-enabled/
    • Now we are almost done with nginx configuration, check if you have any syntax error with following command sudo nginx -t.
    • Let’s create a service for Gitea, run following command: sudo nano /etc/systemd/system/gitea.service paste the following configuration:

    [Unit]
    Description=Gitea
    After=syslog.target
    After=network.target
    
    [Service]
    Type=simple
    User=git
    WorkingDirectory=/home/git/
    ExecStart=/home/git/./gitea web
    Restart=always
    
    [Install]
    WantedBy=multi-user.target
    
    • After saving the configuration you can restart nginx first, sudo systemctl restart nginx than enable your gitea service by following command: sudo systemctl enable gitea.service and finally sudo systemctl start gitea.service.
    • Final configuration for postgresql: create postgres user and db for the system. For creating a new postgresql user, run sudo -u postgres psql -c "CREATE USER <yourpostgresusername> WITH PASSWORD '<yourpass>';"
    • Than run the following command: sudo -i -u postgres
    • Create a db createdb -O <yourpostgresusername> <yourdbname>
    • exit
    That’s all with PG, don’t forget your: <yourpostgresusername> <yourdbname> <yourpass>

    Create Secure Connection With Let’s Encrypt:

    • Run the following command : sudo add-apt-repository ppa:certbot/certbot
    • Update again : sudo apt-get update
    • Install cert-bot: sudo apt-get install python-certbot-nginx
    • Create a certifiate: sudo certbot --nginx -d <your_domain_or_ip>
    • Accept answers, than at the end it will ask for:

    Please choose whether or not to redirect HTTP traffic to HTTPS, removing HTTP access.
    -------------------------------------------------------------------------------
    1: No redirect - Make no further changes to the webserver configuration.
    2: Redirect - Make all requests redirect to secure HTTPS access. Choose this for
    new sites, or if you're confident your site works on HTTPS. You can undo this
    change by editing your web server's configuration.
    -------------------------------------------------------------------------------
    Select the appropriate number [1-2] then [enter] (press 'c' to cancel):
    
    
    • In this case, we generally select 2. But it is your choice.

    Gitea web config part

    • Now go to your domain or your_ip:3000 over a web browser. It will redirect you to your git server installation page, select Postgresql as Database Type in Database Settings, enter necessity informations <yourpostgresusername> <yourdbname> <yourpass>.
    • Don’t forget to change Application URL in General Application Settings, set it to your domain or your_ip:3000.
    • And create admin user if you wish, you can also change server and services settings according to your necessity. After all configuration finish, press Install Gitea Button, you will probably see a 404 page. Go to your root domain, that’s it. You have a SSL certified, fast and cheap git server which runs like a charm.

    You can also make changes on configuration:

    • Open app.ini file:
    sudo nano /home/git/custom/conf/app.ini 
    
    • After you are done with changes:
     sudo systemctl restart gitea.service 
    

    Bonus 0: Your git service has an API! Checkout <yourip:3000_or_yourdomain>/api/swagger

    Bonus 1: You can use migrater.py to migrate your project into your new git server!

    Donate and Help Us

    If you like this work, please star and share it with others 🙂

    As Librenotes team we are developing free as in freedom note taking application, checkout Librenotes, any help is appreciated!

    BTC > 1HvMriWTMaf1pY3Sak2i1vy5QmEcGMcEgK
    
    ETH > 0xBCa591260D9b0d25eD87dc9B4330980DA44DbB18
    

    Visit original content creator repository
    https://github.com/librenotes/your_own_git

  • native-datepicker

    native-datepicker

    Styleable datepicker utilizing the native <input type="date">

    native-datepicker on npm codeclown/native-datepicker on GitHub

    Features:

    • Light-weight, no dependencies
    • Includes optional React-component
    • Supports datetime strings (only replaces date-portion upon change)
    • Simple styling, with BEM classes

    Example/demo:

    Browser support

    Supported:

    • Chrome
    • Firefox
    • Edge
    • Safari iOS

    Not supported (datepicker is hidden):

    • Safari MacOS
    • IE

    Usage

    Vanilla JS

    const NativeDatepicker = require('native-datepicker');
    const picker = new NativeDatepicker({
      onChange: (newValue) => {
        console.log(newValue);
      },
    });
    someElement.appendChild(picker.element);

    See API.

    See also example.html (source).

    React

    const NativeDatepicker = require('native-datepicker/src/react');
    const SomeComponent = () => {
      const [date, setDate] = useState('2020-11-01');
      return (
        <NativeDatepicker value={date} onChange={(newValue) => setDate(newValue)} />
      );
    };

    See React API.

    API

    class NativeDatepicker

    constructor(options)

    options is an object with the following properties:

    options.onChange

    type: function default: (value) => {}

    Callback function which is called when the user selects a new date.

    Receives the new value as string (e.g. "2020-11-01" or "2020-11-01 13:15:00"; just the date-portion of the original value is replaced).

    options.initialValue

    type: string default: ""

    Set the initial date input value.

    These are equivalent:

    const datepicker = new NativeDatepicker({
      initialValue: '2020-11-09 12:43:00',
    });
    // or
    const datepicker = new NativeDatepicker();
    datepicker.setValue('2020-11-09 12:43:00');
    options.existingElement

    type: DOMElement default: null

    If set, existing element will be used instead of creating a new span element.

    options.win

    type: Window default: window

    For the rare use case (e.g. using inside a child iframe) when setting window is necessary.

    setValue(dateString)

    Set the value of the datepicker.

    dateString should be a string containing a date in YYYY-MM-DD format. For example, all of these are valid:

    • "2020-11-01"
    • "2020-11-01 13:15:00"
    • "2020-11-01T13:15:00"

    Upon changes, NativeDatepicker will replace the date-portion of the string and return the result.

    element

    Contains a reference to the datepicker element.

    React API

    NativeDatepicker component

    Props:

    <NativeDatepicker
      value={date}
      onChange={(newValue) => {}}
      className="customClassName"
    >
      {optionalChildren}
    </NativeDatepicker>

    props.value

    type: string default: ""

    Initial value. Examples:

    • value="2020-11-01"
    • value="2020-11-01 13:15:00"
    • value="2020-11-01T13:15:00"

    props.onChange

    type: function default: (value) => {}

    Callback function which is called when the user selects a new date.

    Receives the new value as string (e.g. "2020-11-01" or "2020-11-01 13:15:00"; just the date-portion of the original value is replaced).

    props.className

    type: string default: ""

    Custom className for the created element.

    Example with className="CustomClass":

    <span class="NativeDatepicker CustomClass">
      <input class="NativeDatepicker__input" type="date" />
    </span>

    optionalChildren

    If children are given, they are inserted into the resulting DOM. This can be used for any styling needs.

    Example:

    <span class="NativeDatepicker">
      <input class="NativeDatepicker__input" type="date" />
    </span>

    The recommended way to style the datepicker is to apply styles (e.g. width/height and a background-image) to the topmost element. Example:

    .NativeDatepicker {
      width: 16px;
      height: 16px;
      background: transparent url(...) no-repeat center center;
    }

    Note: under normal circumstances you should not add any styles to .NativeDatepicker__input!

    Development

    Source files reside in src/. Note that src/index.js is not precompiled in any way; it should remain valid ES5 (no worries, though; this is checked by eslint).

    Release process (for maintainers)

    Keep CHANGELOG.md up-to-date. Run:

    yarn test
    # will ask for updated version number
    yarn publish
    # remember to push commits and tags to remote
    git push --follow-tags

    License

    ISC

    Visit original content creator repository https://github.com/codeclown/native-datepicker
  • helm-sudo

    helm-sudo plugin

    A helm plugin that uses impersonating to execute helm-commands on clusters within the admin context.

    Demo gif

    For questions or suggestions you are welcome to join us at our myCloudogu community forum.

    Discuss it on myCloudogu

    Installation

    Install the plugin using the built-in plugin manager (see releases for latest version):

    # Installs latest commit
    helm plugin install https://github.com/cloudogu/helm-sudo
    # Installs deterministic version
    helm plugin install  https://github.com/cloudogu/helm-sudo --version=0.0.2
    

    Usage

    Its usage is pretty simple, just use “sudo” on your helm commands like so:

    helm sudo list 
    

    what the plugin does is, it adds the –kube-as-user and –kube-as-group flags with your user ($USER) and system:masters group to the given helm command.

    So the plugin executes the following:

    helm --kube-as-user $USER --kube-as-group system:masters list
    

    Flags will just be passed along to the command you are calling.

    CAUTION: Due to the usage of this plugin, you will execute the helm command as admin on your cluster!

    Syntax completion works with helm version 3.8.0 and up.


    Configuration

    ENV_VAR Default Description
    HELM_SUDO_PROMPT false If set to true you will be prompted to acknowledge the usage of the helm-command on the current context as admin

    Similar projects

    Visit original content creator repository https://github.com/cloudogu/helm-sudo