Blog

  • dockbox

    dockbox – Dockerize your PHP development

    Dockerized PHP development stack: Nginx, Apache2, PHP-FPM, HHVM, MySQL, MariaDB, PostgreSQL, MongoDB, Neo4j, RethinkDB, Minio, Redis, Memcached, Beanstalkd, RabbitMQ and Elasticsearch.

    forthebadge

    Dockbox allows you to containerize your PHP application allowing you to build a local development environment using Docker.

    Dockbox gives you everything you need for developing PHP applications locally. It provides an OS-agnostic and virtualized alternative to MNPP stack. Dockbox tries to keep download file size to a minimum by utilizing official docker images.

    Quick Setup

    # Clone dockbox inside your PHP project (Laravel):
    git clone https://github.com/MobileSnapp/dockbox.git
    
    # Run your containers:
    docker-compose up -d nginx mysql redis rabbitmq elasticsearch
    
    # (For Laravel) Open your project’s .env file and set the following:
    DB_HOST=dockbox-mysql
    REDIS_HOST=dockbox-redis
    QUEUE_HOST=dockbox-rabbitmq
    
    # Open your browser and visit localhost: http://localhost.
    

    Features

    1. Official and rated Docker images
    2. Every software runs as a separate container
    3. Easy to apply configurations inside containers.
    4. Faster image and container builds.
    5. Pre-configured NGINX for Laravel. (Setup for Symfony, Phalcon and Silex coming soon…)

    Supported Containers

    Database Engines

    • MySQL
    • MariaDB
    • PostgreSQL
    • MongoDB
    • Neo4j
    • RethinkDB
    • Minio
    • OrientDB

    Cache Engines

    • Redis
    • Memcached

    Web Servers/Compilers

    • Apache2
    • Nginx
    • PHP (included in Apache2 container)
    • PHP-FPM (included in Nginx container)
    • HHVM

    Message Queues

    • Beanstalkd (includes console)
    • RabbitMQ (includes console)

    Management Consoles

    • PhpMyAdmin (for MySQL/MariaDB)
    • PgAdmin (for PostgreSQL)

    Additional

    • Elasticsearch
    • Node
    • Mailhog
    • Selenium Grid
    • Docker Registry

    Requirements

    Web Configuration

    Dockbox currently follows generic ‘Zend/Laravel/Lumen’ folder structure assuming that the hosting files are loacated under ‘public’ directory. Support for other framework (Symfony, Phalcon, Silex) coming soon.

    Web root folder: '/var/www/site/public'
    

    For Apache, default web configuration setup is available as dockbox default. Uncomment custom configuration in apache/Dockerfile for custom/generic (Zend/Laravel/Lumen) configuration.

    Database Configuration

    Granting permisssion to database users

    MySQL/MariaDB
    'GRANT ALL PRIVILEGES ON * . * TO 'sitedb_user'@'localhost';'
    

    More details: DigitalOcean

    PosgreSQL
    'ALTER USER sitedb_user WITH SUPERUSER;'
    

    More details: DigitalOcean

    Installation and Usage

    1. Clone dockbox inside your PHP project (Zend/Laravel/Lumen):
    git clone https://github.com/MobileSnapp/dockbox.git
    
    1. Your folder structure should look like this:
    + php-project
        + dockbox
    
    1. Build the enviroment and run it using docker-compose: Run NGINX (web server) and MySQL (database engine) to host a PHP web project:
    docker-compose up -d nginx mysql
    

    You can select your own combination of containers form the list below:

    nginx (PHP_FPM included), apache, hhvm, mariadb, mysql, postgres, mongo, minio, rethinkdb, orientdb, redis, memcached, rabbitmq, beanstalkd, node, elasticsearch, neo4j, mailhog, selenium grid and more…!

    Note: The data container will run automatically in most of the cases, so no need to specify them in the up command. It will setup the project folder and stop.

    Dockbox is setup to run management console with the following containers:

    mariadb, mysql, progres, rabbitmq, beanstalkd

    Comment ‘links’ section in ‘docker-compose’ file to detach the management console.

    1. Enter apache/nginx container, to execute commands like (Composer, PHPUnit …): For apache:
    docker-compose exec dockbox-apache bash
    

    For nginx:

    docker-compose exec dockbox-nginx bash
    

    Alternatively, for Windows PowerShell users: execute the following command to enter any running container:

    docker exec -it {workspace-container-id} bash
    
    1. Enter the node container, to execute commands like (Artisan, Gulp, …):
    docker-compose exec dockbox-node bash
    
    1. Update your project configurations: DB_HOST=dockbox-mysql REDIS_HOST=dockbox-redis QUEUE_HOST=dockbox-rabbitmq

    2. Open your browser and visit localhost: http://localhost.

    Run Commands

    Container Command
    apache docker-compose up -d apache
    nginx docker-compose up -d nginx
    hhvm docker-compose up -d hhvm
    mariadb docker-compose up -d mariadb
    mysql docker-compose up -d mysql
    postgres docker-compose up -d postgres
    mongo docker-compose up -d mongo
    minio docker-compose up -d minio
    rethinkdb docker-compose up -d rethinkdb
    orientdb docker-compose up -d orientdb
    redis docker-compose up -d redis
    memcached docker-compose up -d memcached
    rabbitmq docker-compose up -d rabbitmq
    beanstalkd docker-compose up -d beanstalkd
    node docker-compose up -d node
    elasticsearch docker-compose up -d elasticsearch
    neo4j docker-compose up -d neo4j
    mailhog docker-compose up -d mailhog
    docker registry docker-compose up -d docker-registry
    selenium chrome node docker-compose up -d selenium-chrome-node
    selenium firefox node docker-compose up -d selenium-firefox-node

    Note: Selenium chrome/firefox node will bring up Selenium Hub container and attach to Selenium Hub.

    References

    1. Docker for php developers
    2. PHP Web development with docker
    3. webdevops docker
    4. laradock
    5. php-dockerized

    License

    • Copyright 2017 MobileSnapp Inc.
    • Distributed under the MIT License (hereby included)
    Visit original content creator repository https://github.com/MobileSnapp/dockbox
  • DamageDeposit

    Why?

    The only way to defeat spam is to raise the cost of spamming. This can be done two ways: increasing the work needed to submit content (captcha, email verification, IP blacklisting, ID verification) or directly using Damage Deposit. As methods like CAPTCHA increasingly fail due to advancements in ML-based solving and solving farms, user privacy is constantly eroded as identifying humans from bots becomes increasingly difficult. DamageDeposit provides an alternative by directly increasing the cost of spamming while reducing the impact on legitimate users, using an Ethereum smart contract to collect a deposit that can be confiscated by the service operator in cases of abuse. This also allows spam removal to become a profitable undertaking rather than a financial burden.

    Usage

    Configuration

    Edit scripts/deploy.js with the appropriate contract values for deposit amount and withdrawal hold period. Withdrawal period should be set long enough that abuse can be detected before the user withdraws the deposit.

    const withdrawPeriod = 5;
    const depositRequirement = "0.001";
    

    Compiling

    npm install
    npx hardhat compile
    

    Deploying The Contract:

    To deploy the smart contract to the Ethereum network you need a network provider, either an RPC provider like Infura or Alchemy (both have free options) or your own Ethereum node. You will also need enough Ethereum to cover gas fees for deploying the contract.

    Point the URL to your mainnet provder by editing hardhat.config.js and adding your RPC URL and wallet private key:

        mainnet:{
          url:"https://mainnet.infura.io/v3/1234567890abcdef",
          accounts: ["0xbbbbbbbbccccc2222222222111111111aaaaaaaaaa0000000000"]
        }
    

    The owner of the contract (private key) will have access to the admin functions, most importantly deposit confiscation. The Ethereum account that deploys the contract will be the first contract owner and can be changed later. Keep this account safe, otherwise admin functions cannot be performed.

    Other methods of configuring the connected wallet can be found here.

    Deploy the contract
    npx hardhat run scripts/deploy.js --network mainnet

    Deploying to Test Network

    The contract can also be deployed to the Sepolia test network to test live functionality without using real Ethereum. Complete the Sepolia network config in hardhat.config.js with a Sepolia provider (Infura, Alchemy) and wallet containing Sepolia ETH:

        sepolia:{
          url:"https://sepolia.infura.io/v3/1234567890abcdef",
          accounts: ["0xbbbbbbbbccccc2222222222111111111aaaaaaaaaa0000000000"]
        }
    

    Then deploy the contract:

    npx hardhat run scripts/deploy.js --network sepolia

    Interacting with DamageDeposit

    A demo interface is included in the interface/ directory. After deploying your contract, you can load the interface to interact with it:

    cd interface  
    npx http-server
    

    The page will be available at http://localhost:8080/. You will need a browser-connected Ethereum wallet (Frame, Metamask etc) to sign the transactions.

    Basic Workflow

    1. User deposits Ethereum to the contract.
    2. User interacts with protected infrastrucutre (forum, service etc) signing their submissions with their Ethereum wallet.
    3. Service checks contract for valid user deposit before accepting content.
    4. User signals intent to withdraw when interaction with target service ends.
    5. Service admin (forum admin, chat moderator, website operator etc) checks content for rule violations and confiscates user deposit if needed.
    6. After timelock period ends, user can withdraw their deposit (if not confiscated).

    Visit original content creator repository
    https://github.com/cheerymodem/DamageDeposit

  • Deeplab-pytorch

    [PYTORCH] Deeplab

    Introduction

    Here is my pytorch implementation of the model described in the paper DeepLab: Semantic Image Segmentation with Deep Convolutional Nets, Atrous Convolution, and Fully Connected CRFs paper.

    How to use my code

    With my code, you can:

    • Train your model from scratch
    • Train your model with my trained model
    • Evaluate test images with either my trained model or yours

    Requirements:

    • python 3.6
    • pytorch 0.4
    • opencv (cv2)
    • tensorboard
    • tensorboardX (This library could be skipped if you do not use SummaryWriter)
    • torchvision
    • PIL
    • numpy

    Datasets:

    I used 2 different datases: VOC2012 and VOCaugmented (VOC2007 + 2012) Statistics of datasets I used for experiments is shown below

    Dataset #Classes #Train images #Validation images
    VOC2012 20 5011 1449
    VOCaugmented 20 1464 1449

    Create a data folder under the repository,

    cd {repo_root}
    mkdir data
    
    • VOC: Download the voc images and annotations from VOC2007 or VOC2012. Make sure to put the files as the following structure:
      VOCDevkit
      ├── VOC2007
      │   ├── Annotations  
      │   ├── ImageSets
      │   ├── JPEGImages
      │   └── ...
      ├── VOC2012
      │   ├── Annotations  
      │   ├── ImageSets
      │   ├── JPEGImages
      │   └── ...
      └── VOCaugmented
          ├── gt  
          ├── img
          ├── list
          └── ...
      

    Note: You need to put ALL images from 2 dataset VOC2007 and VOC2012 into folder VOCdevkit/VOCaugmented/img/

    • In my implementation, in every epoch, the model is saved only when its loss is the lowest one so far. You could also use early stopping, which could be triggered by specifying a positive integer value for parameter es_patience, to stop training process when validation loss has not been improved for es_patience epoches.

    Trained models

    You could find all trained models I have trained in Deeplab trained models

    Training

    I provide my pre-trained model name vietnh_trained_deeplab_voc. You could put it in the folder trained_models/, and load it before training your new model, for faster convergence.

    If you want to train a new model, you could run:

    • python3 train_voc.py –dataset dataset: For example, python train_voc.py –dataset augmentedvoc

    Test

    By default, my test script will load trained model from folder trained_models/. You of course could change it to other folder which contains your trained model(s).

    I provide 2 different test scripts:

    If you want to test a trained model with a standard VOC dataset, you could run:

    • python3 test_voc.py –year year: For example, python3 test_voc.py –year 2012

    If you want to test a model with some images, you could put them into the folder test_images/, then run:

    • python3 test_voc_single_images.py –input –output path/to/output/folder: For example, python3 test_voc_single_images.py –output predictions. For easy comparison, not only output images are created, but input images are also copied to output folder

    Experiments:

    I trained models in 2 machines, one with NVIDIA TITAN X 12gb GPU and the other with NVIDIA quadro 6000 24gb GPU.

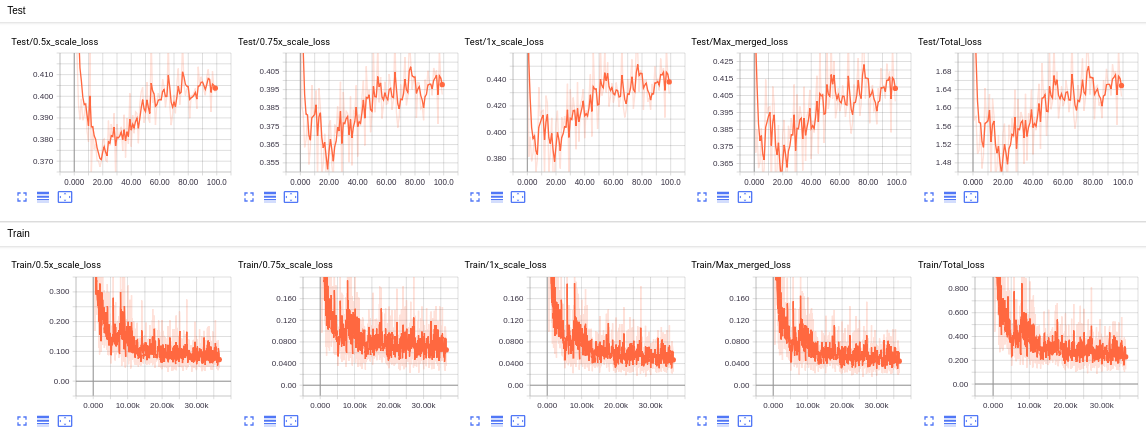
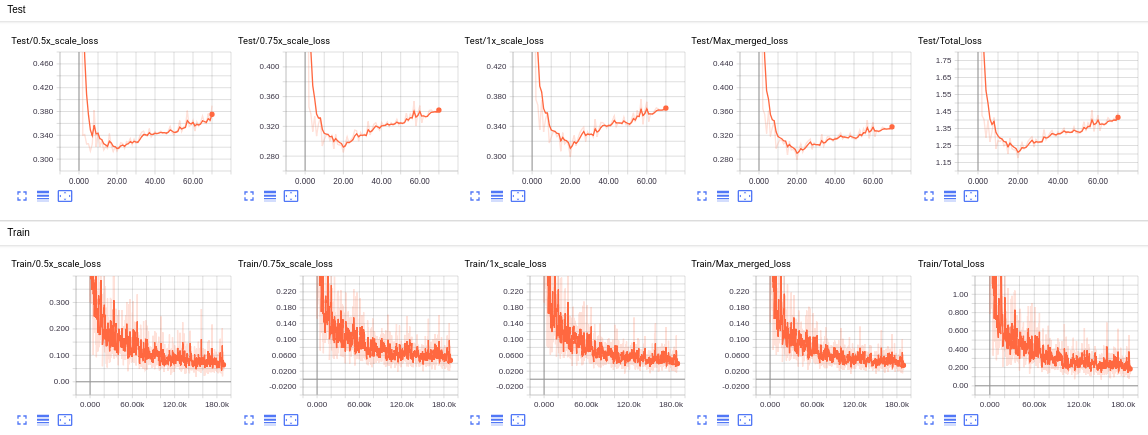
    The training/test loss curves for each experiment are shown below:

    • VOC2012 voc2012 loss
    • VOCaugmented vocaugmented loss

    Results

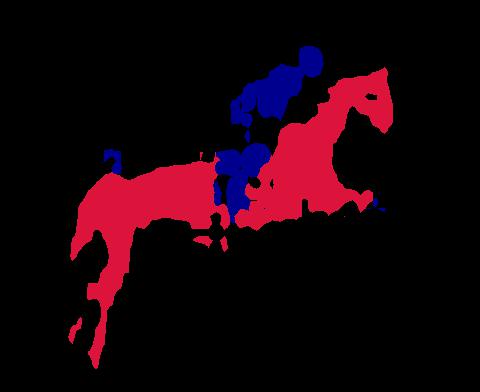
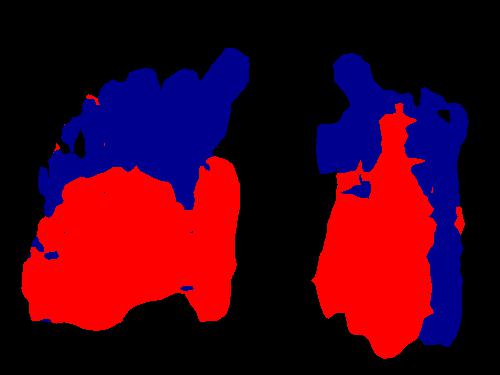
    Some output predictions for experiments for each dataset are shown below:

    • VOC2012

    • VOCaugmented

    Visit original content creator repository https://github.com/vietnh1009/Deeplab-pytorch
  • supvisors

    Supvisors

    PyPI version Python Versions License Build Status Coverage Status Documentation Status Downloads

    Supvisors is a Control System for Distributed Applications, based on multiple instances of Supervisor running over multiple nodes.

    Supvisors works as a Supervisor plugin and its main features are:

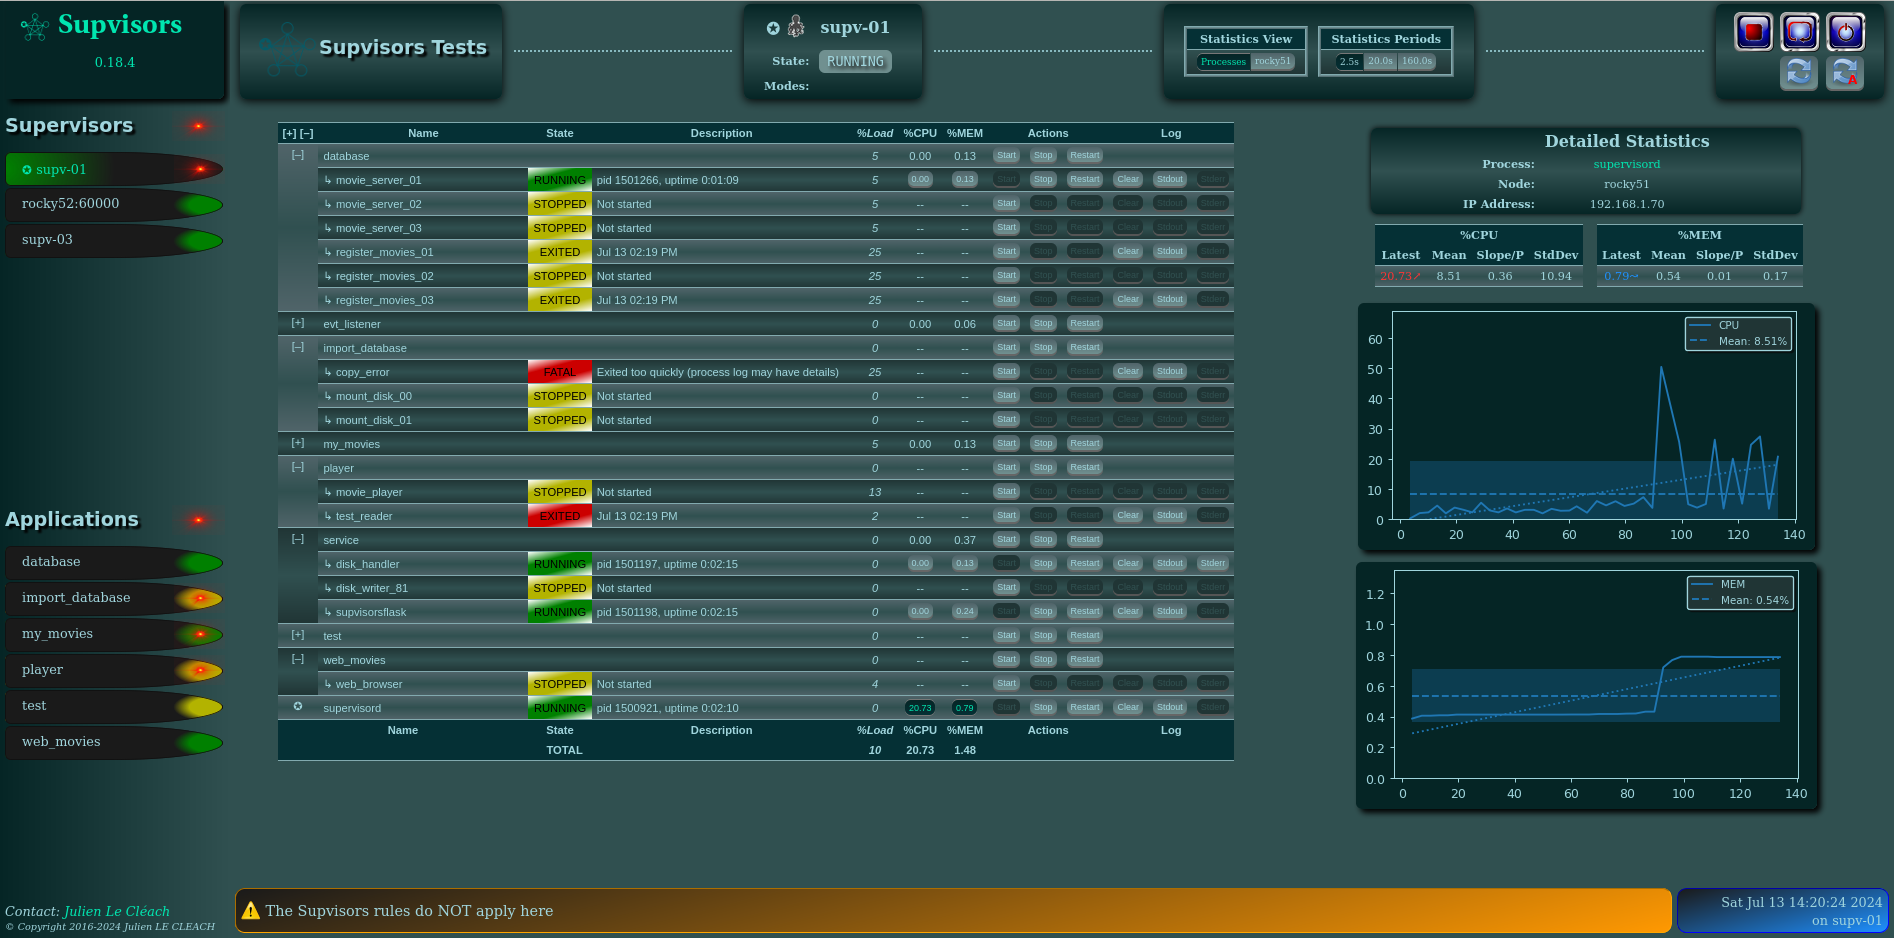
    • a new web-based dashboard that replaces the default dashboard of Supervisor and allows to control all the Supervisor instances declared,
    • an extended XML-RPC API to control applications and processes over the multiple Supervisor instances,
    • a notification interface to get the events from multiple Supervisor instances on a websocket or on a PyZmq socket.

    A set of application and program rules can be added to manage:

    • the starting sequence of the applications,
    • the stopping sequence of the applications,
    • the starting strategy of the processes,
    • the strategy to apply when a process crashes or when a node shuts down,
    • the strategy to apply when conflicts are detected.

    The Supervisor program supervisorctl has been extended to include the additional XML-RPC API.

    Also provided in the scope of this project:

    • a JAVA client with a full implementation of the Supervisor and Supvisors XML-RPC API ;
    • a Flask-RESTX application that exposes the Supervisor and Supvisors XML-RPC API through a REST API.

    Image of Supvisors' Dashboard

    Supervisor Enhancements

    Supvisors proposes a contribution to the following Supervisor issues:

    Supported Platforms

    Supvisors has been tested and is known to run on Linux (Rocky 8, RedHat 8, Ubuntu 20 to 24). It will likely work fine on most UNIX systems.

    Supvisors will not run at all under any version of Windows.

    From the version 0.19, Supvisors works with Python 3.9 to Python 3.12.

    Due to the lack of support of Python 3.6 and Python 3.7 in the Ubuntu releases provided in the Standard GitHub-hosted runners, Supvisors is now based on the minimal Python release provided in RedHat 9, i.e., Python 3.9.

    Supvisors 0.18.7 is therefore the last version supporting Python 3.6 to Python 3.8.

    Dependencies

    Supvisors has dependencies on:

    Package Optional Minimal release
    Supervisor 4.2.4
    psutil X 5.9.0
    matplotlib X 3.5.1
    lxml X 4.8.0
    Flask-RESTX X 1.2.0
    PyZMQ X 25.1.1
    websockets X 11.0.3

    Please note that some of these dependencies may have their own dependencies.

    Versions are given for information. Although Supvisors has been developed and tested with these releases, the minimal release of each dependency is unknown. Other releases are likely working as well.

    Installation

    Supvisors can be installed with pip install:

       # minimal install (including only Supervisor and its dependencies)
       [bash] > pip install supvisors
    
       # extra install for all optional dependencies
       [bash] > pip install supvisors[all]

    Documentation

    You can view the current Supvisors documentation on Read the Docs.

    You will find detailed installation and configuration documentation.

    Reporting Bugs and Viewing the Source Repository

    Please report bugs in the GitHub issue tracker.

    You can view the source repository for Supvisors.

    Contributing

    Not opened yet.

    Visit original content creator repository https://github.com/julien6387/supvisors
  • face-detect-backend

    Face Detect Backend

    Backend of the Face Detect Project, built with Node.js, Express.js, Knex.js and hosted using Heroku.
    Password are safely encrytped using brcrypt.

    Installation

    1. Clone the repo using
    git clone https://github.com/AmplifiedHuman/face-detect-backend.git
    
    1. Install dependencies
    npm install
    
    1. Setup environment variables, create a .env file with the following variables

    API_KEY=
    HOST=
    USER=
    PASSWORD=
    DB=
    
    1. Start the development server
    npm start
    
    1. API Link
    Visit http://localhost:3001
    

    Endpoints

    Login

    Authenticate user given email and password

    • URL

      /login

    • Method:

      POST

    • Data Params

      { "email": "John@gmail.com", "password": "cookies" }

    • Success Response:

      • Code: 200
        Content: { "id": 16, "name": "John", "email": "John@gmail.com", "entries": "18", "joined": "2020-08-31T07:27:46.990Z" }
    • Error Response:

      • Code: 401 UNAUTHORIZED
        Content: {"Invalid Credentials"}

    Register

    Register user given email, name and password, user email must be unique.

    • URL

      /register

    • Method:

      POST

    • Data Params

      { "email": "Johny123@gmail.com", "password": "cookies", "name": "Johny" }

    • Success Response:

      • Code: 200
        Content: { "id": 30, "name": "Johny", "email": "Johny123@gmail.com", "entries": "0", "joined": "2020-09-10T07:15:07.586Z" }
    • Error Response:

      • Code: 400 BAD REQUEST
        Content: {"Unable to register user"}

    Face detection

    Given image link, return face detection data.

    • URL

      /imageURL

    • Method:

      POST

    • Data Params

      { "input": "https://cdn.vox-cdn.com/thumbor/zcdhPZbwtnwiator3LCNdKmGihw=/1400x788/filters:format(png)/cdn.vox-cdn.com/uploads/chorus_asset/file/13762264/fake_ai_faces.png" }

    • Success Response:

    • Error Response:

      • Code: 400 BAD REQUEST
        Content: {"Unable to call image API"}

    User infomation

    Given id, get basic user information

    • URL

      /profile/:id

    • Method:

      GET

    • URL Params

      Required:

      id=[string]

    • Success Response:

      • Code: 200
        Content: { "id": 30, "name": "Johny", "email": "Johny123@gmail.com", "entries": "1", "joined": "2020-09-10T07:15:07.586Z" }
    • Error Response:

      • Code: 404 NOT FOUND
        Content: {"Unable to get user"}

    Update Image Entry

    Given id, updated entries of the current user, returns the updated count.

    • URL

      /image

    • Method:

      PUT

    • Data Params

      { "id": "30" }

    • Success Response:

      • Code: 200
        Content: { 1 }
    • Error Response:

      • Code: 400 BAD REQUEST
        Content: {"Unable to update entries"}

    Visit original content creator repository
    https://github.com/jsn-t/face-detect-backend

  • Intelli-Mall

    Intelli-Mall: Autonomous Commerce System

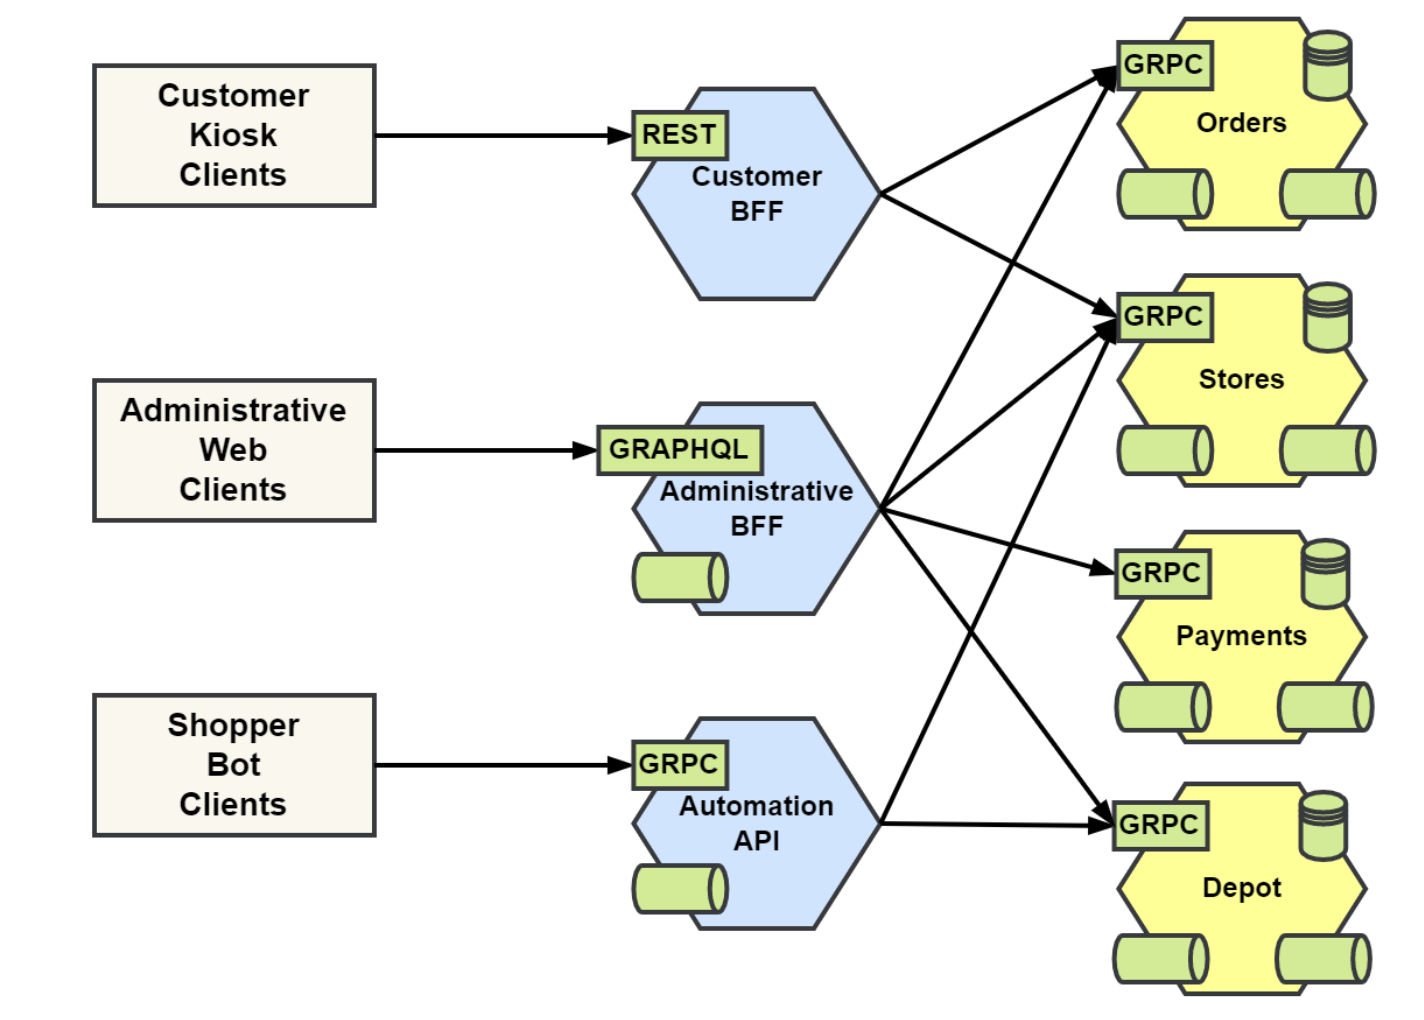
    High-level view of the components

    Intelli-Mall Architecture

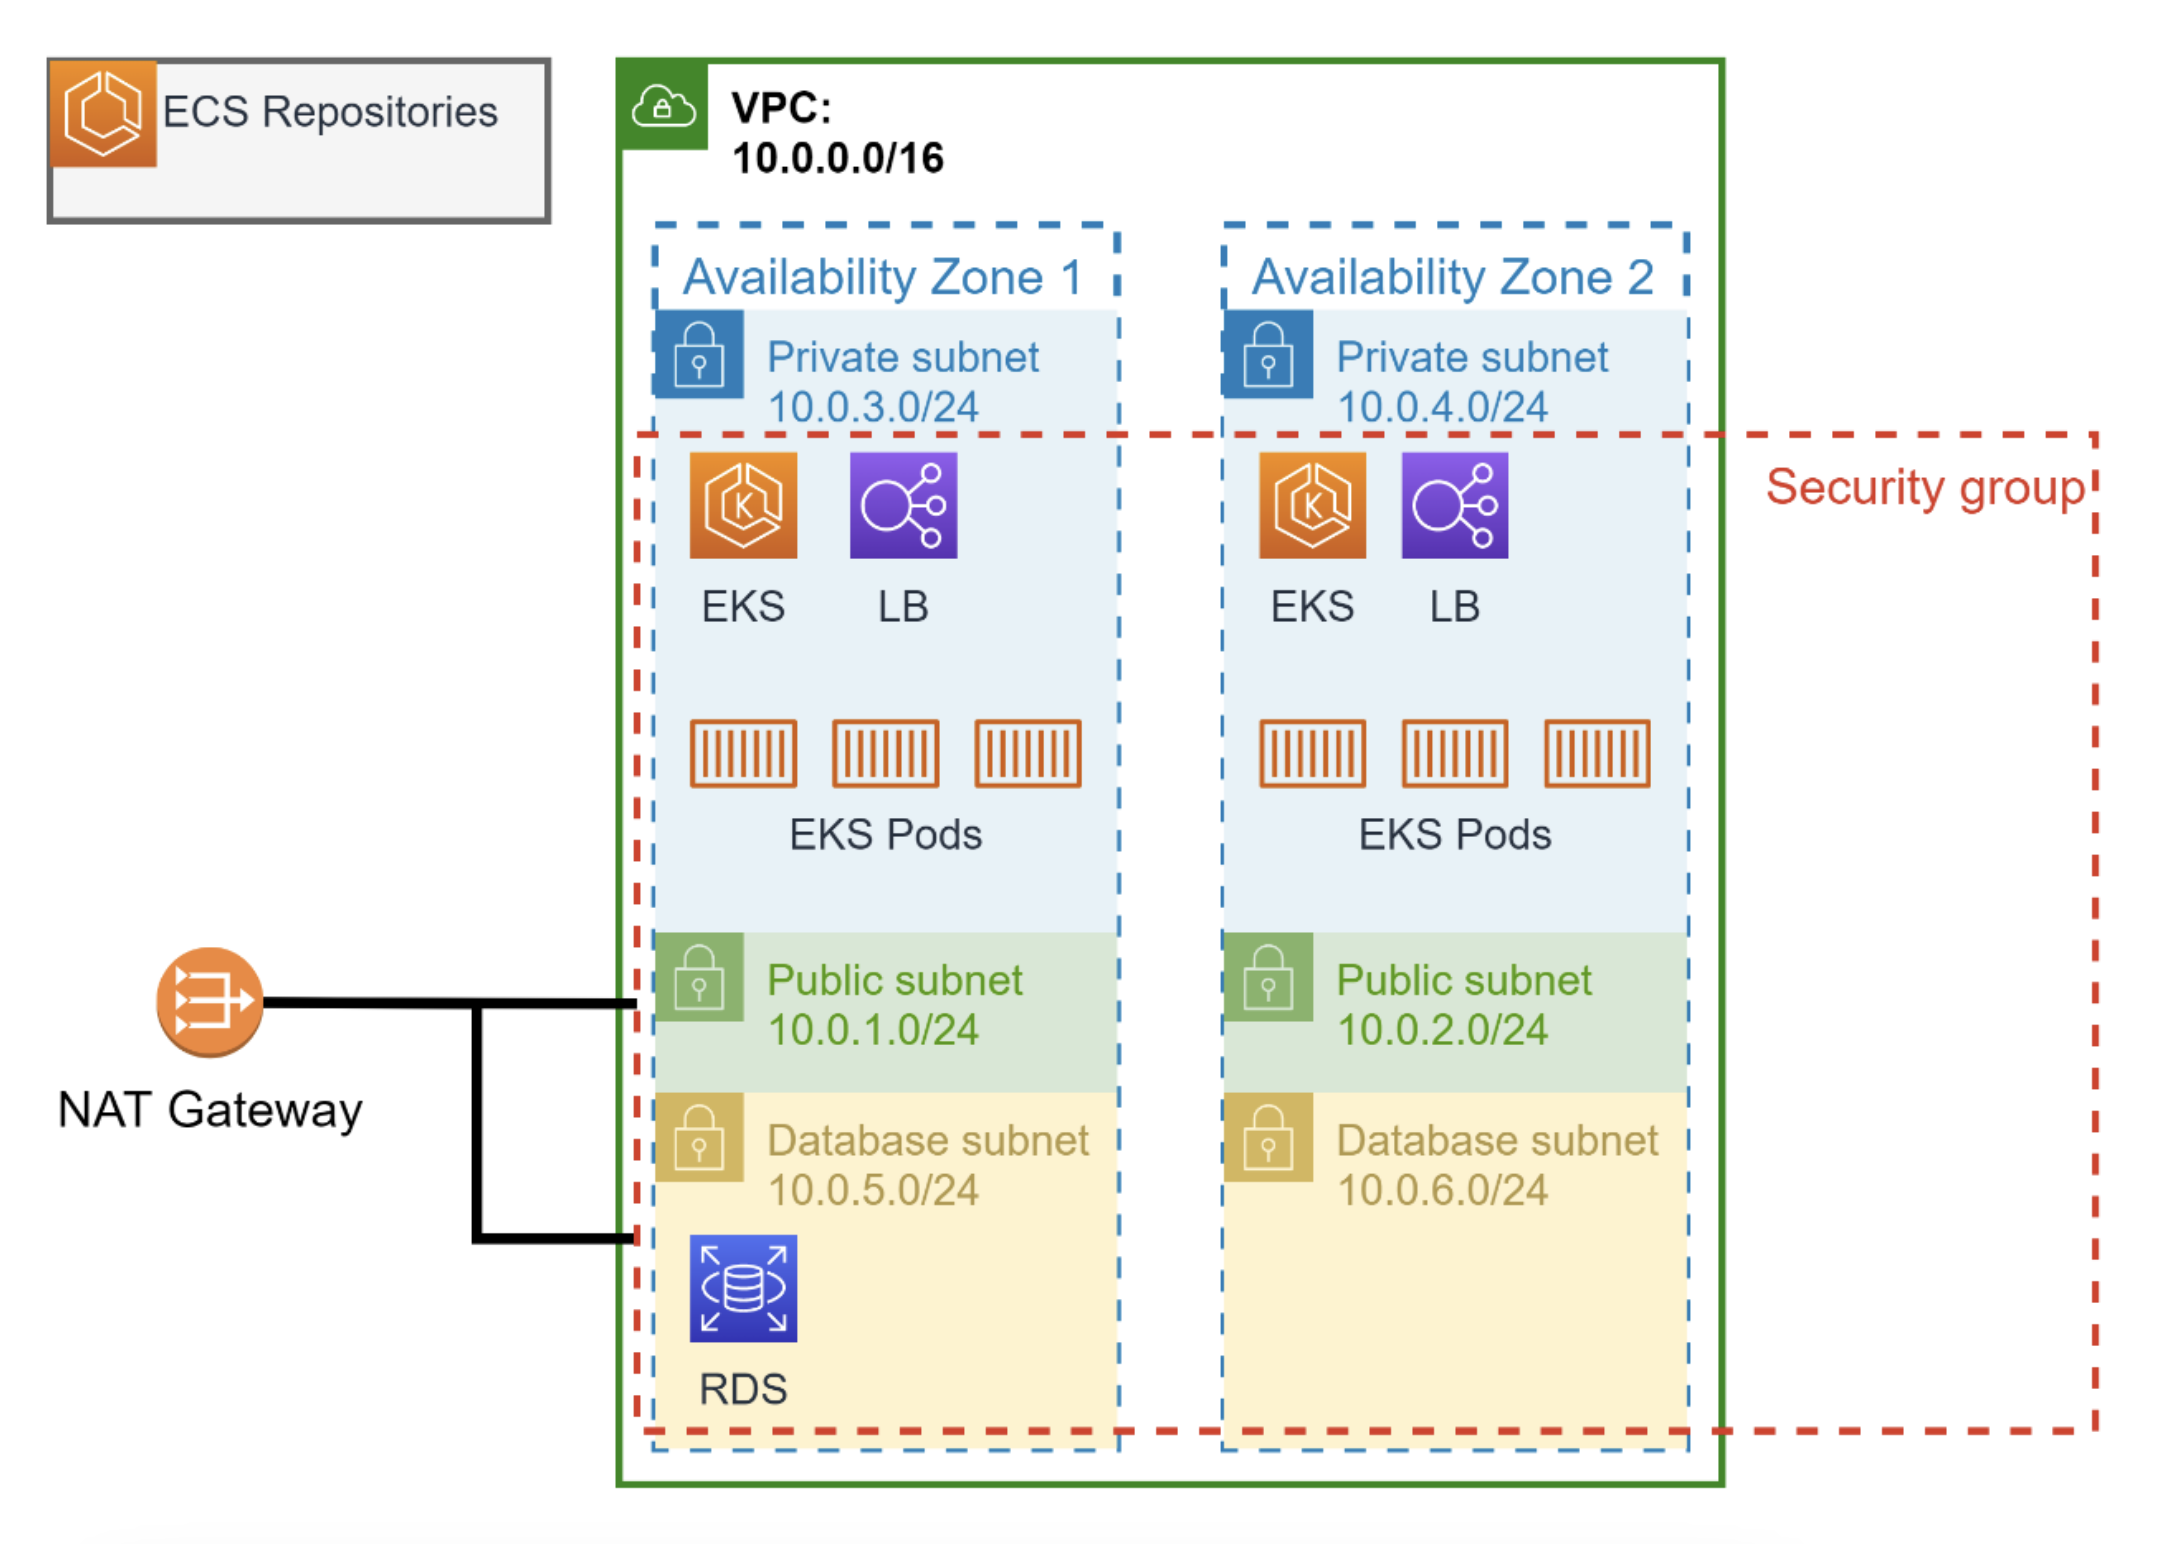
    Intelli-Mall AWS Architecture

    Intelli-Mall AWS Architecture

    How to start the application

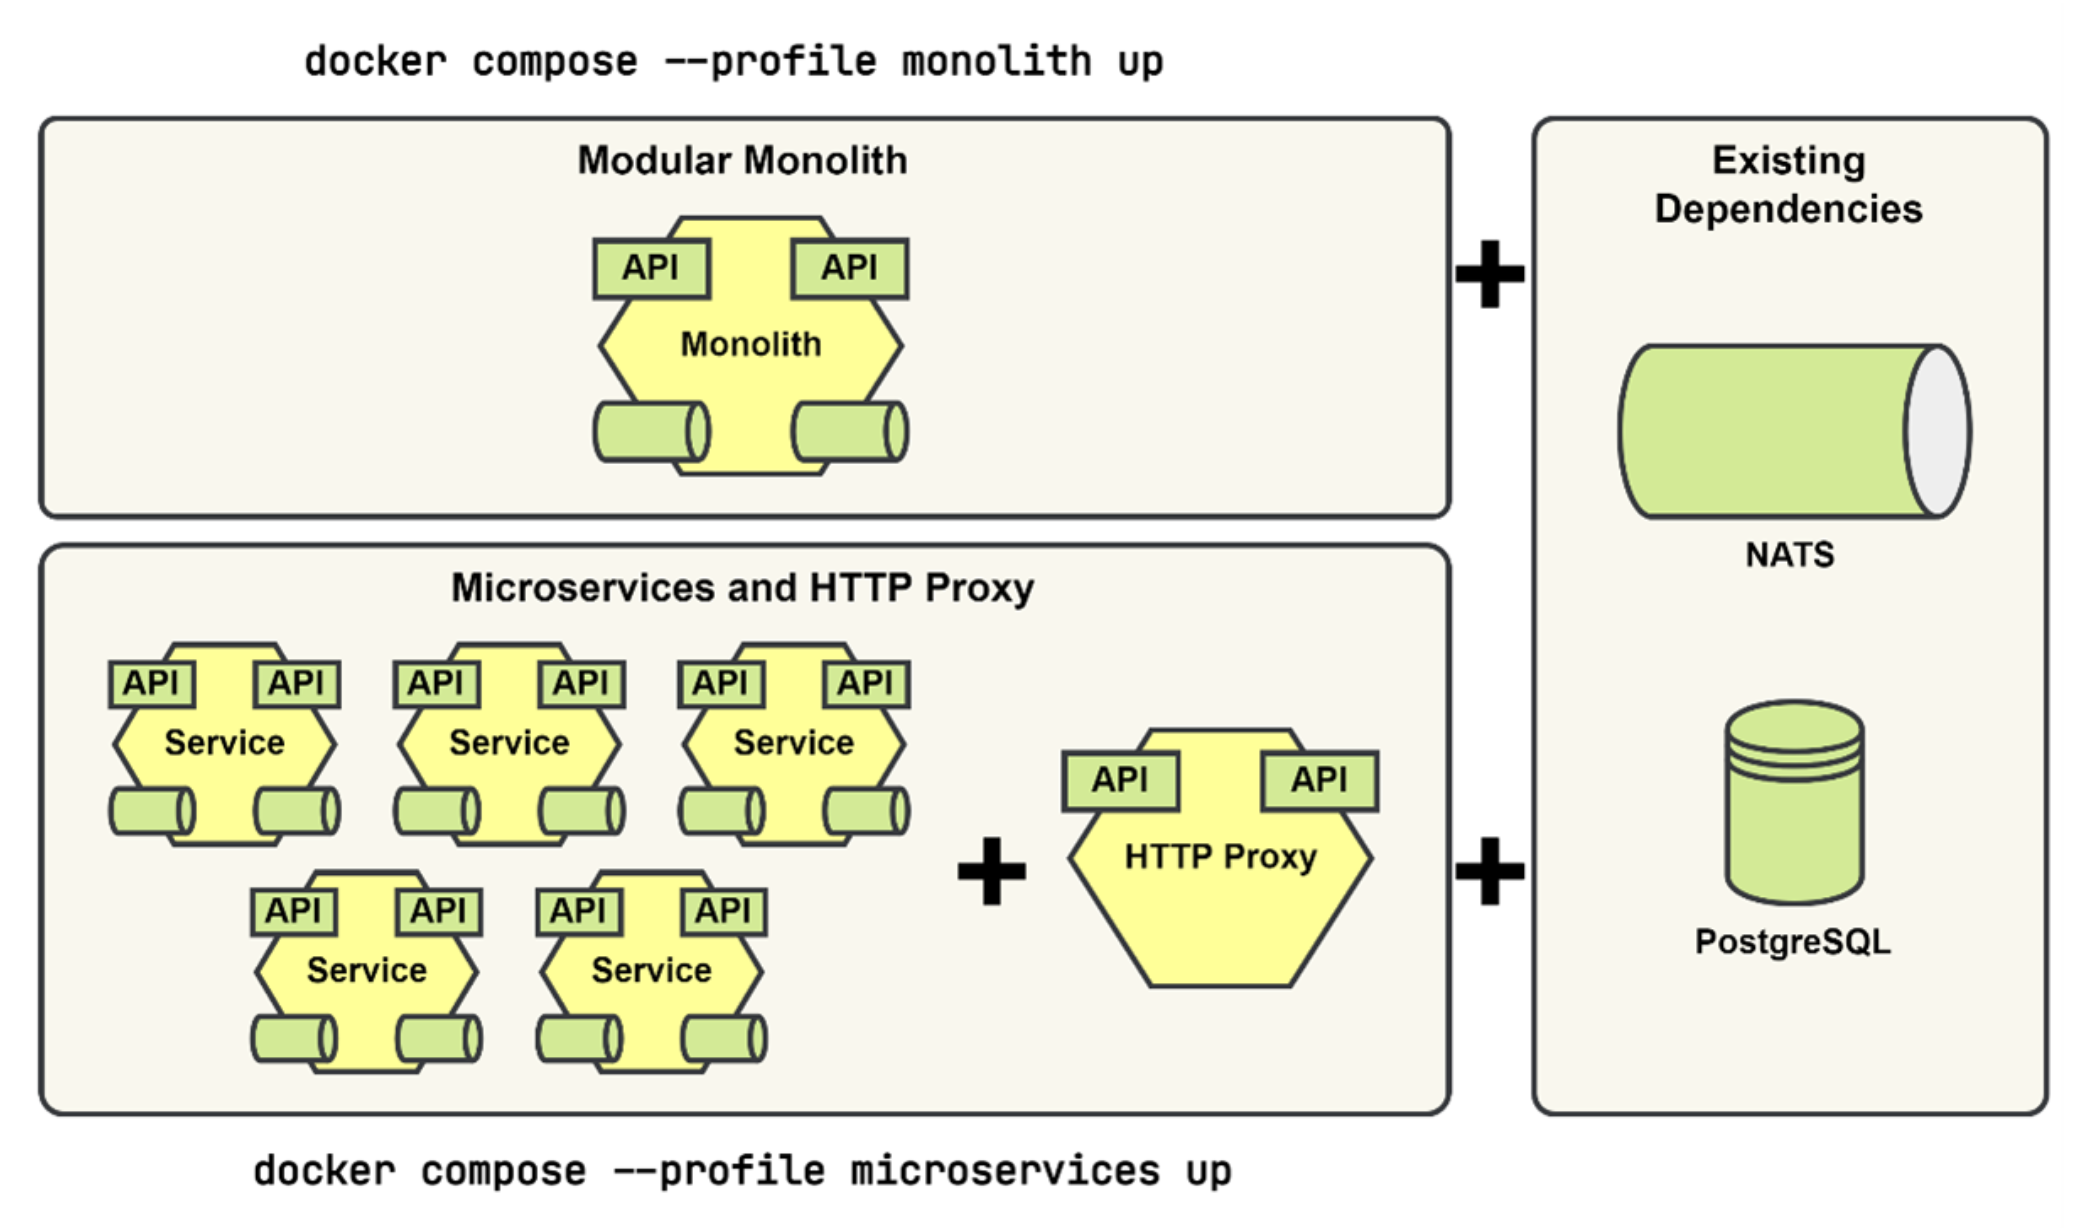
    Starting the monolith:

    docker compose --profile monolith up

    Starting the microservices

    docker compose --profile microservices up  

    Note: my local machine is Mac M2 ARM64, be sure to locate the docker image with the tag version compatible with your machine architecture.

    How to generate .pb.go files for the microservices

    let’s take baskets microservice for example, once you have your .proto files like api.proto and events.proto specified in basketspb folder:

    cd baskets && go generate

    buf generate inside the generate.go file will generate based on what is configured in the buf.gen.yaml file.

    Note: mockery tool in the Makefile @go install github.com/vektra/mockery/v2@latest will generate files starting with mock_ that contains a mock implementation of the BasketServiceClient interface defined in the basketspb package. The mock implementation allows you to test your code in isolation from the real implementation of the BasketServiceClient interface, making it easier to test and debug your code.

    For more info on using buf, please go to buf tutorial

    Docker Compose with either a monolith or microservices

    Screenshot of Intelli-Mall

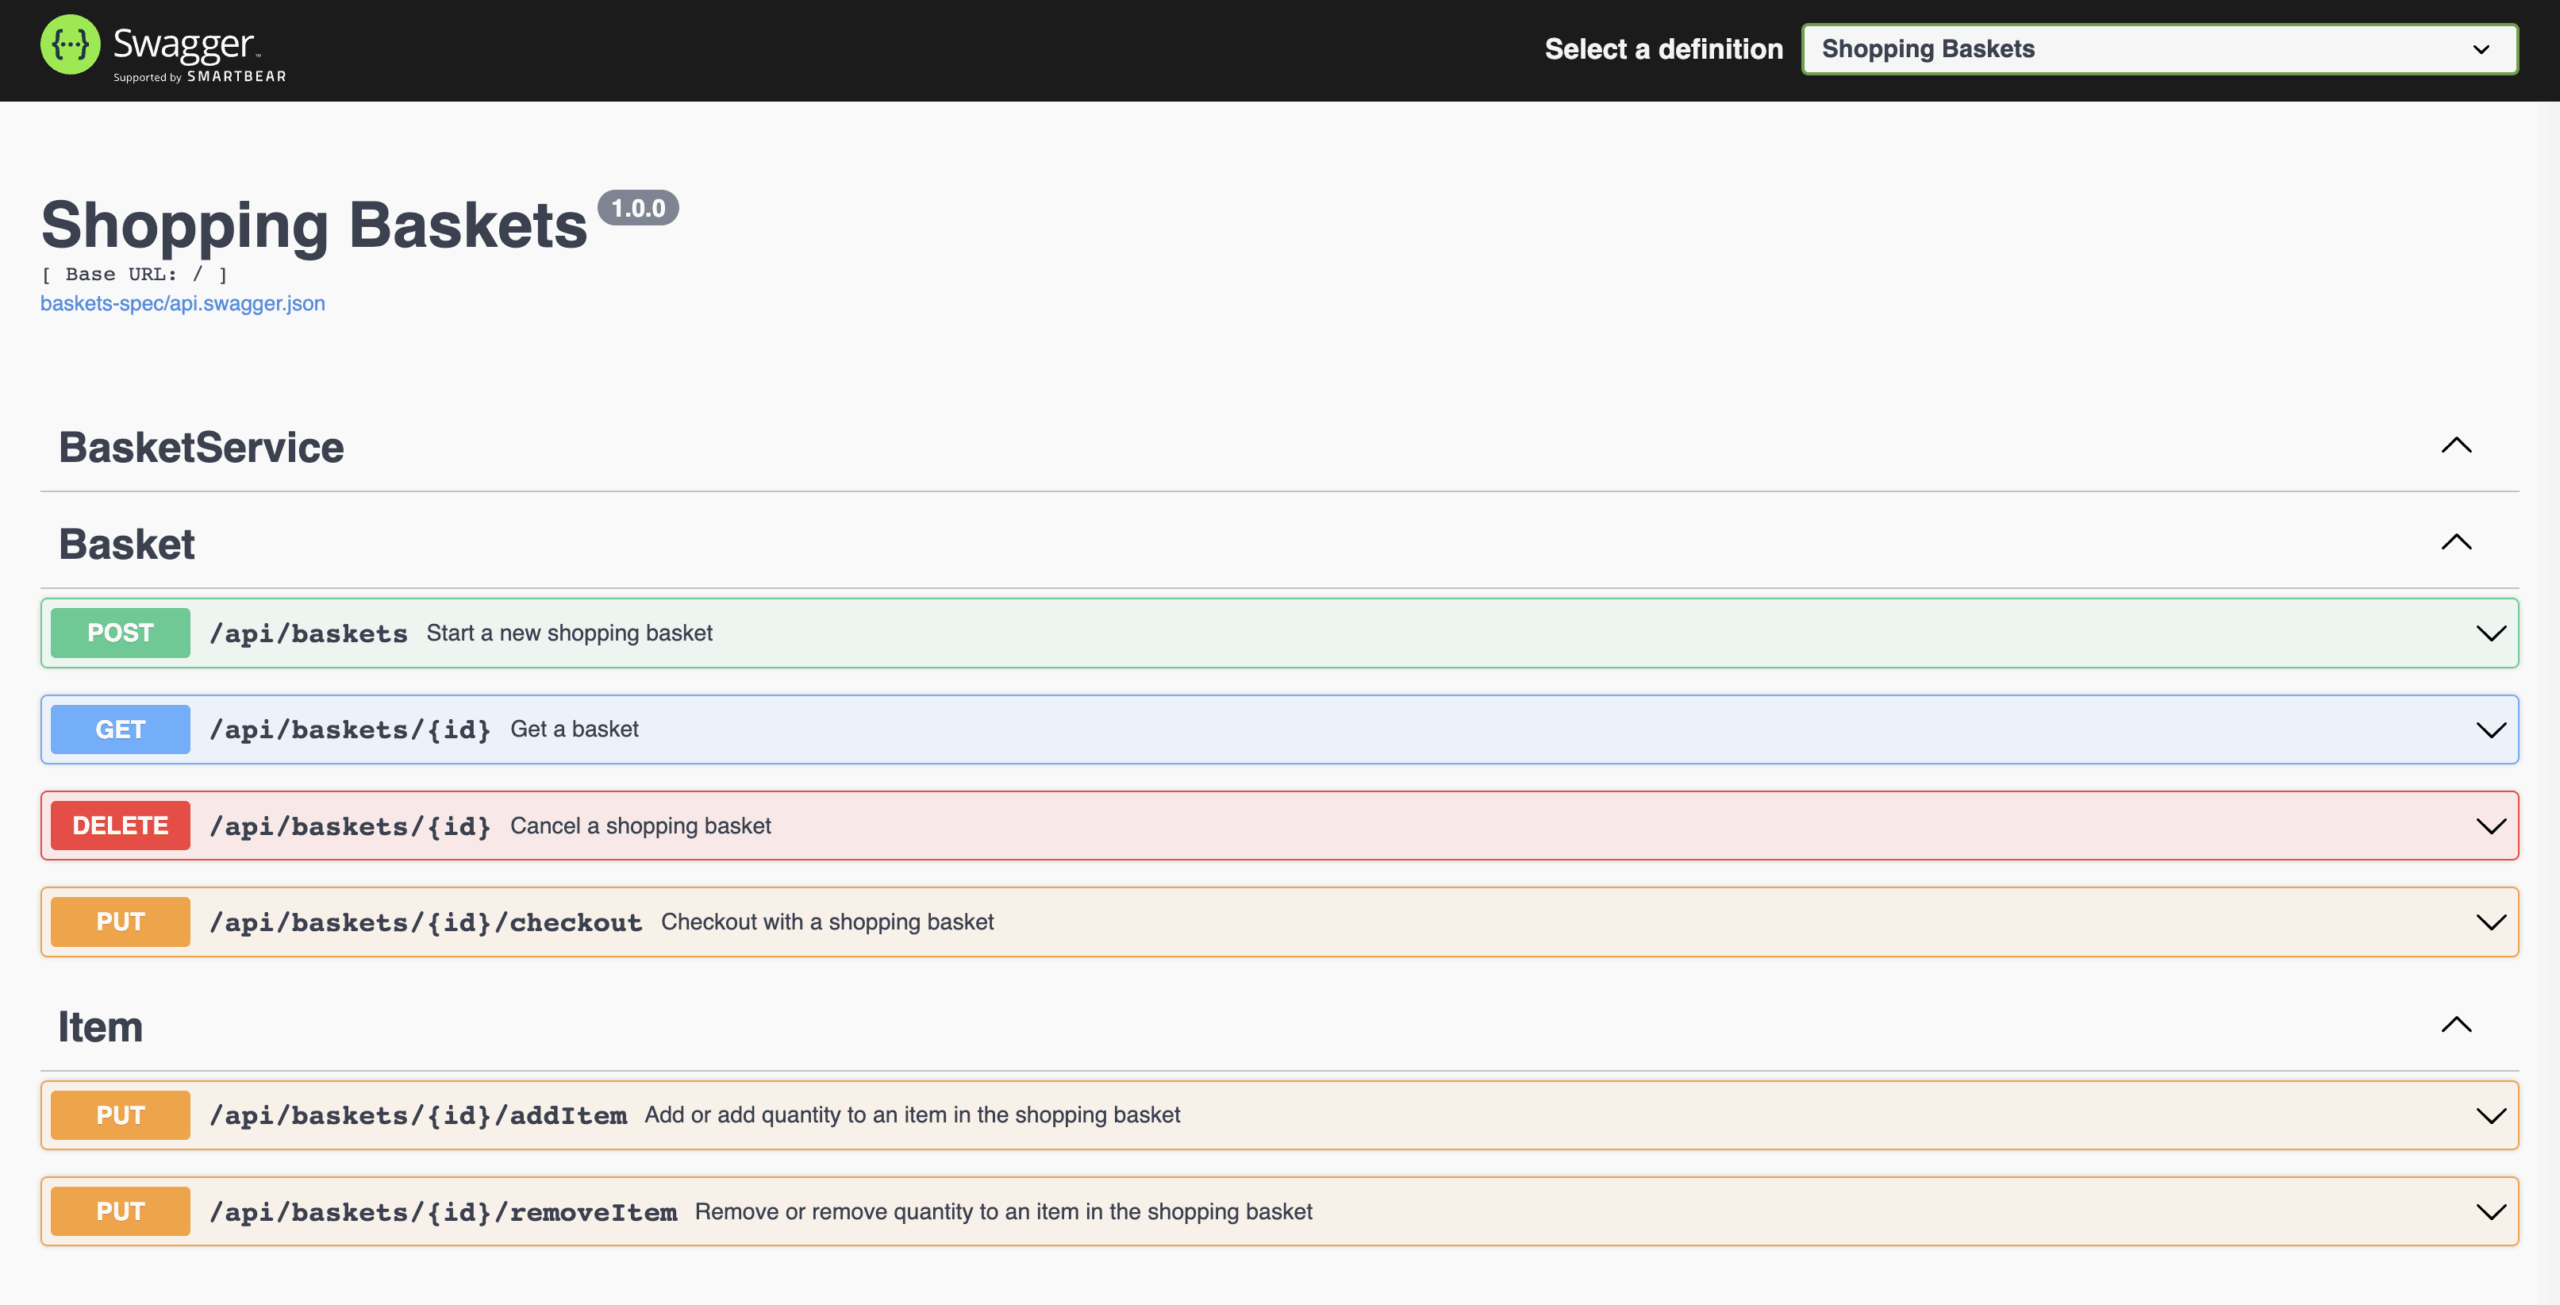
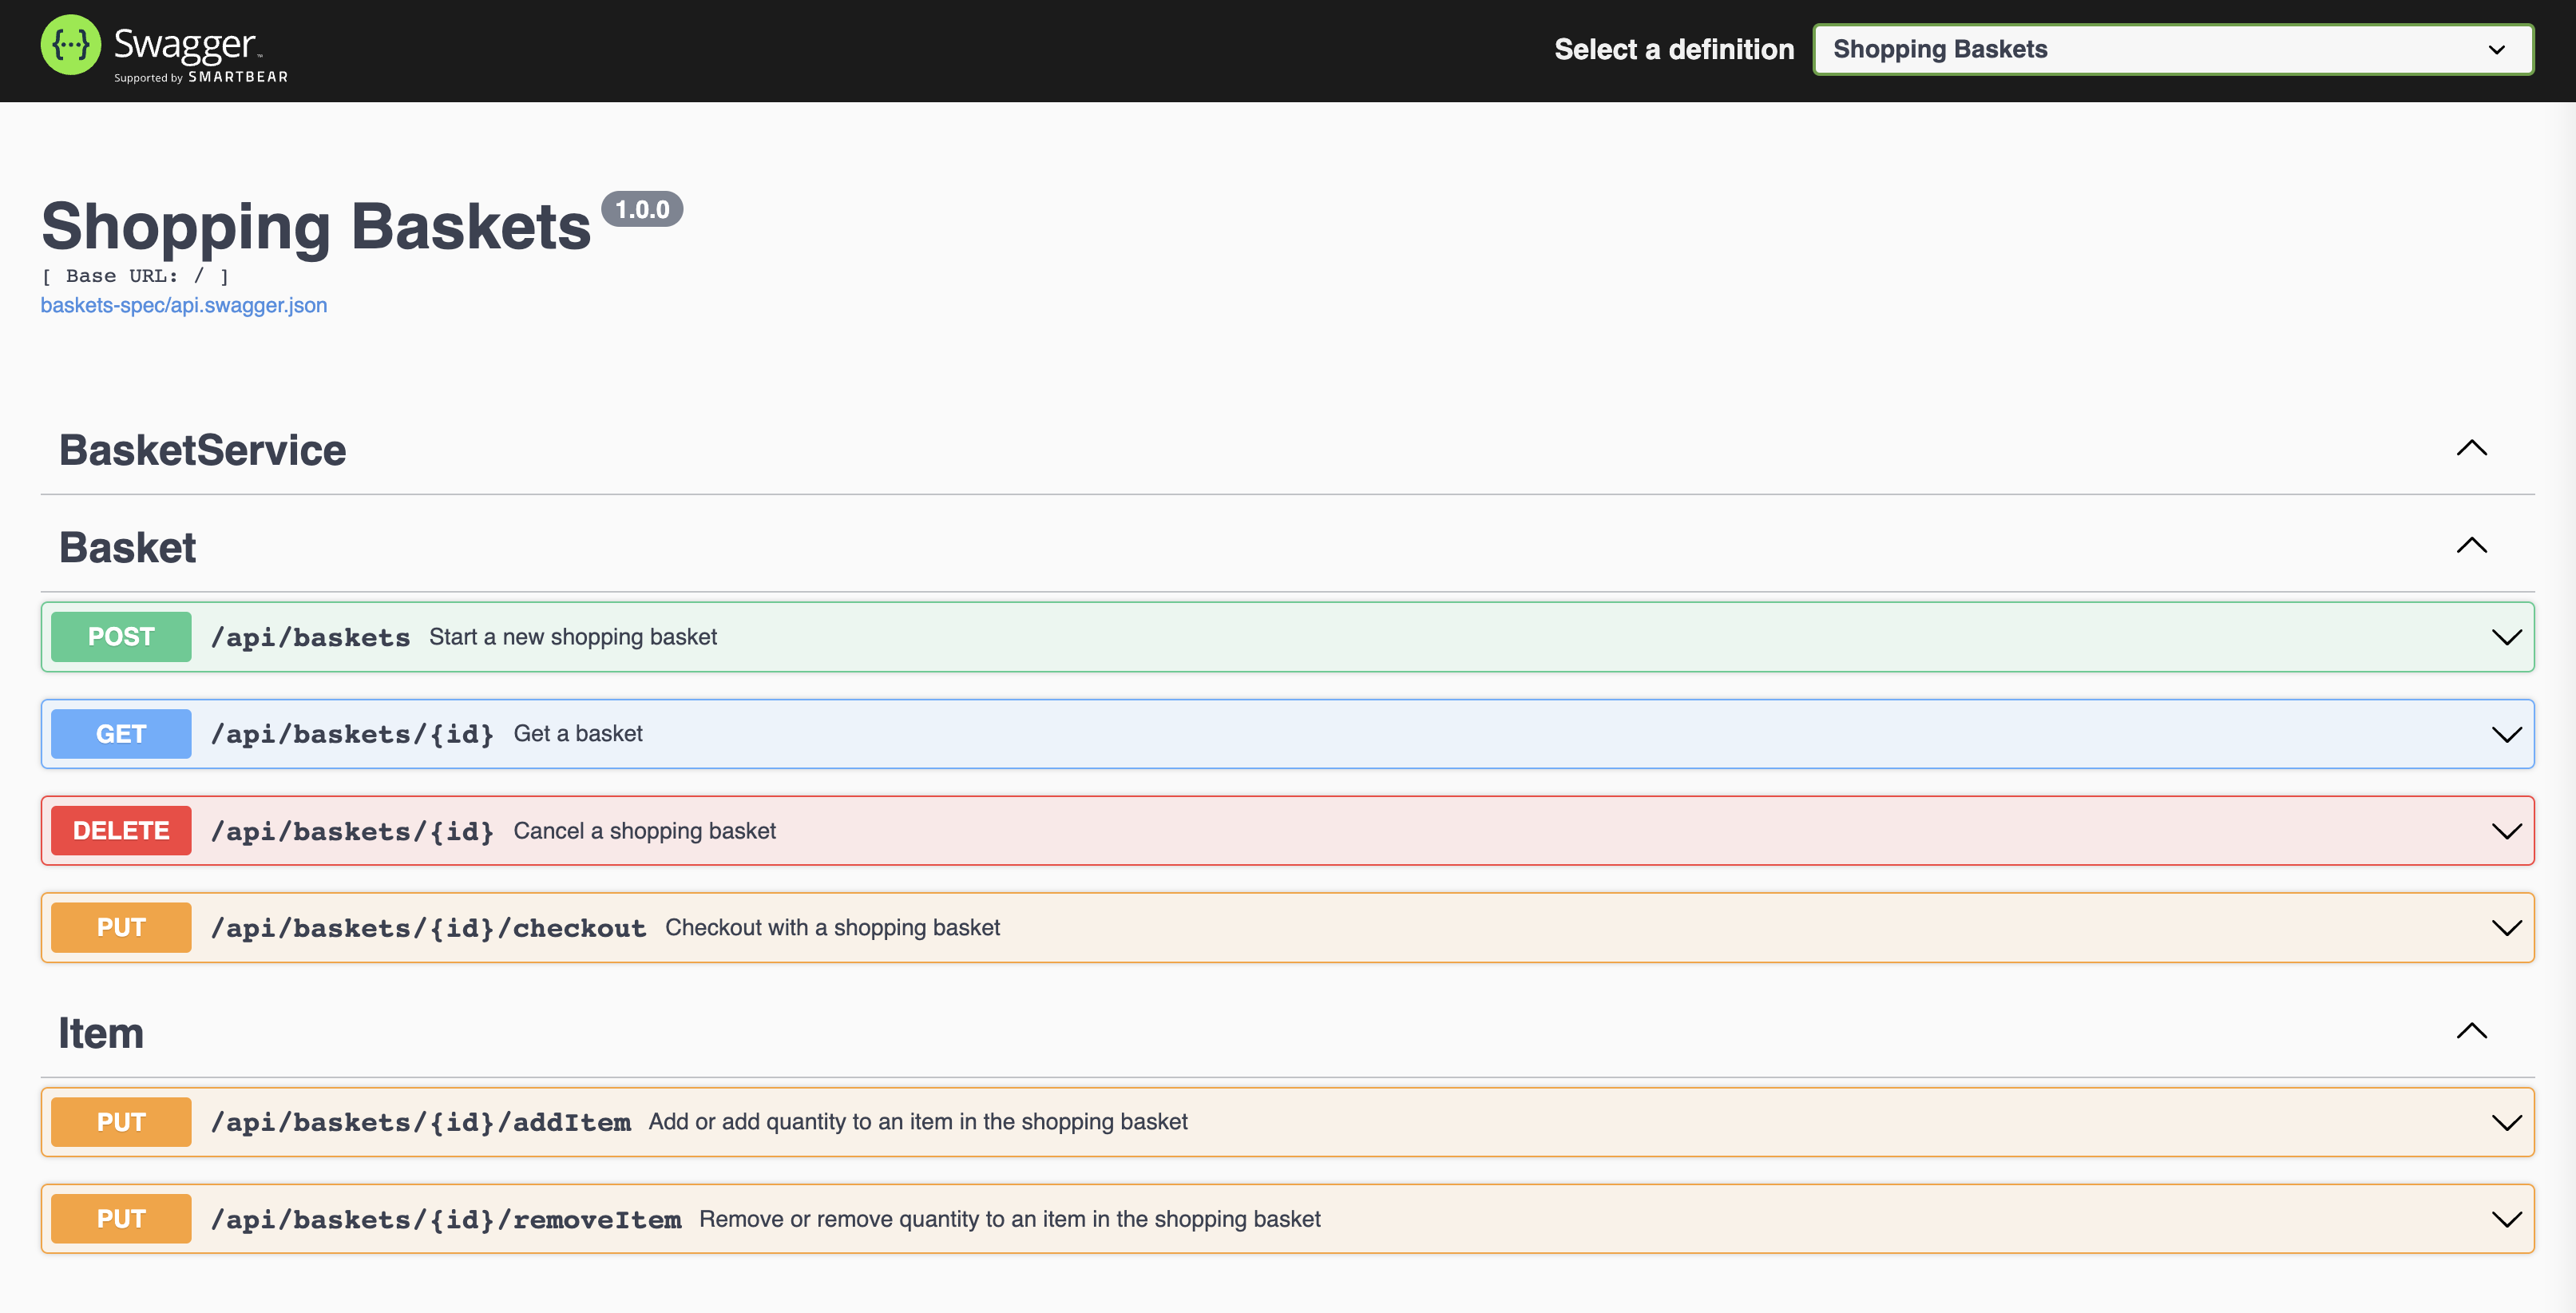
    Swagger UI

    Screenshot of Intelli-Mall

    The monitoring services

    Screenshot of Intelli-Mall

    Use /cmd/busywork to simulate several users making requests to perform several different activities:

    cd cmd/busywork
    go run .

    Busywork Output

    07:55:36.221473 [Client 1] is considering adding new inventory
    07:55:36.687106 [Client 3] is considering registering a new account
    07:55:37.281486 [Client 1] is adding "Refined Wooden Computer" for $6.76
    07:55:38.797600 [Client 1] is adding "Oriental Granite Keyboard" for $8.81
    07:55:39.115718 [Client 2] is considering registering a new account
    07:55:40.790283 [Client 1] is adding "Unbranded Steel Chair" for $8.65
    07:55:40.797666 [Client 1] is done adding new inventory
    07:55:42.595664 [Client 4] is considering adding new inventory
    07:55:43.460873 [Client 4] is adding "Rustic Rubber Fish" for $9.26
    07:55:44.069827 [Client 4] is adding "Licensed Frozen Pants" for $11.21
    07:55:45.709748 [Client 5] is considering browsing for new things
    07:55:45.721676 [Client 4] is adding "Practical Metal Towels" for $6.27
    07:55:45.729938 [Client 4] is done adding new inventory
    07:55:46.598130 [Client 3] is considering adding new inventory
    07:55:47.884613 [Client 5] is browsing the items from "William Connelly"
    07:55:48.285565 [Client 3] is adding "Incredible Granite Chips" for $10.04
    07:55:49.448966 [Client 3] is adding "Handmade Bronze Chicken" for $6.83
    07:55:49.651385 [Client 5] might buy 3 "Rustic Concrete Pants" for $7.37 each
    07:55:50.290852 [Client 5] thinks $22.11 is too much
    07:55:50.297213 [Client 5] Quitting time
    07:55:50.394300 [Client 3] is adding "Intelligent Rubber Shirt" for $10.36
    07:55:50.400688 [Client 3] is done adding new inventory
    07:55:50.400713 [Client 3] Quitting time
    07:55:50 busywork shutdown

    You can increase the number of clients by passing in the -clients=n flag, with an upper limit of 25.

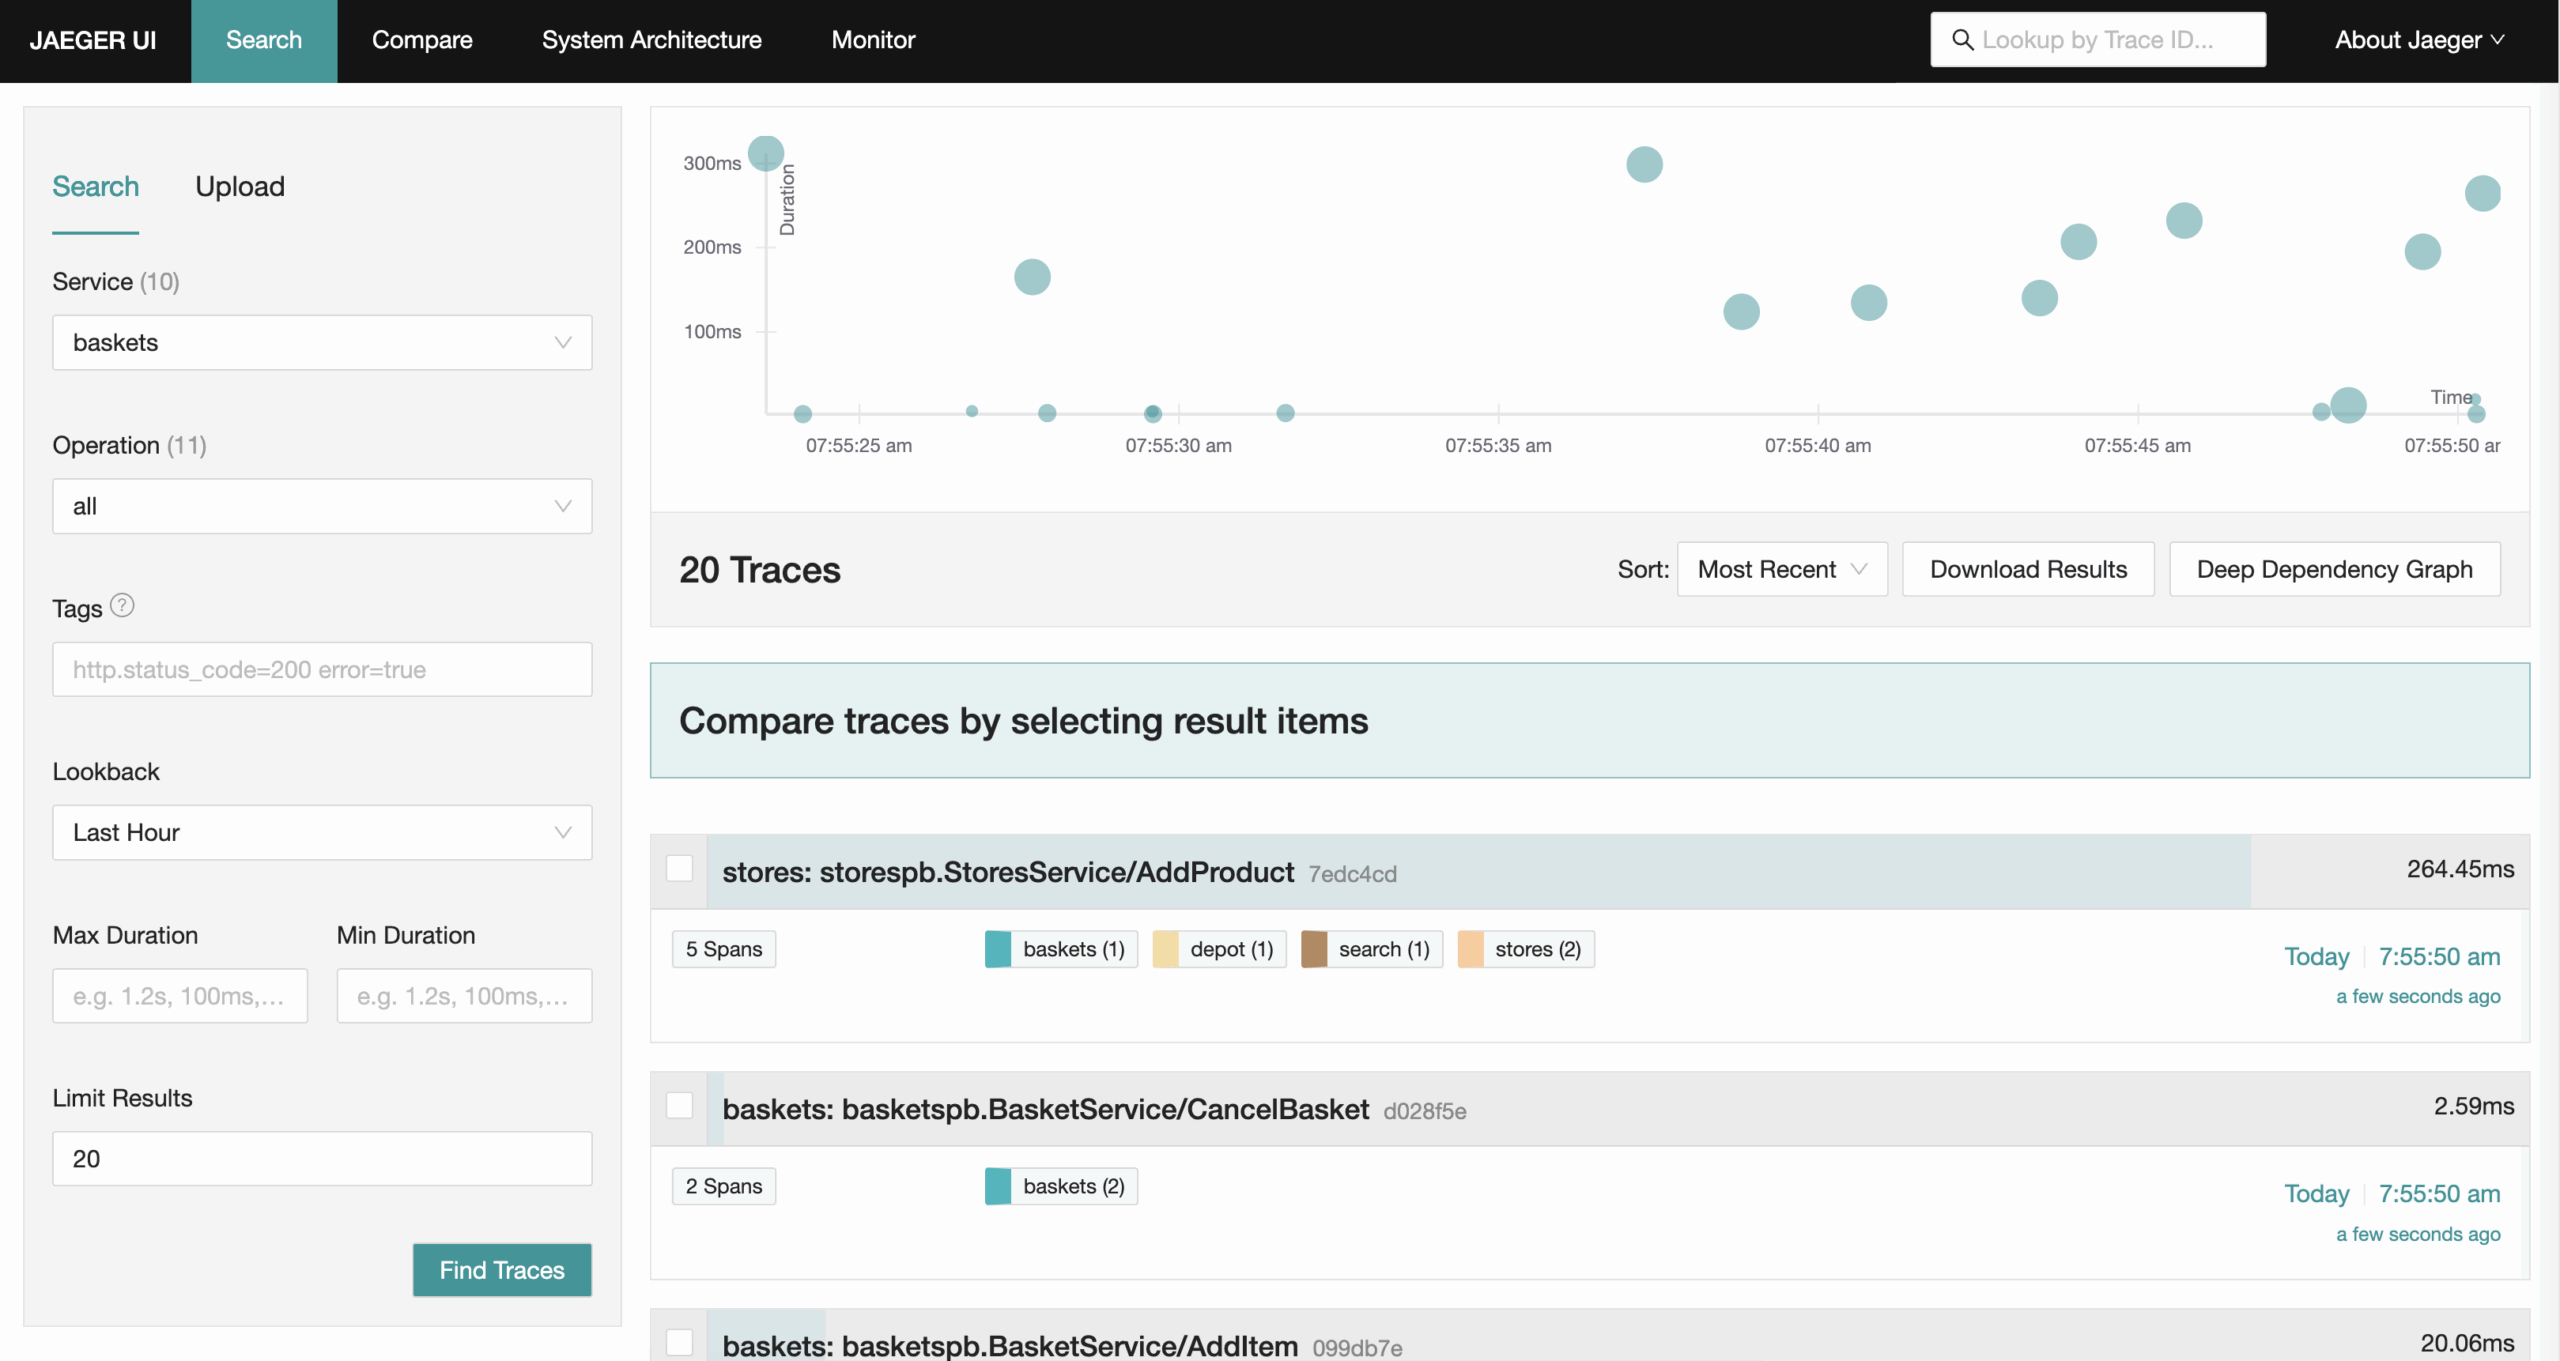
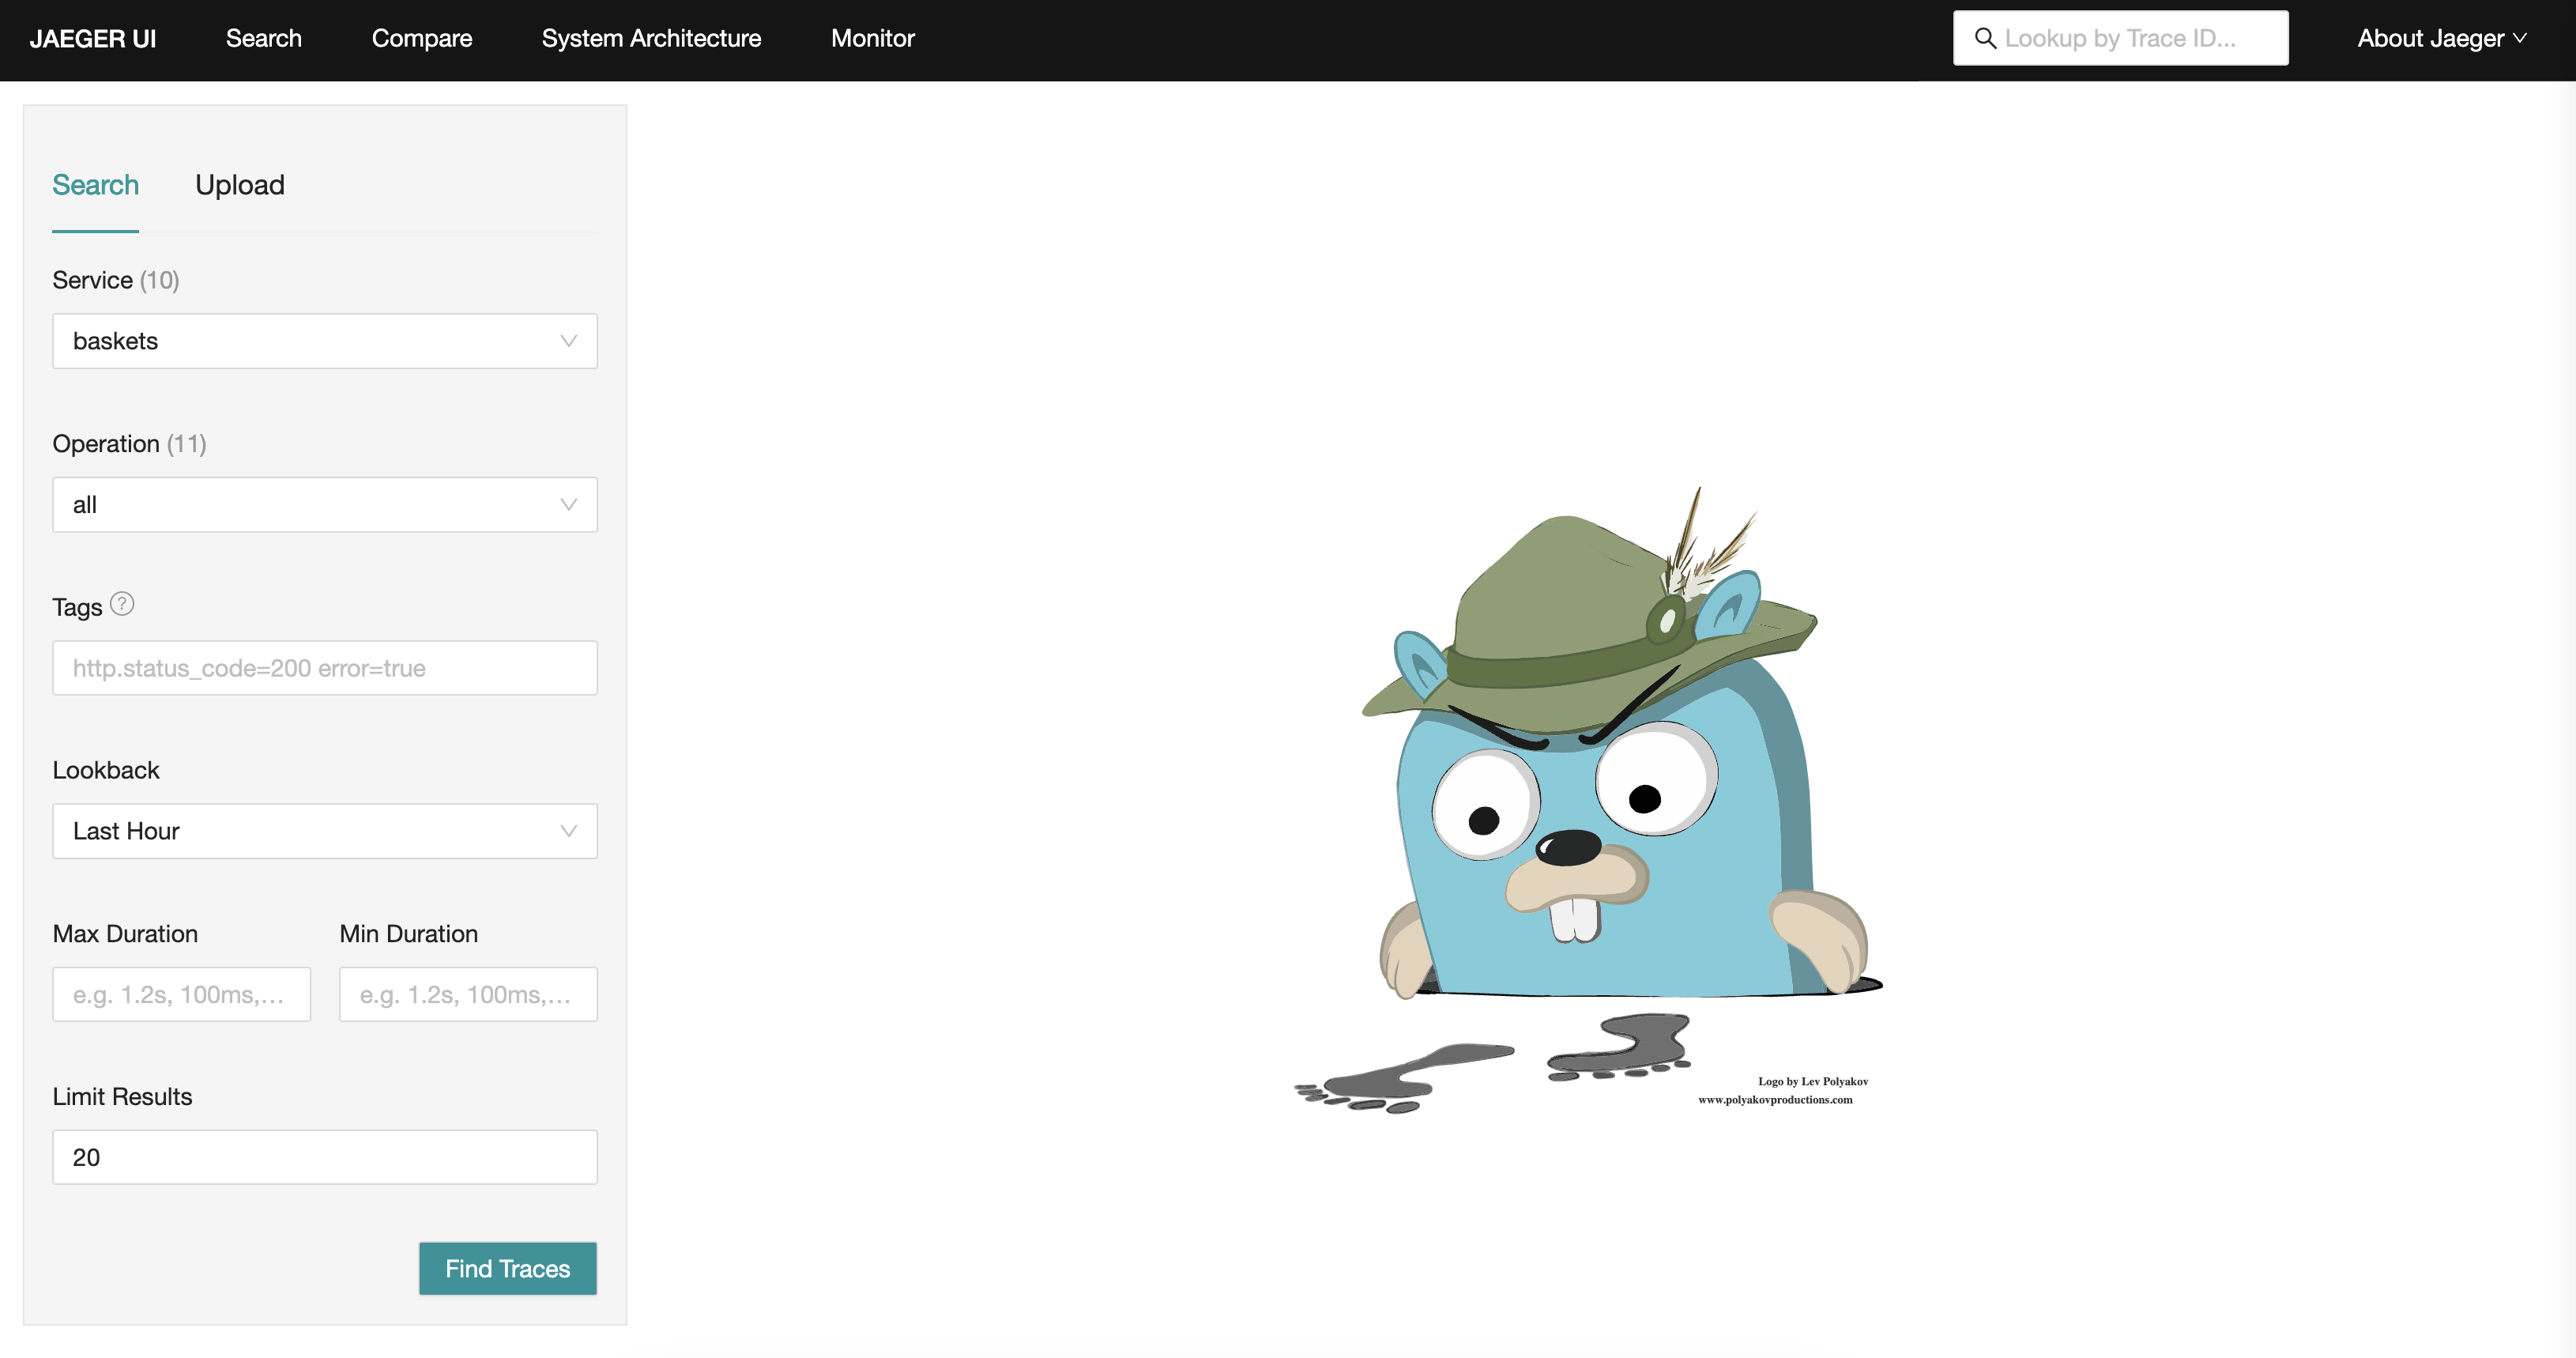
    The Jaeger UI for tracing

    Open http:// localhost:8081 in your browser to open Jaeger.

    Screenshot of Intelli-Mall

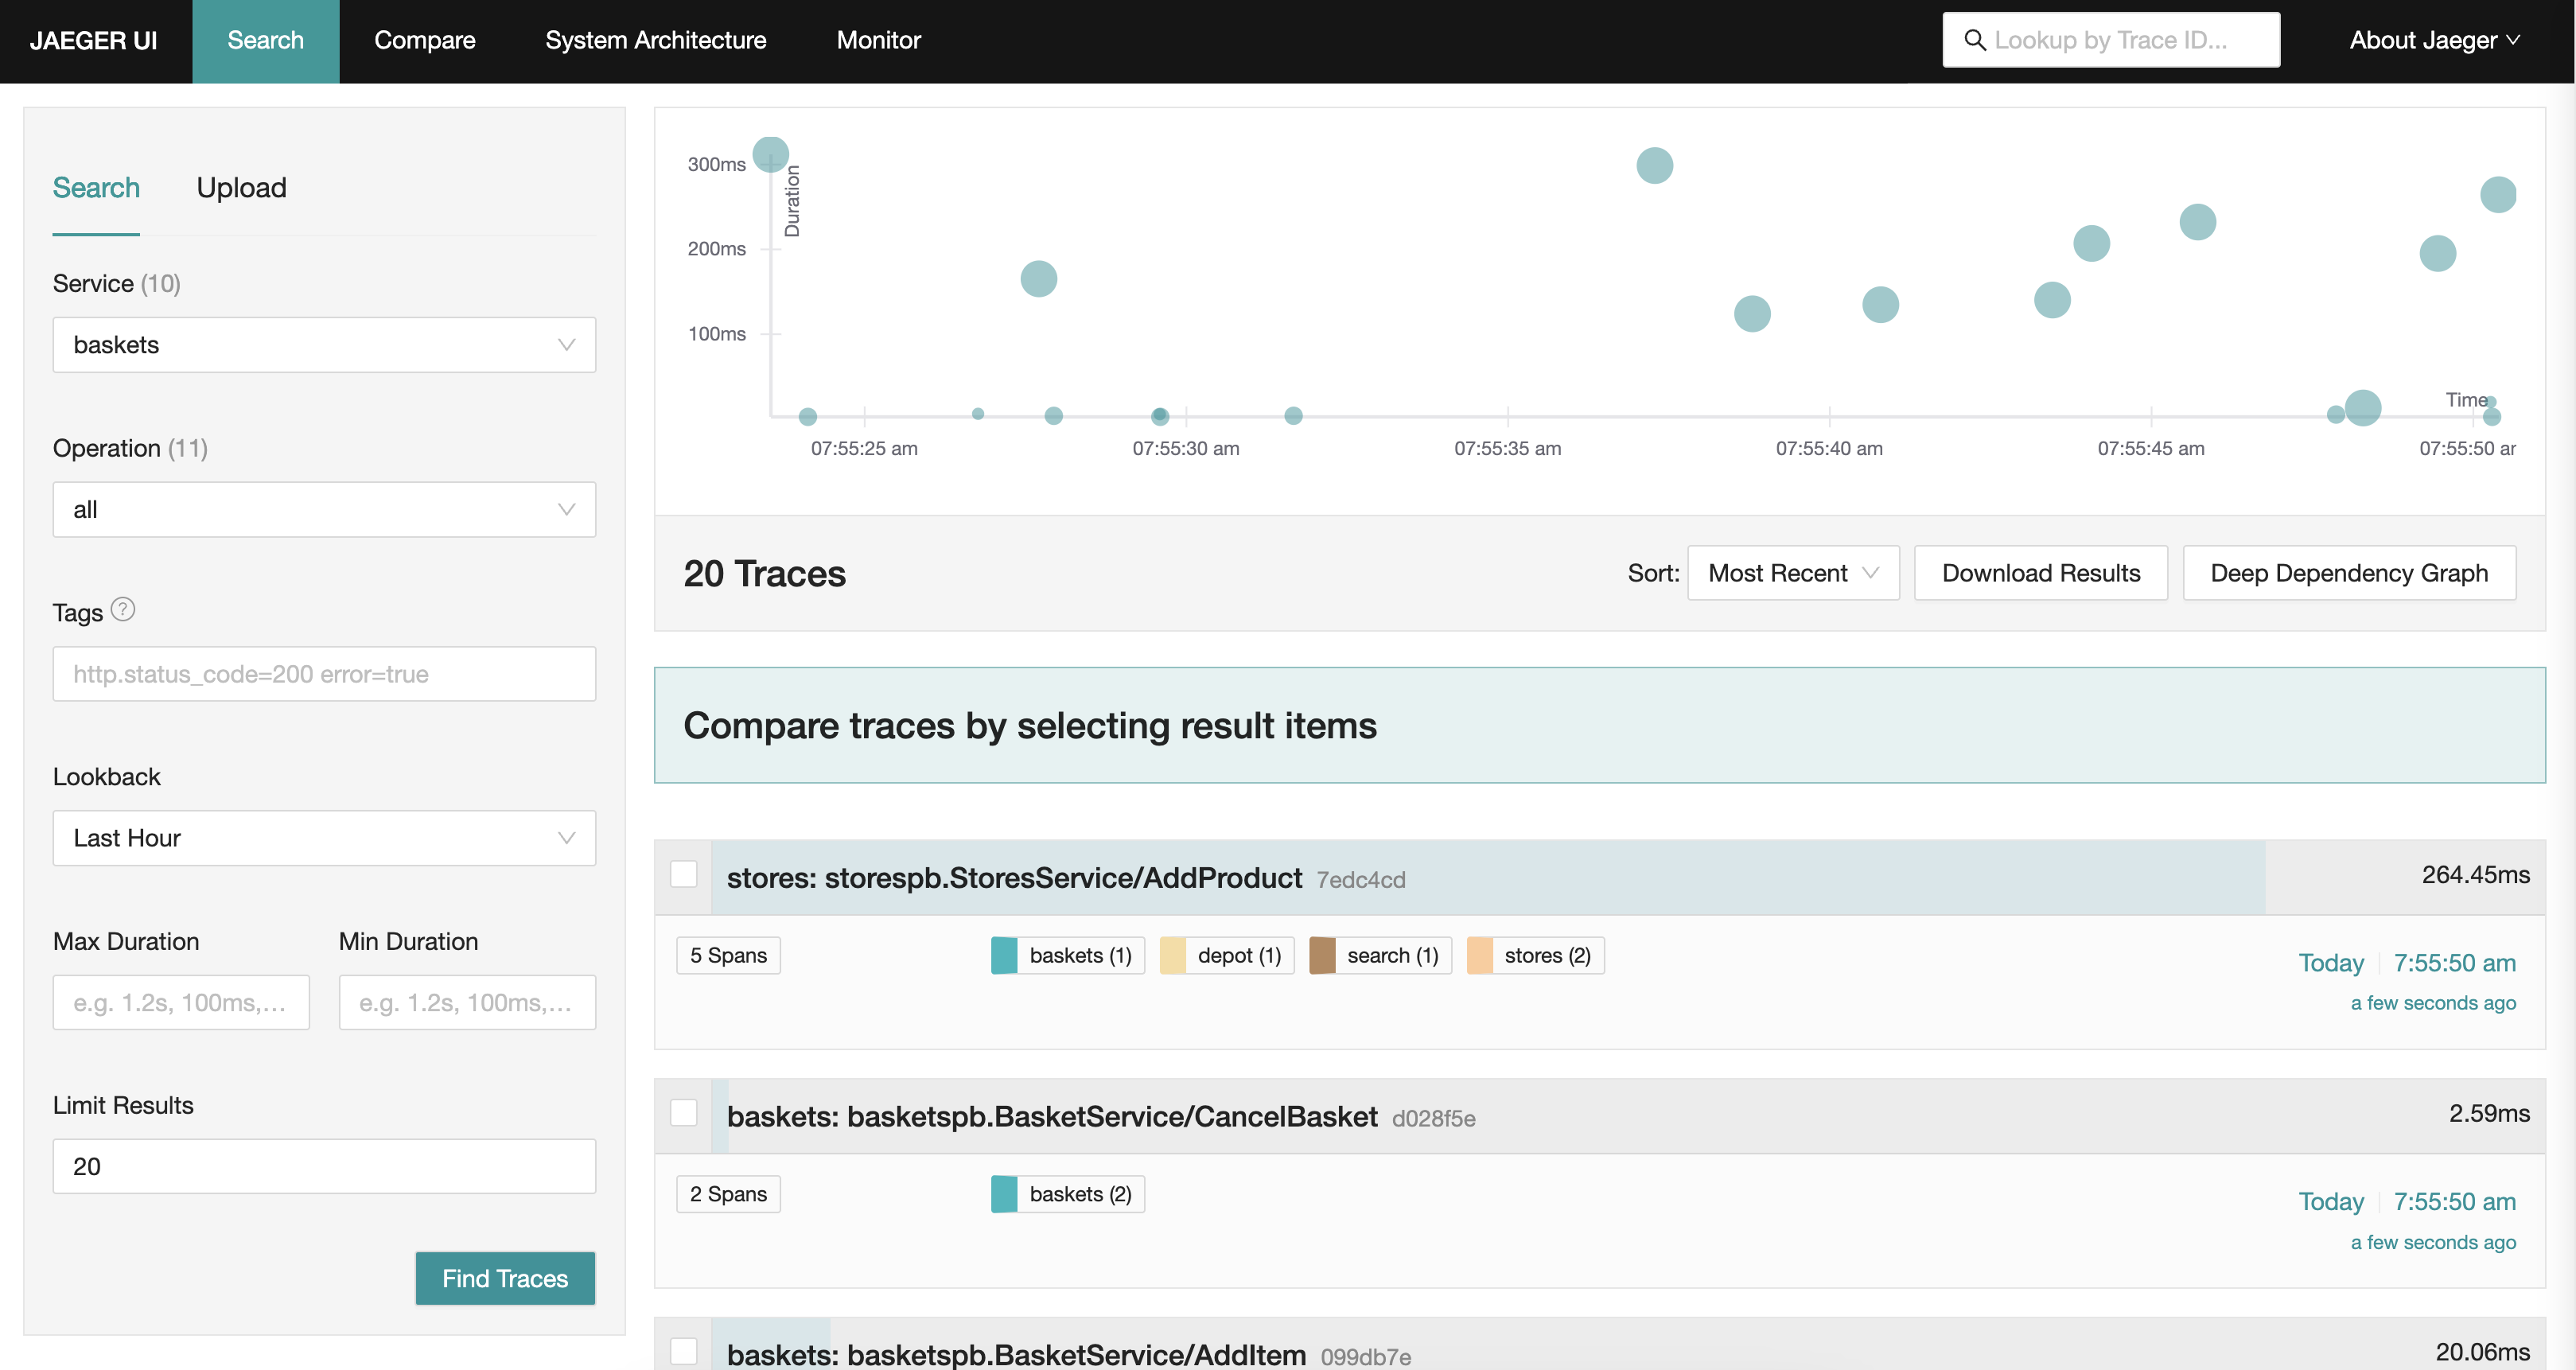
    Traces that involved the baskets service

    Screenshot of the Jaeger UI for tracing

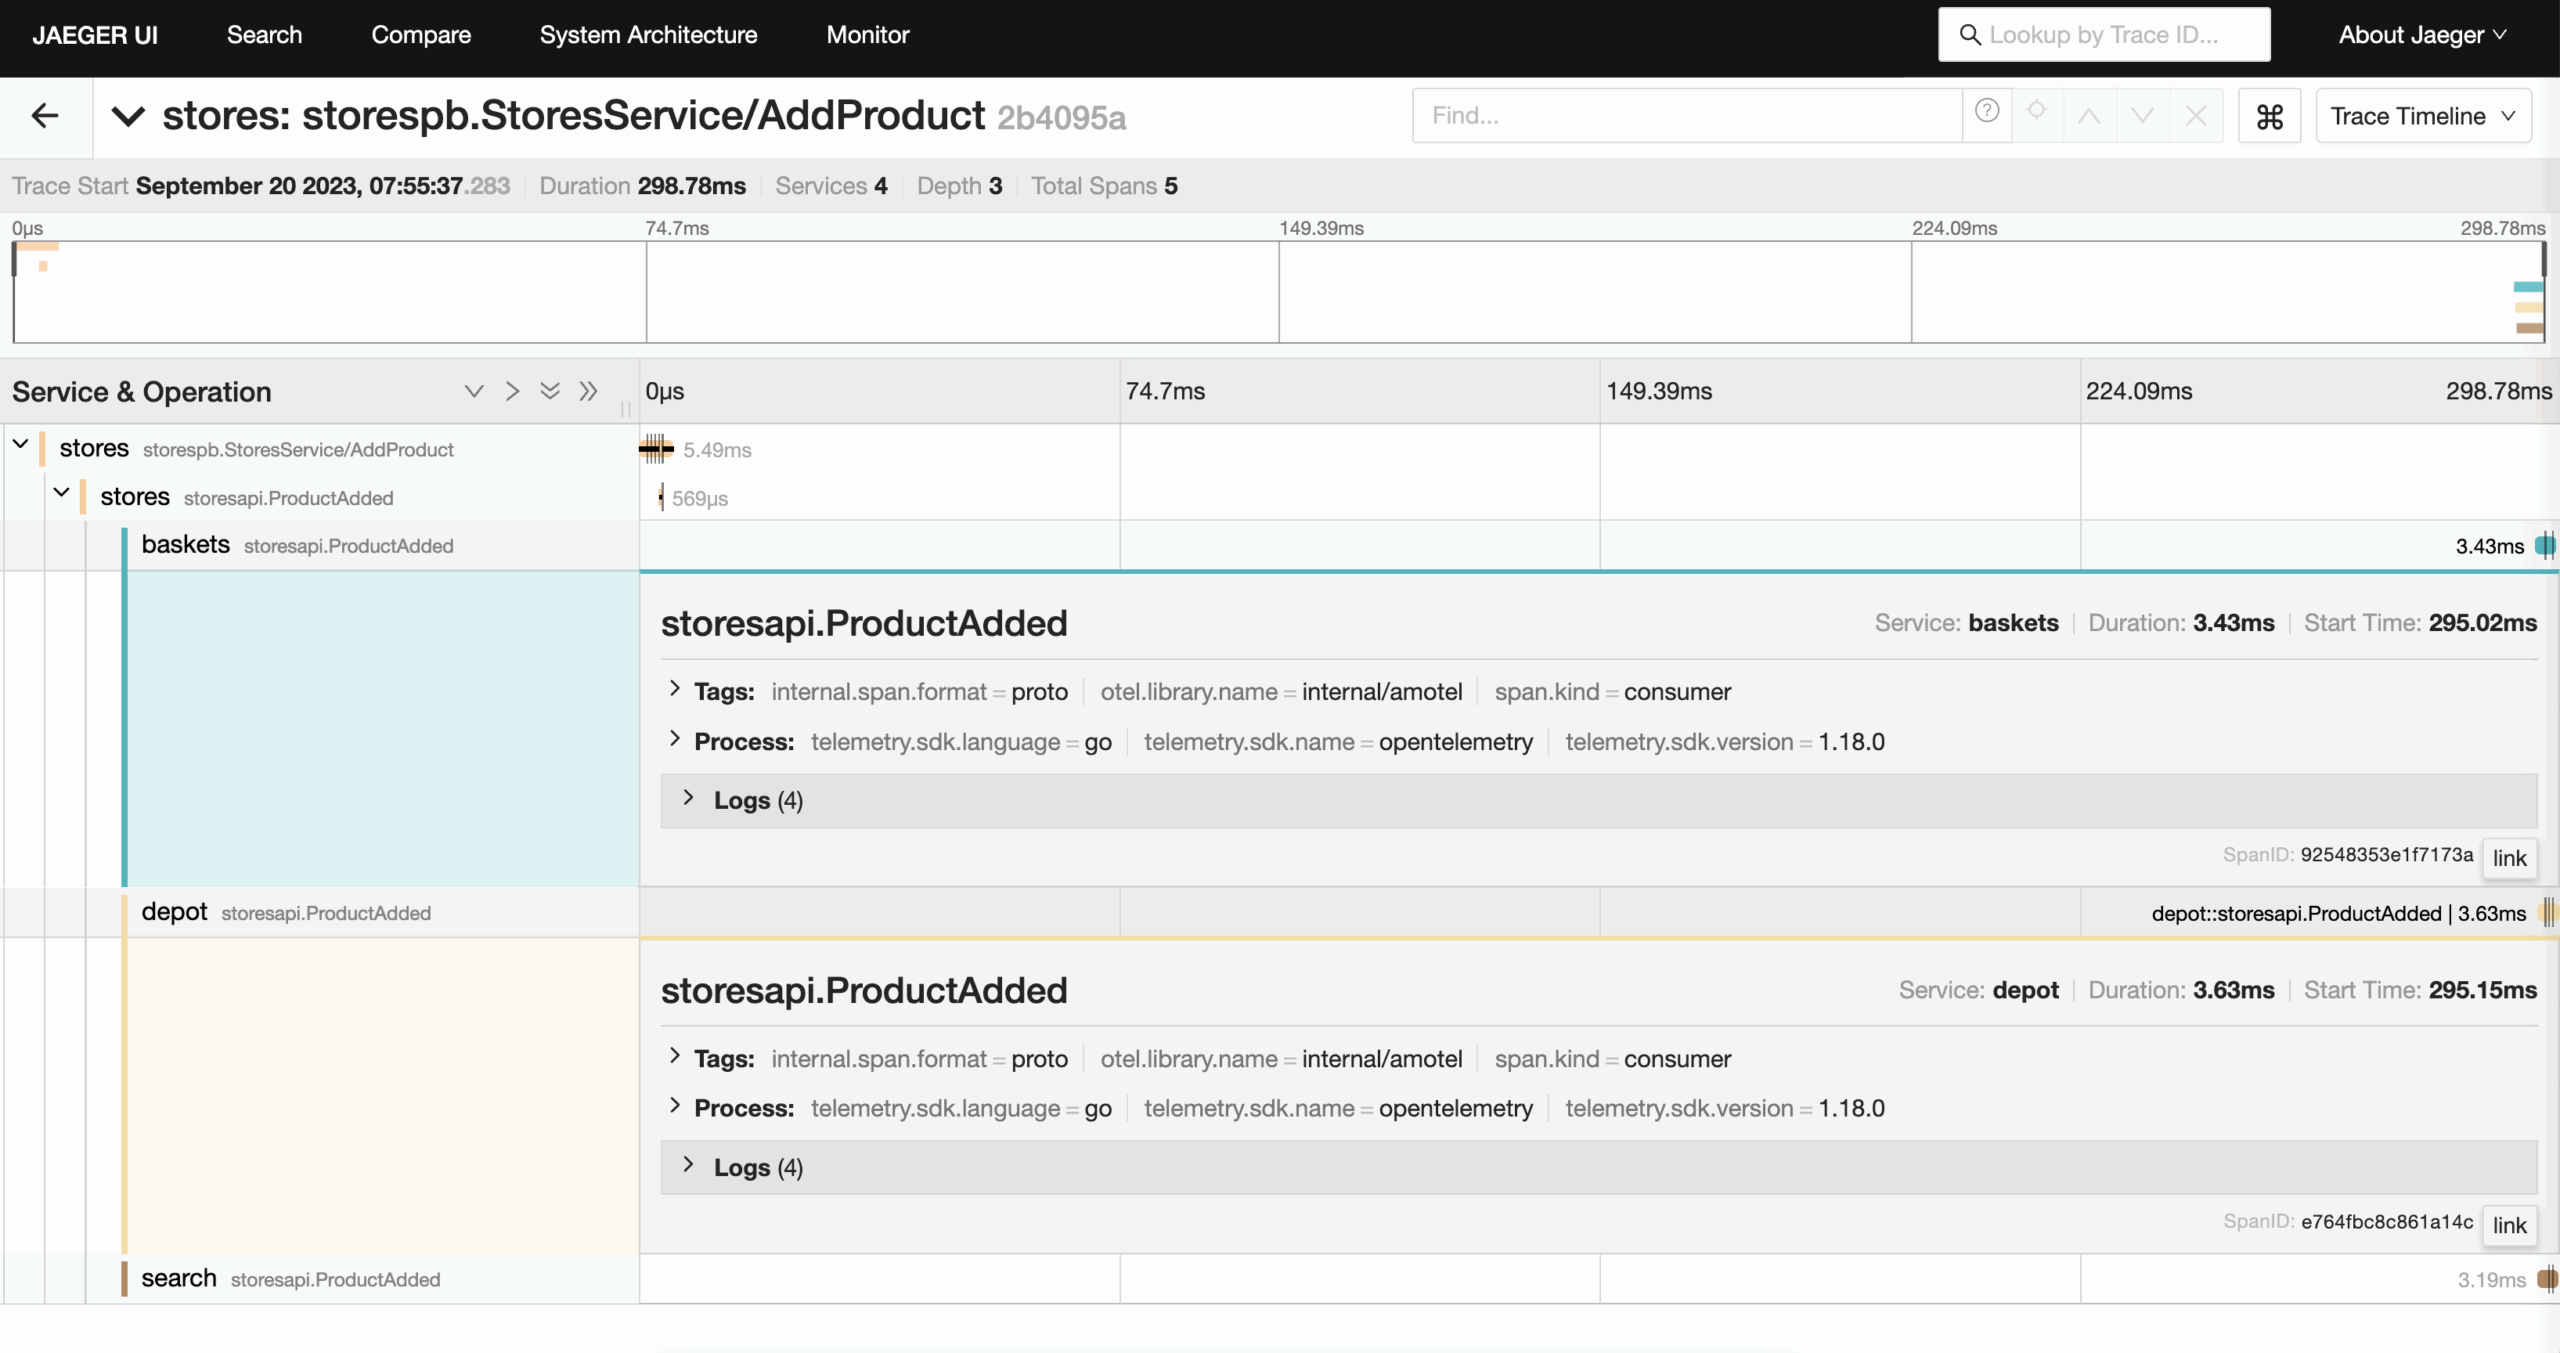
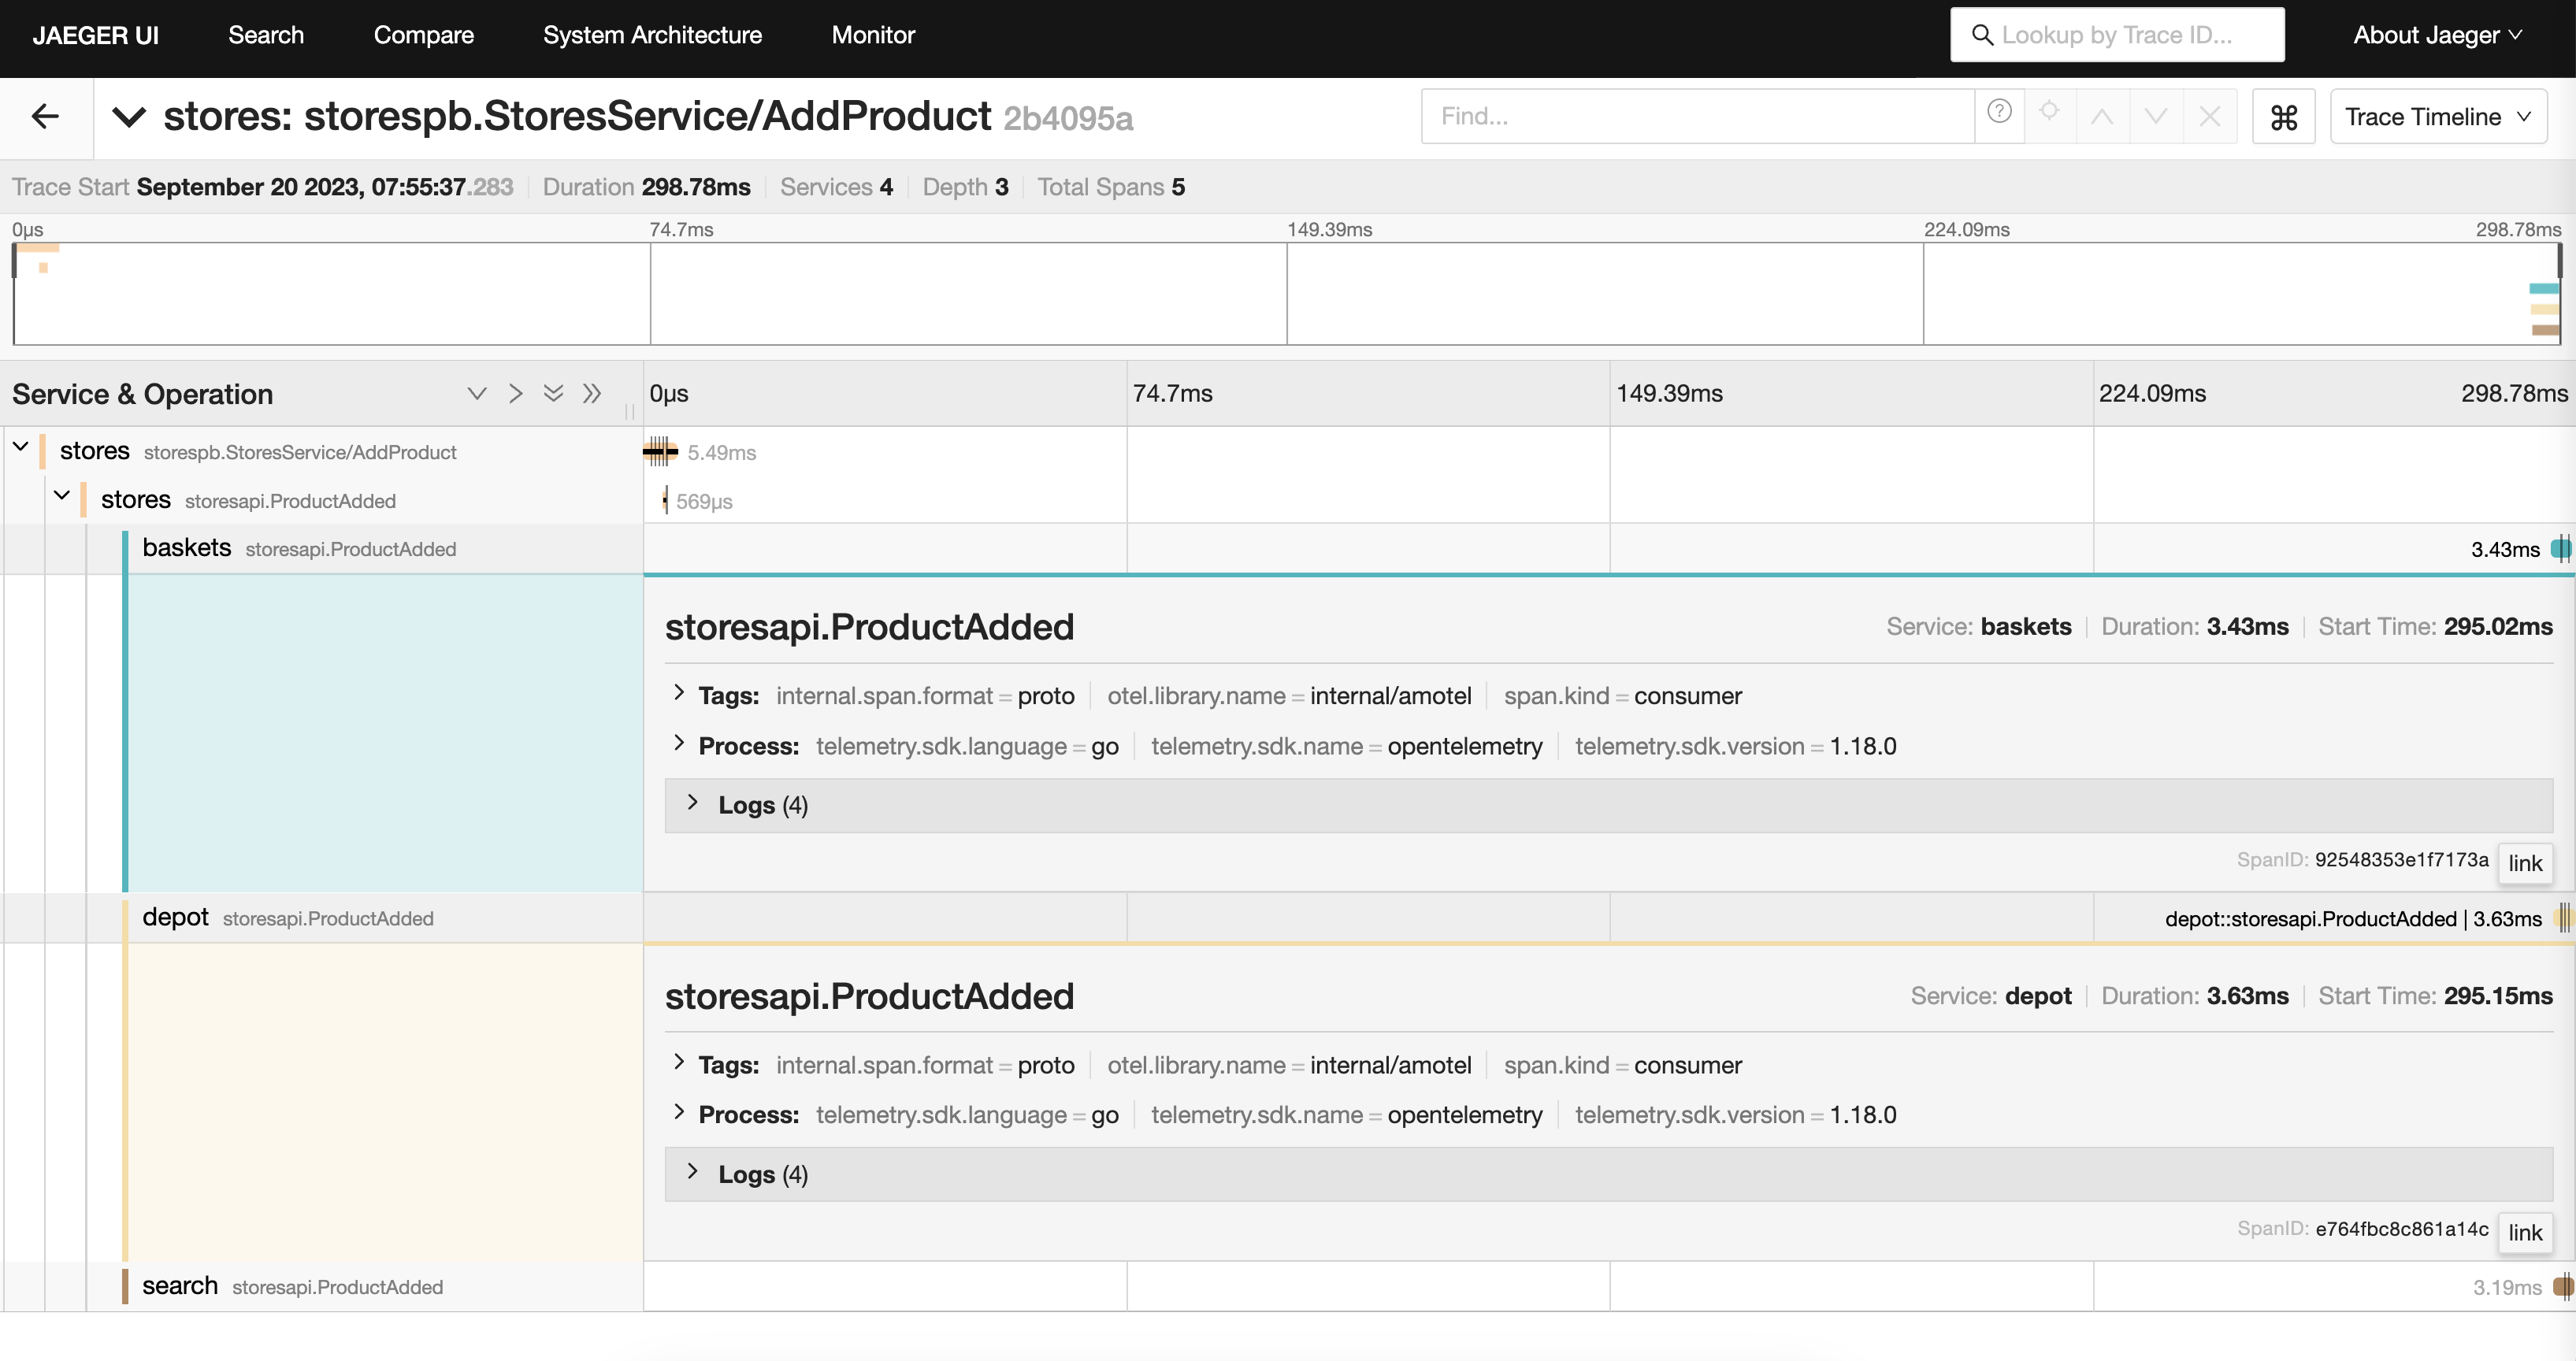
    Viewing the monitoring data

    Screenshot of the Jaeger UI for tracing

    Clicking on one of the rows in the graph will provide you with additional details.

    The Prometheus UI

    We also have the metrics to check out in Prometheus at http://localhost:9090

    Screenshot of received messages counts for the cosec service

    Searching for the received messages counts for the cosec service

    Screenshot of received messages counts for the cosec service

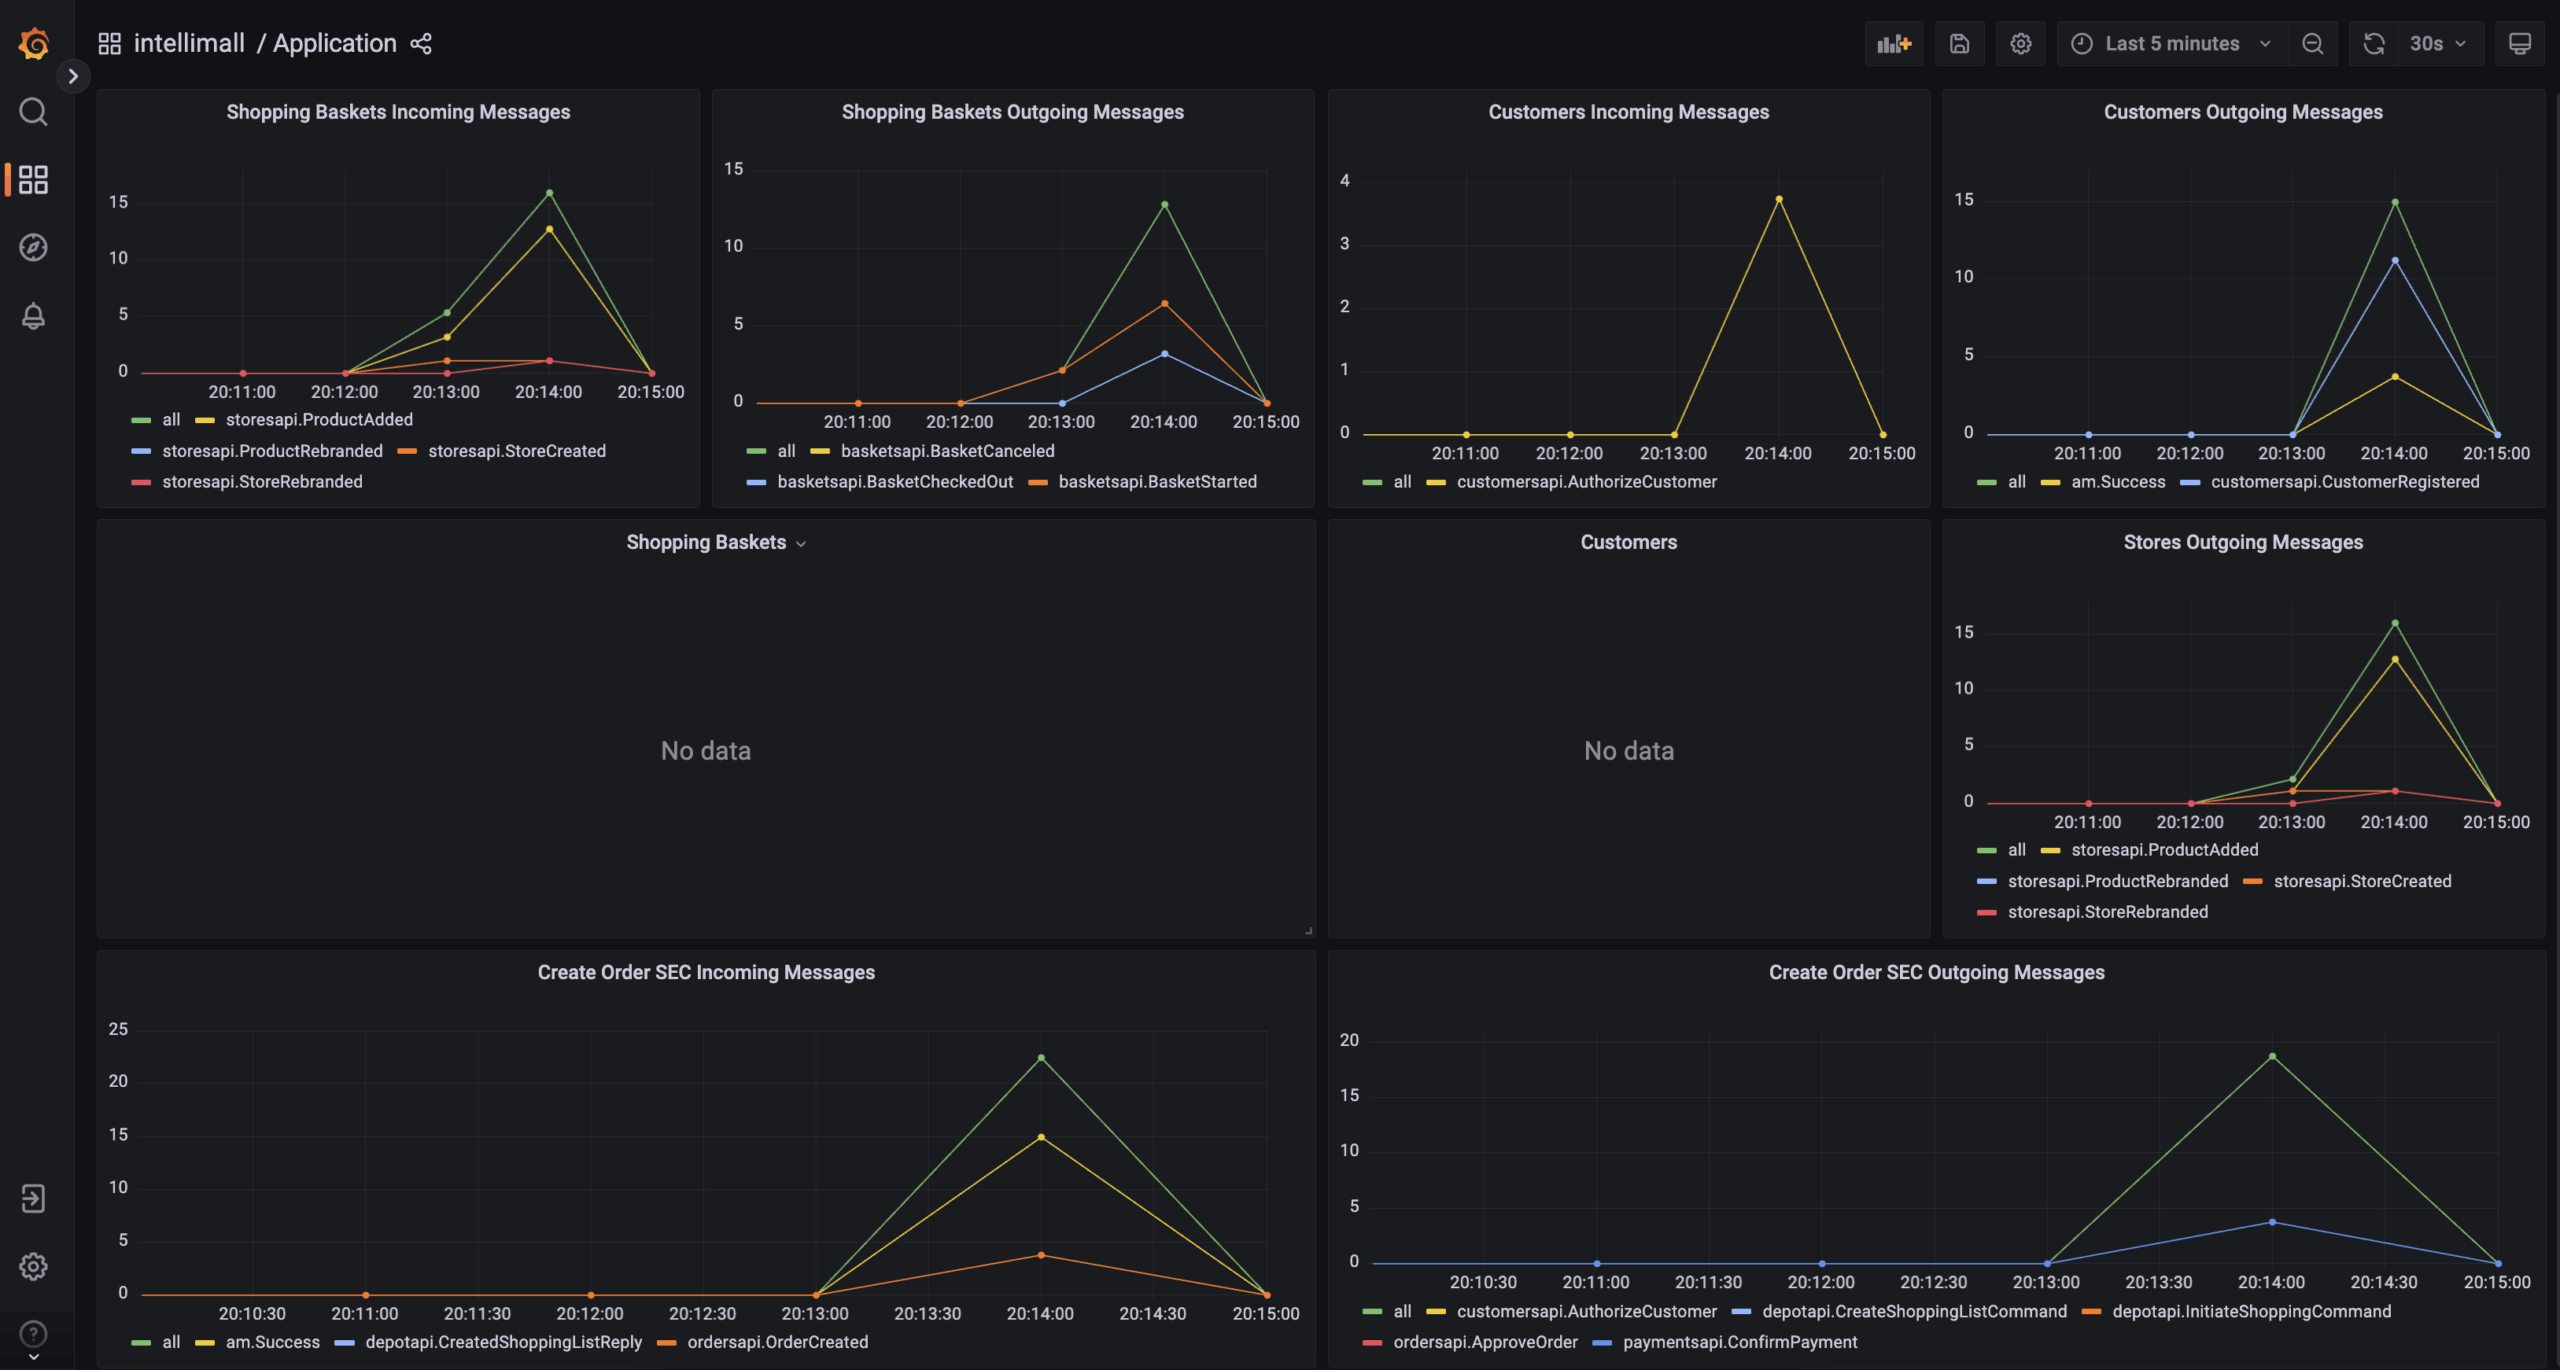
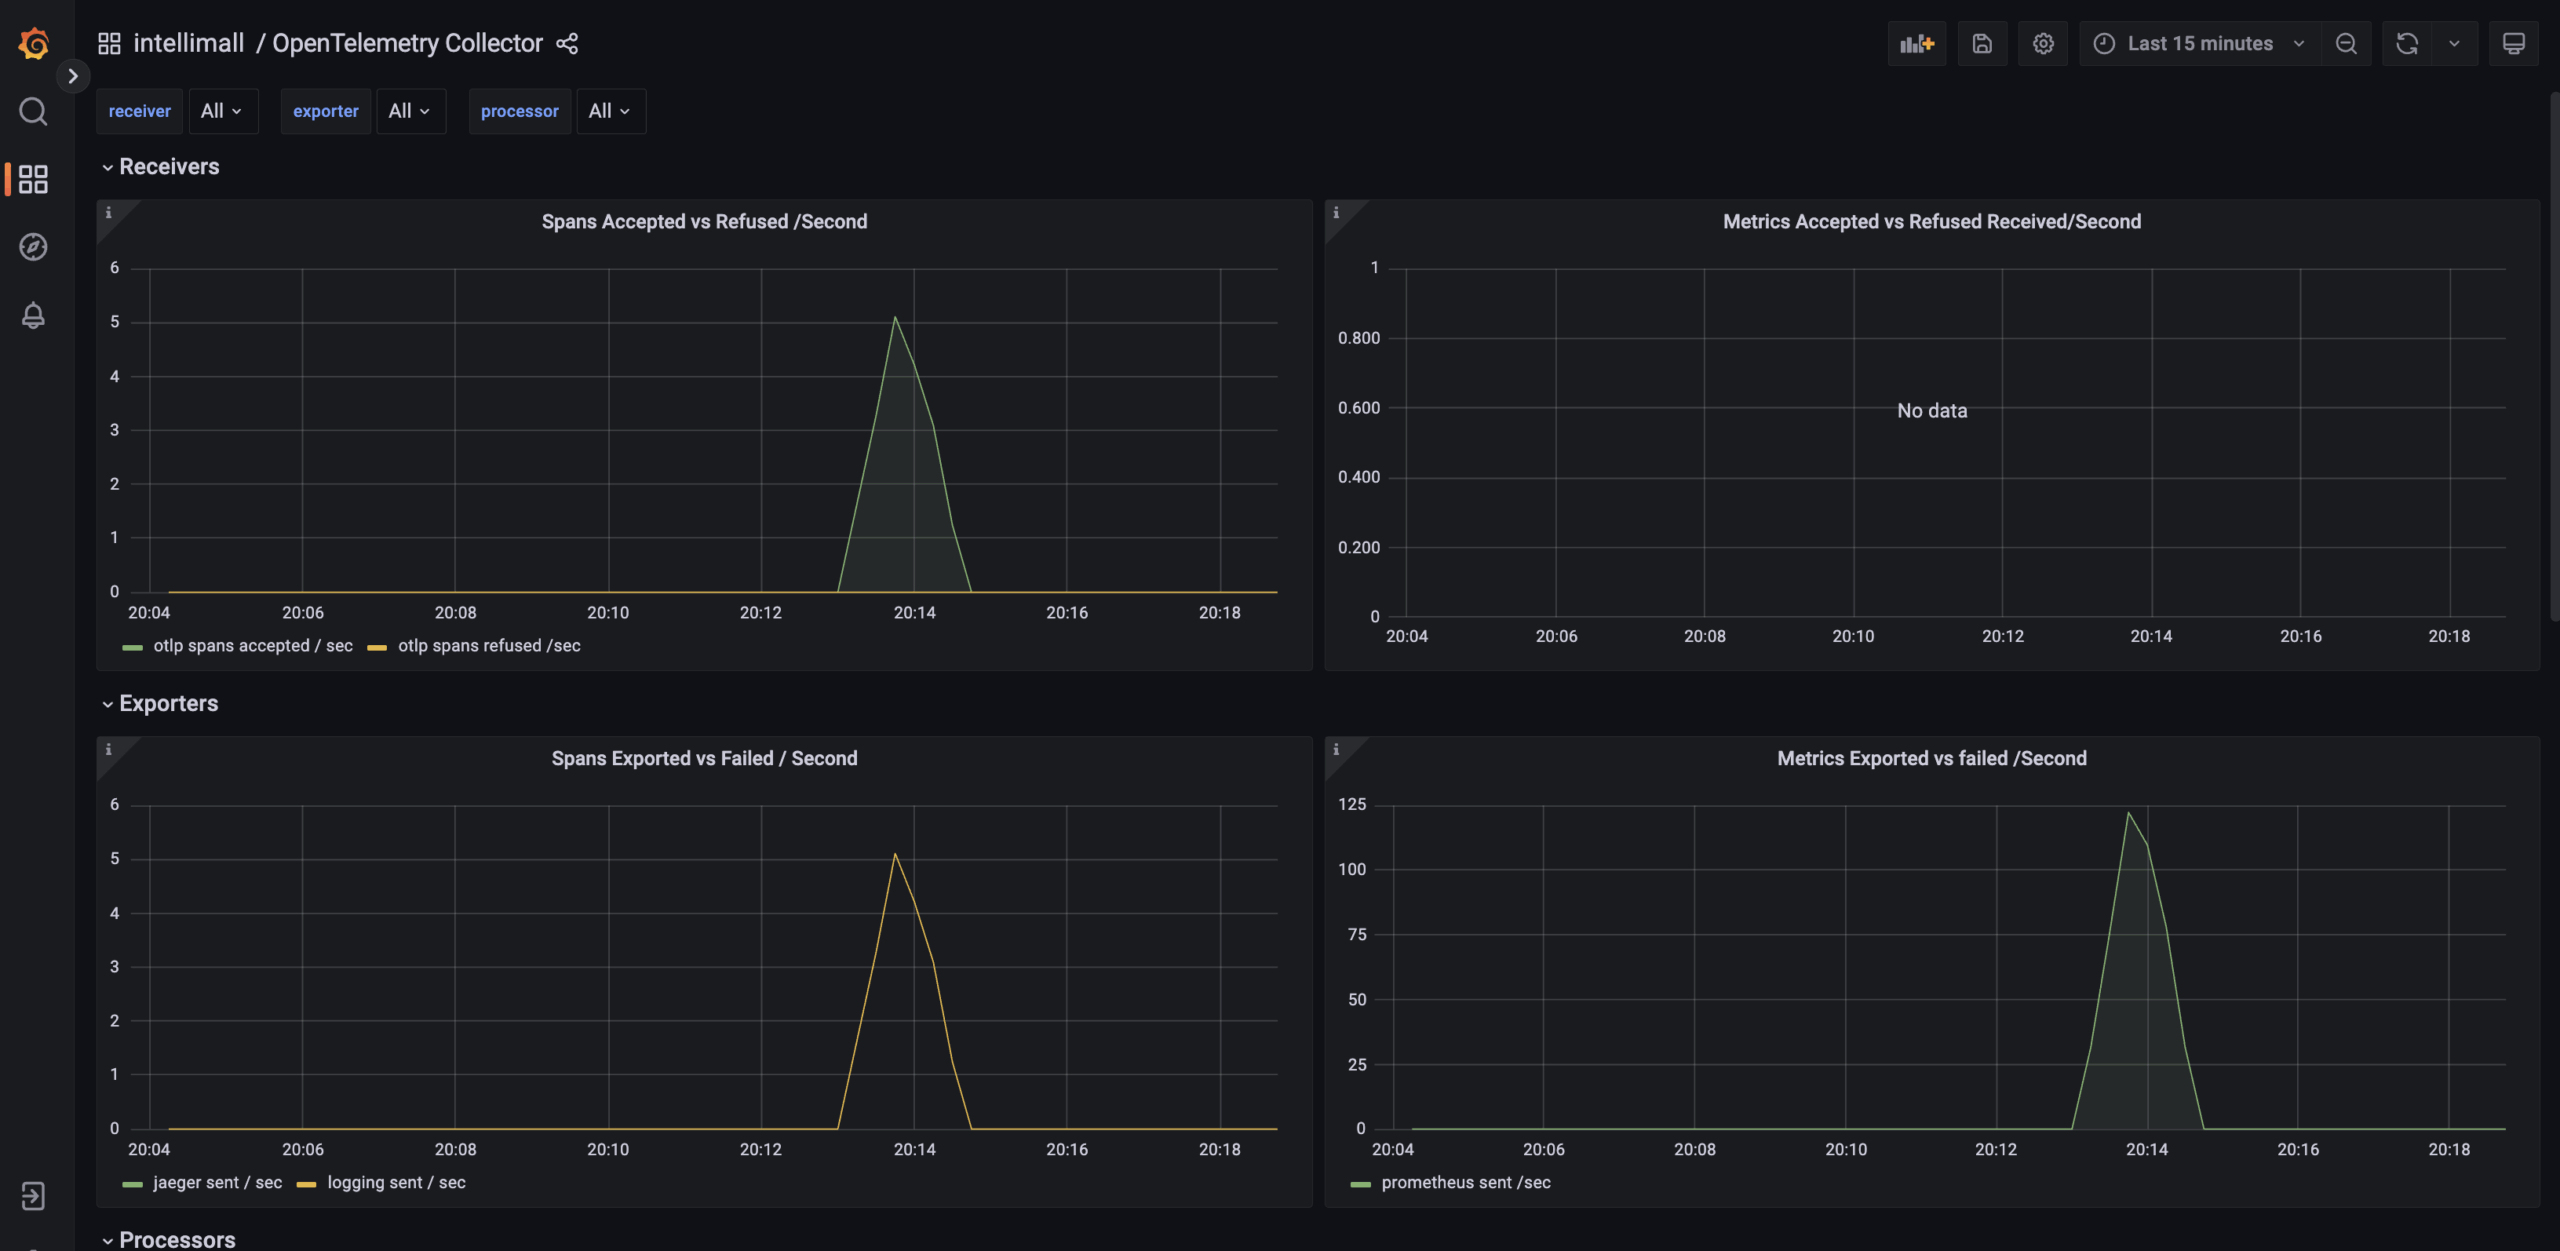
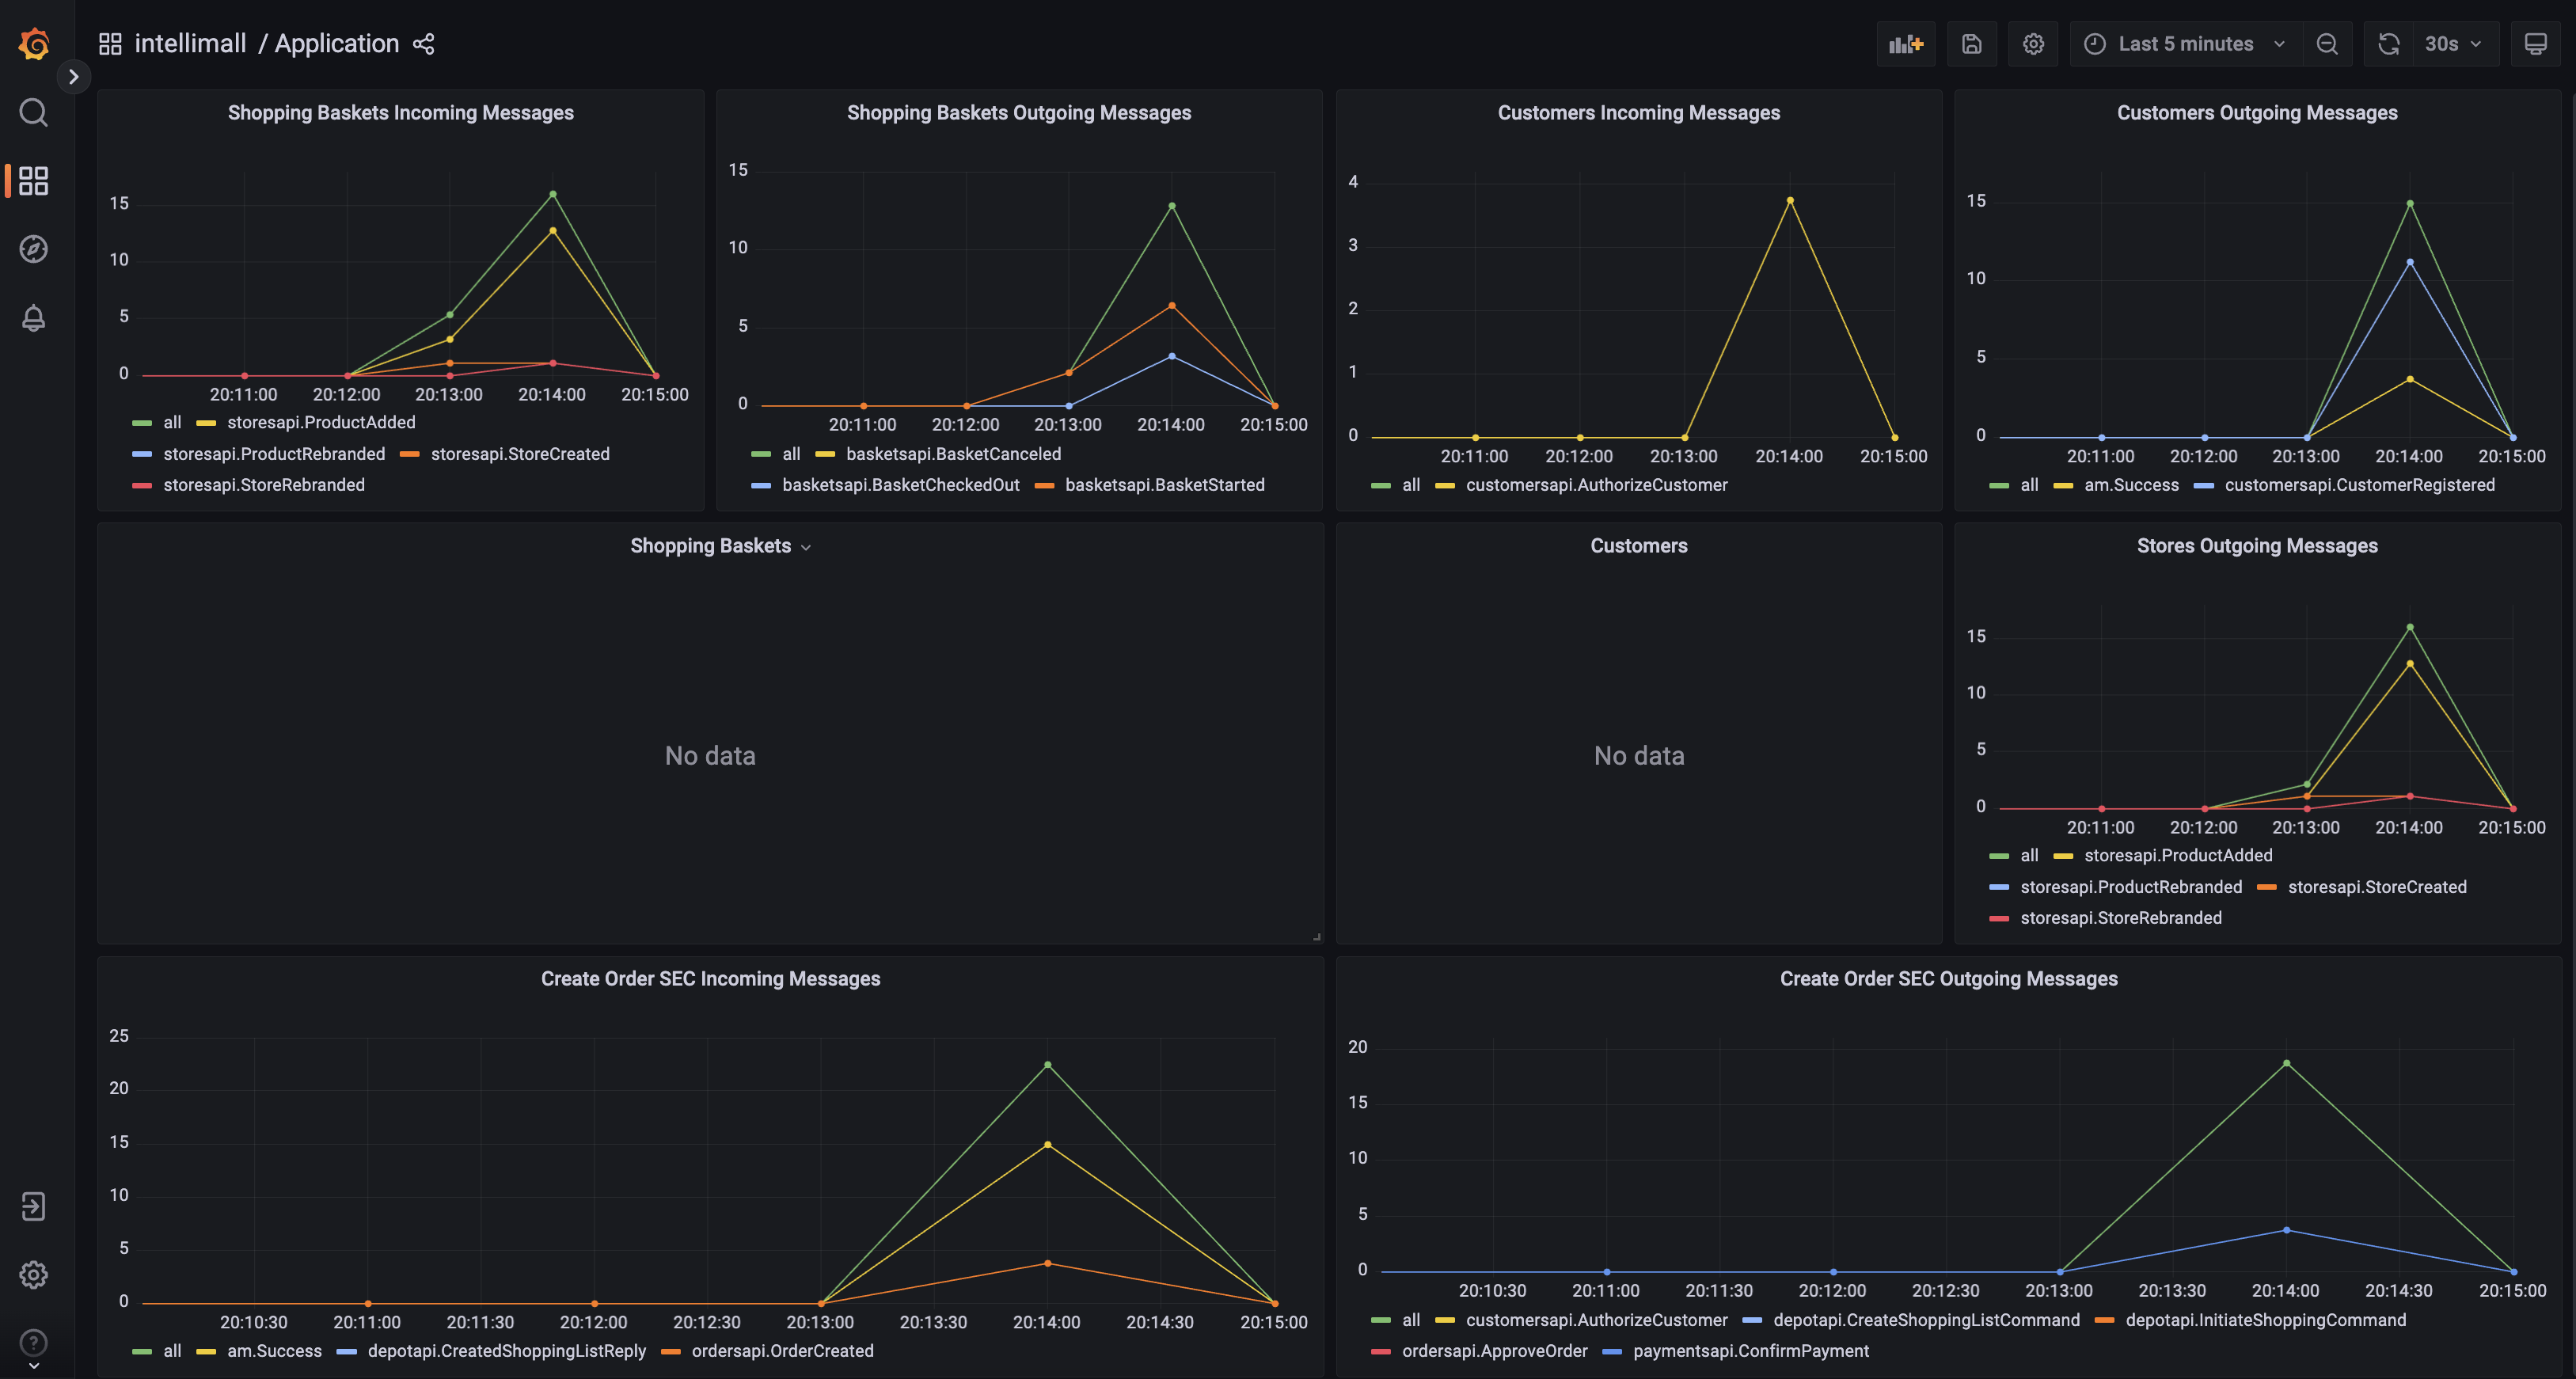
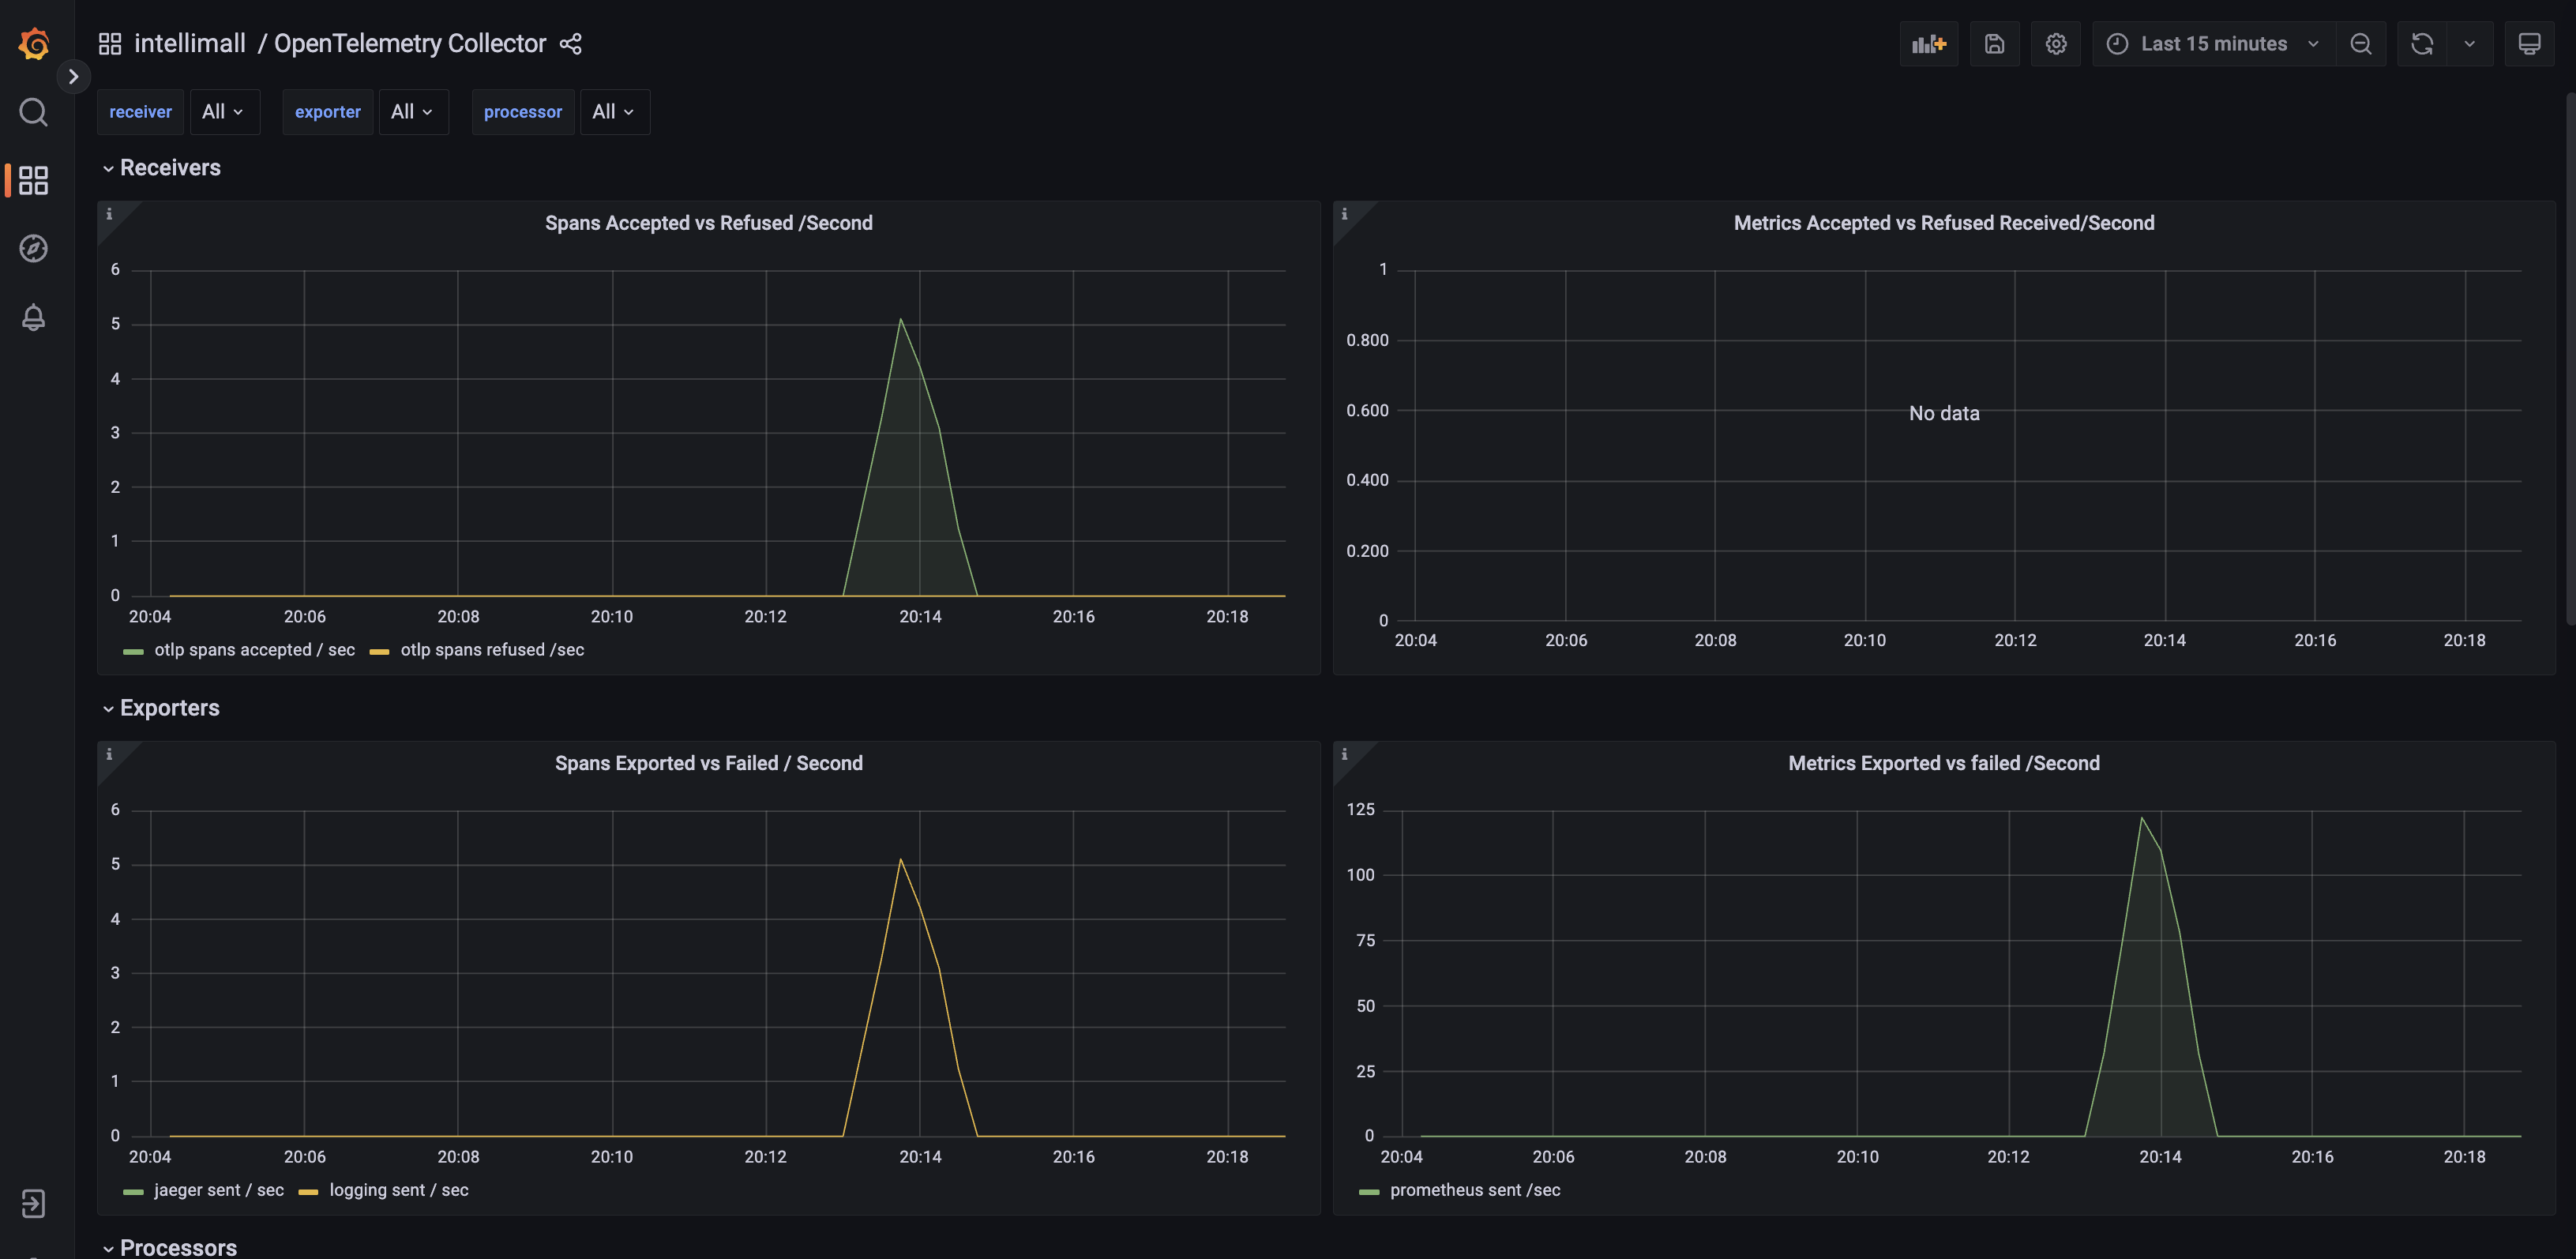
    Grafana UI for more compelling intepretation – Intelli Mall App Dashboard

    Opening localhost:3000/ and then browsing for dashboards will show the two dashboards that are installed under the intellimall folder.

    Screenshot of OpenTelemetry Collector dashboard

    How much activity you see in the dashboard will depend on how many clients you have running in the busywork application and the random interactions that the clients are performing.

    OpenTelemetry Collector dashboard

    Screenshot of OpenTelemetry Collector dashboard

    Details about how much work the collector is doing.

    How does Terminal reflect the events:

    grafana        | logger=context traceID=00000000000000000000000000000000 userId=0 orgId=1 uname= t=2023-09-20T12:06:26.480212513Z level=info msg="Request Completed" method=POST path=/api/ds/query status=400 remote_addr=172.18.0.1 time_ms=21 duration=21.768709ms size=99 referer="http://localhost:3000/d/Pc9ixd4Vk/application?orgId=1&refresh=30s" traceID=00000000000000000000000000000000
    collector      | 2023-09-20T12:13:41.244Z       info    TracesExporter  {"kind": "exporter", "data_type": "traces", "name": "logging", "#spans": 2}
    grafana        | logger=live t=2023-09-20T12:18:33.088289544Z level=info msg="Initialized channel handler" channel=grafana/dashboard/uid/BKf2sowmj address=grafana/dashboard/uid/BKf2sowmj
    prometheus     | ts=2023-09-20T13:04:51.975Z caller=compact.go:519 level=info component=tsdb msg="write block" mint=1695204291419 maxt=1695211200000 ulid=01HASB306VTMA1K6NRP5ZCCEQ3 duration=44.237792ms

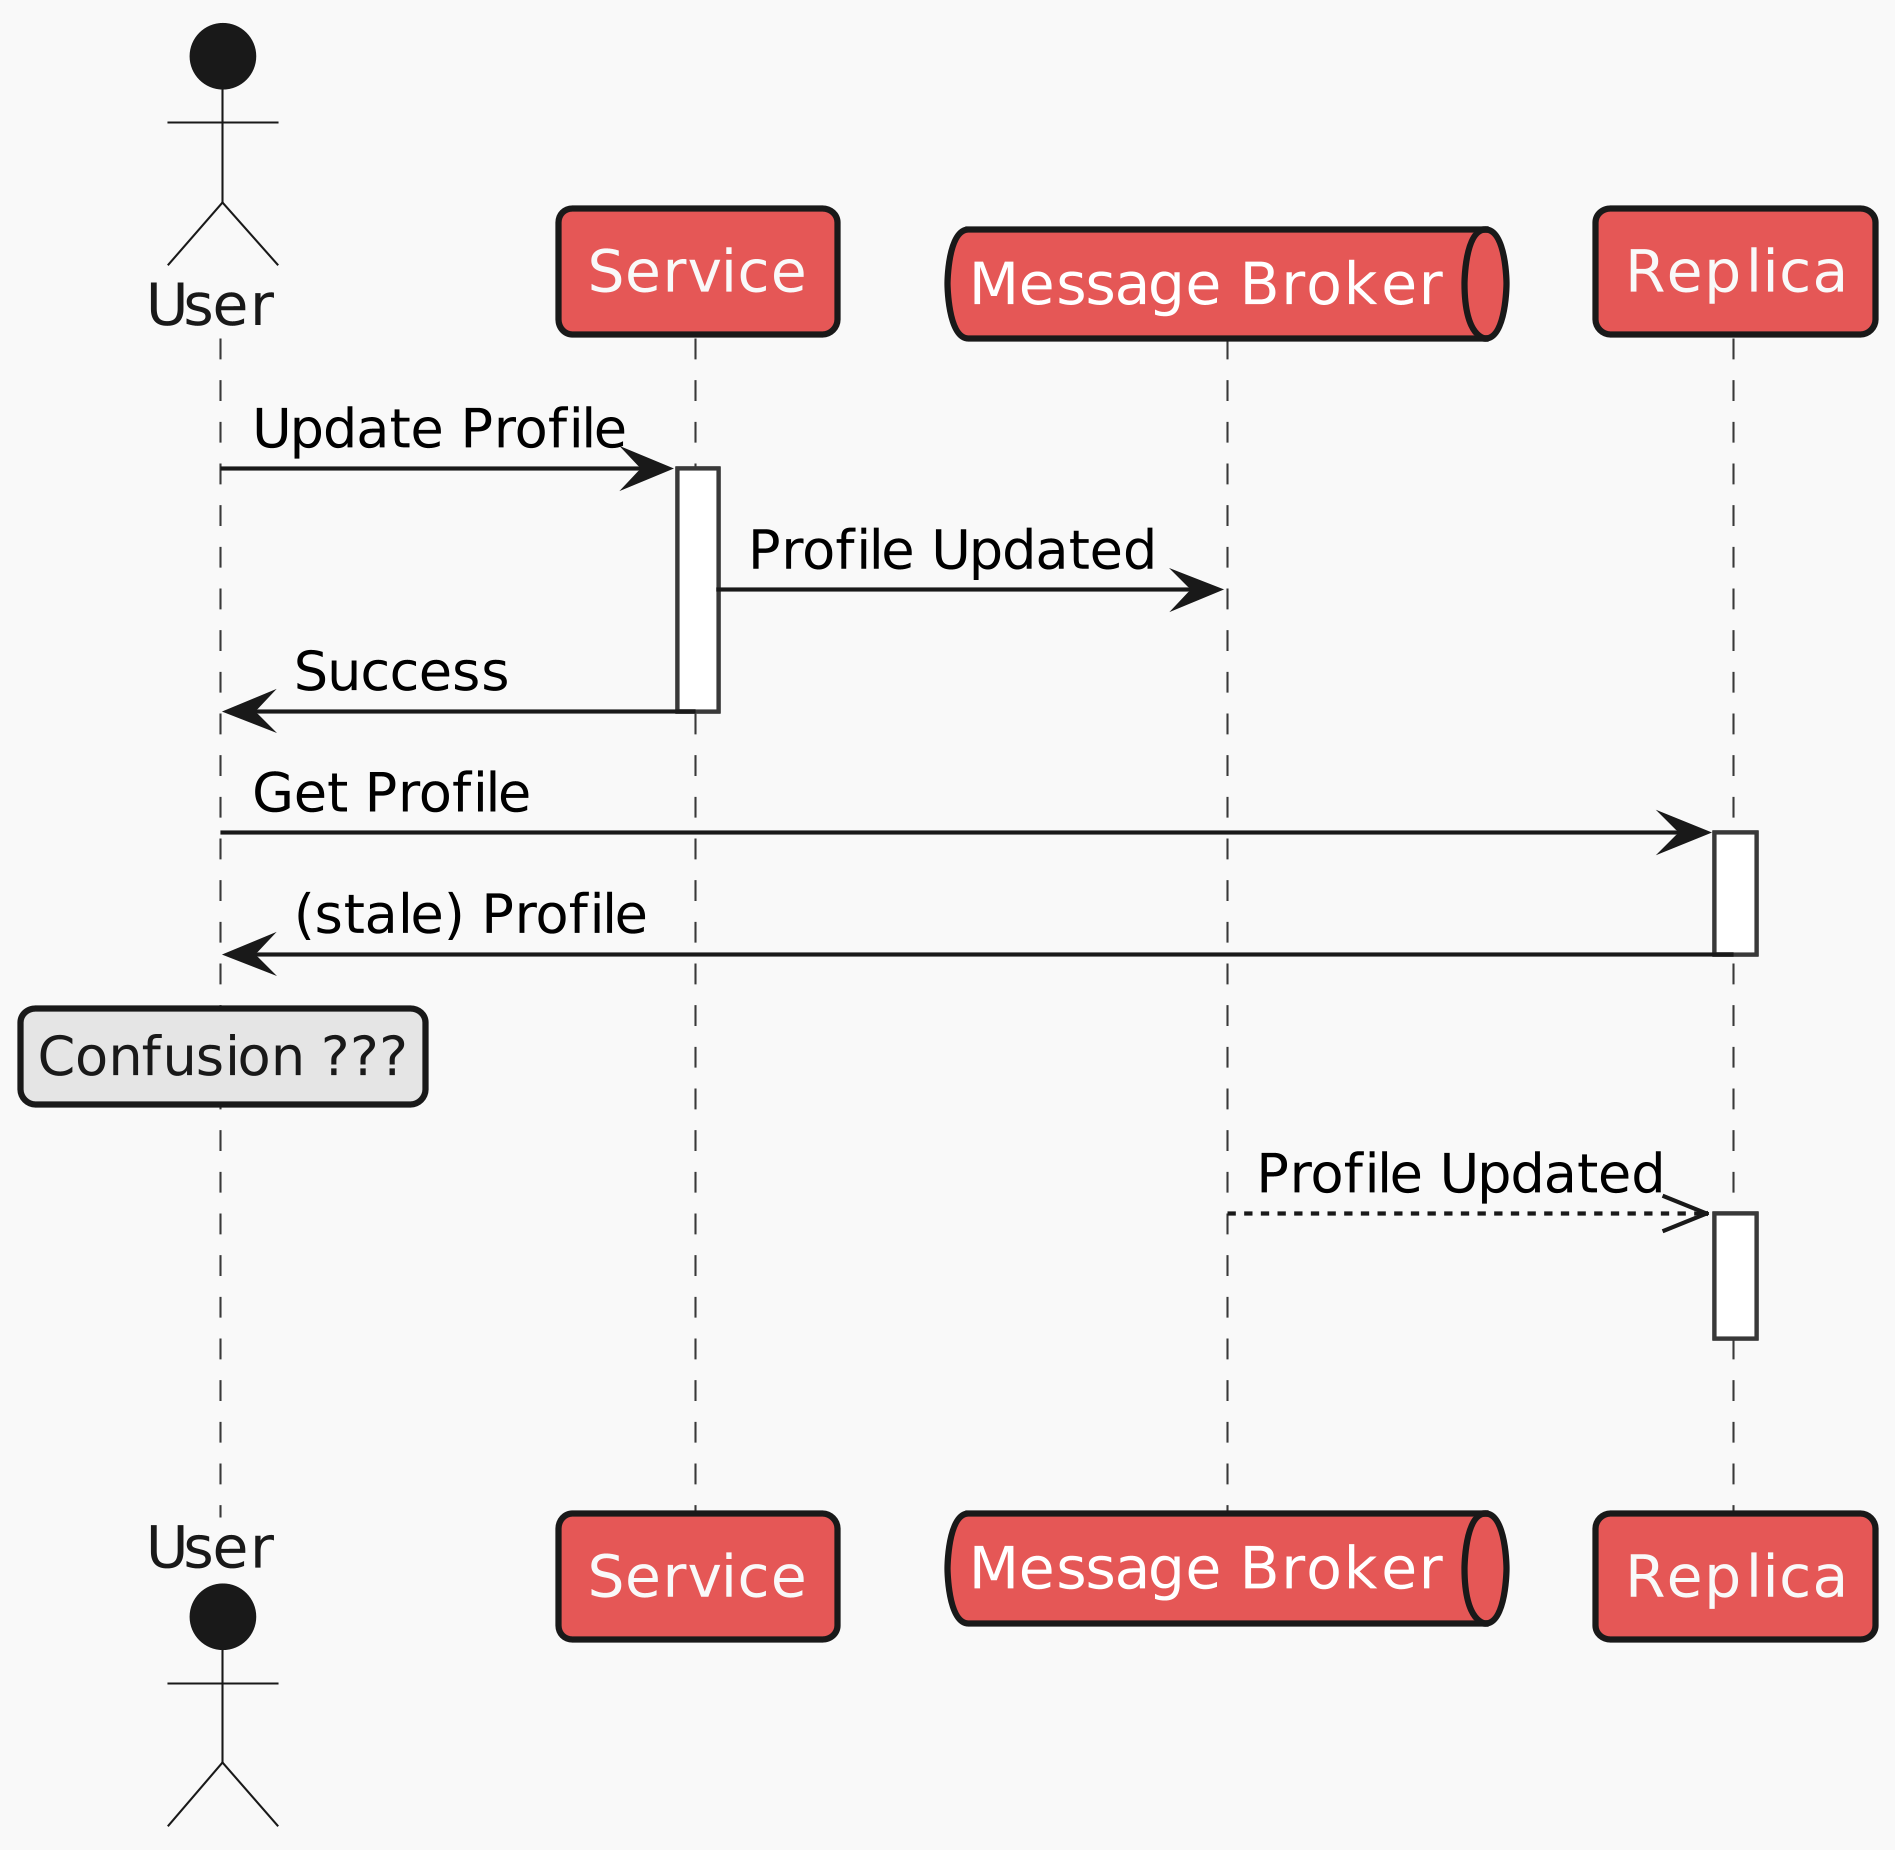
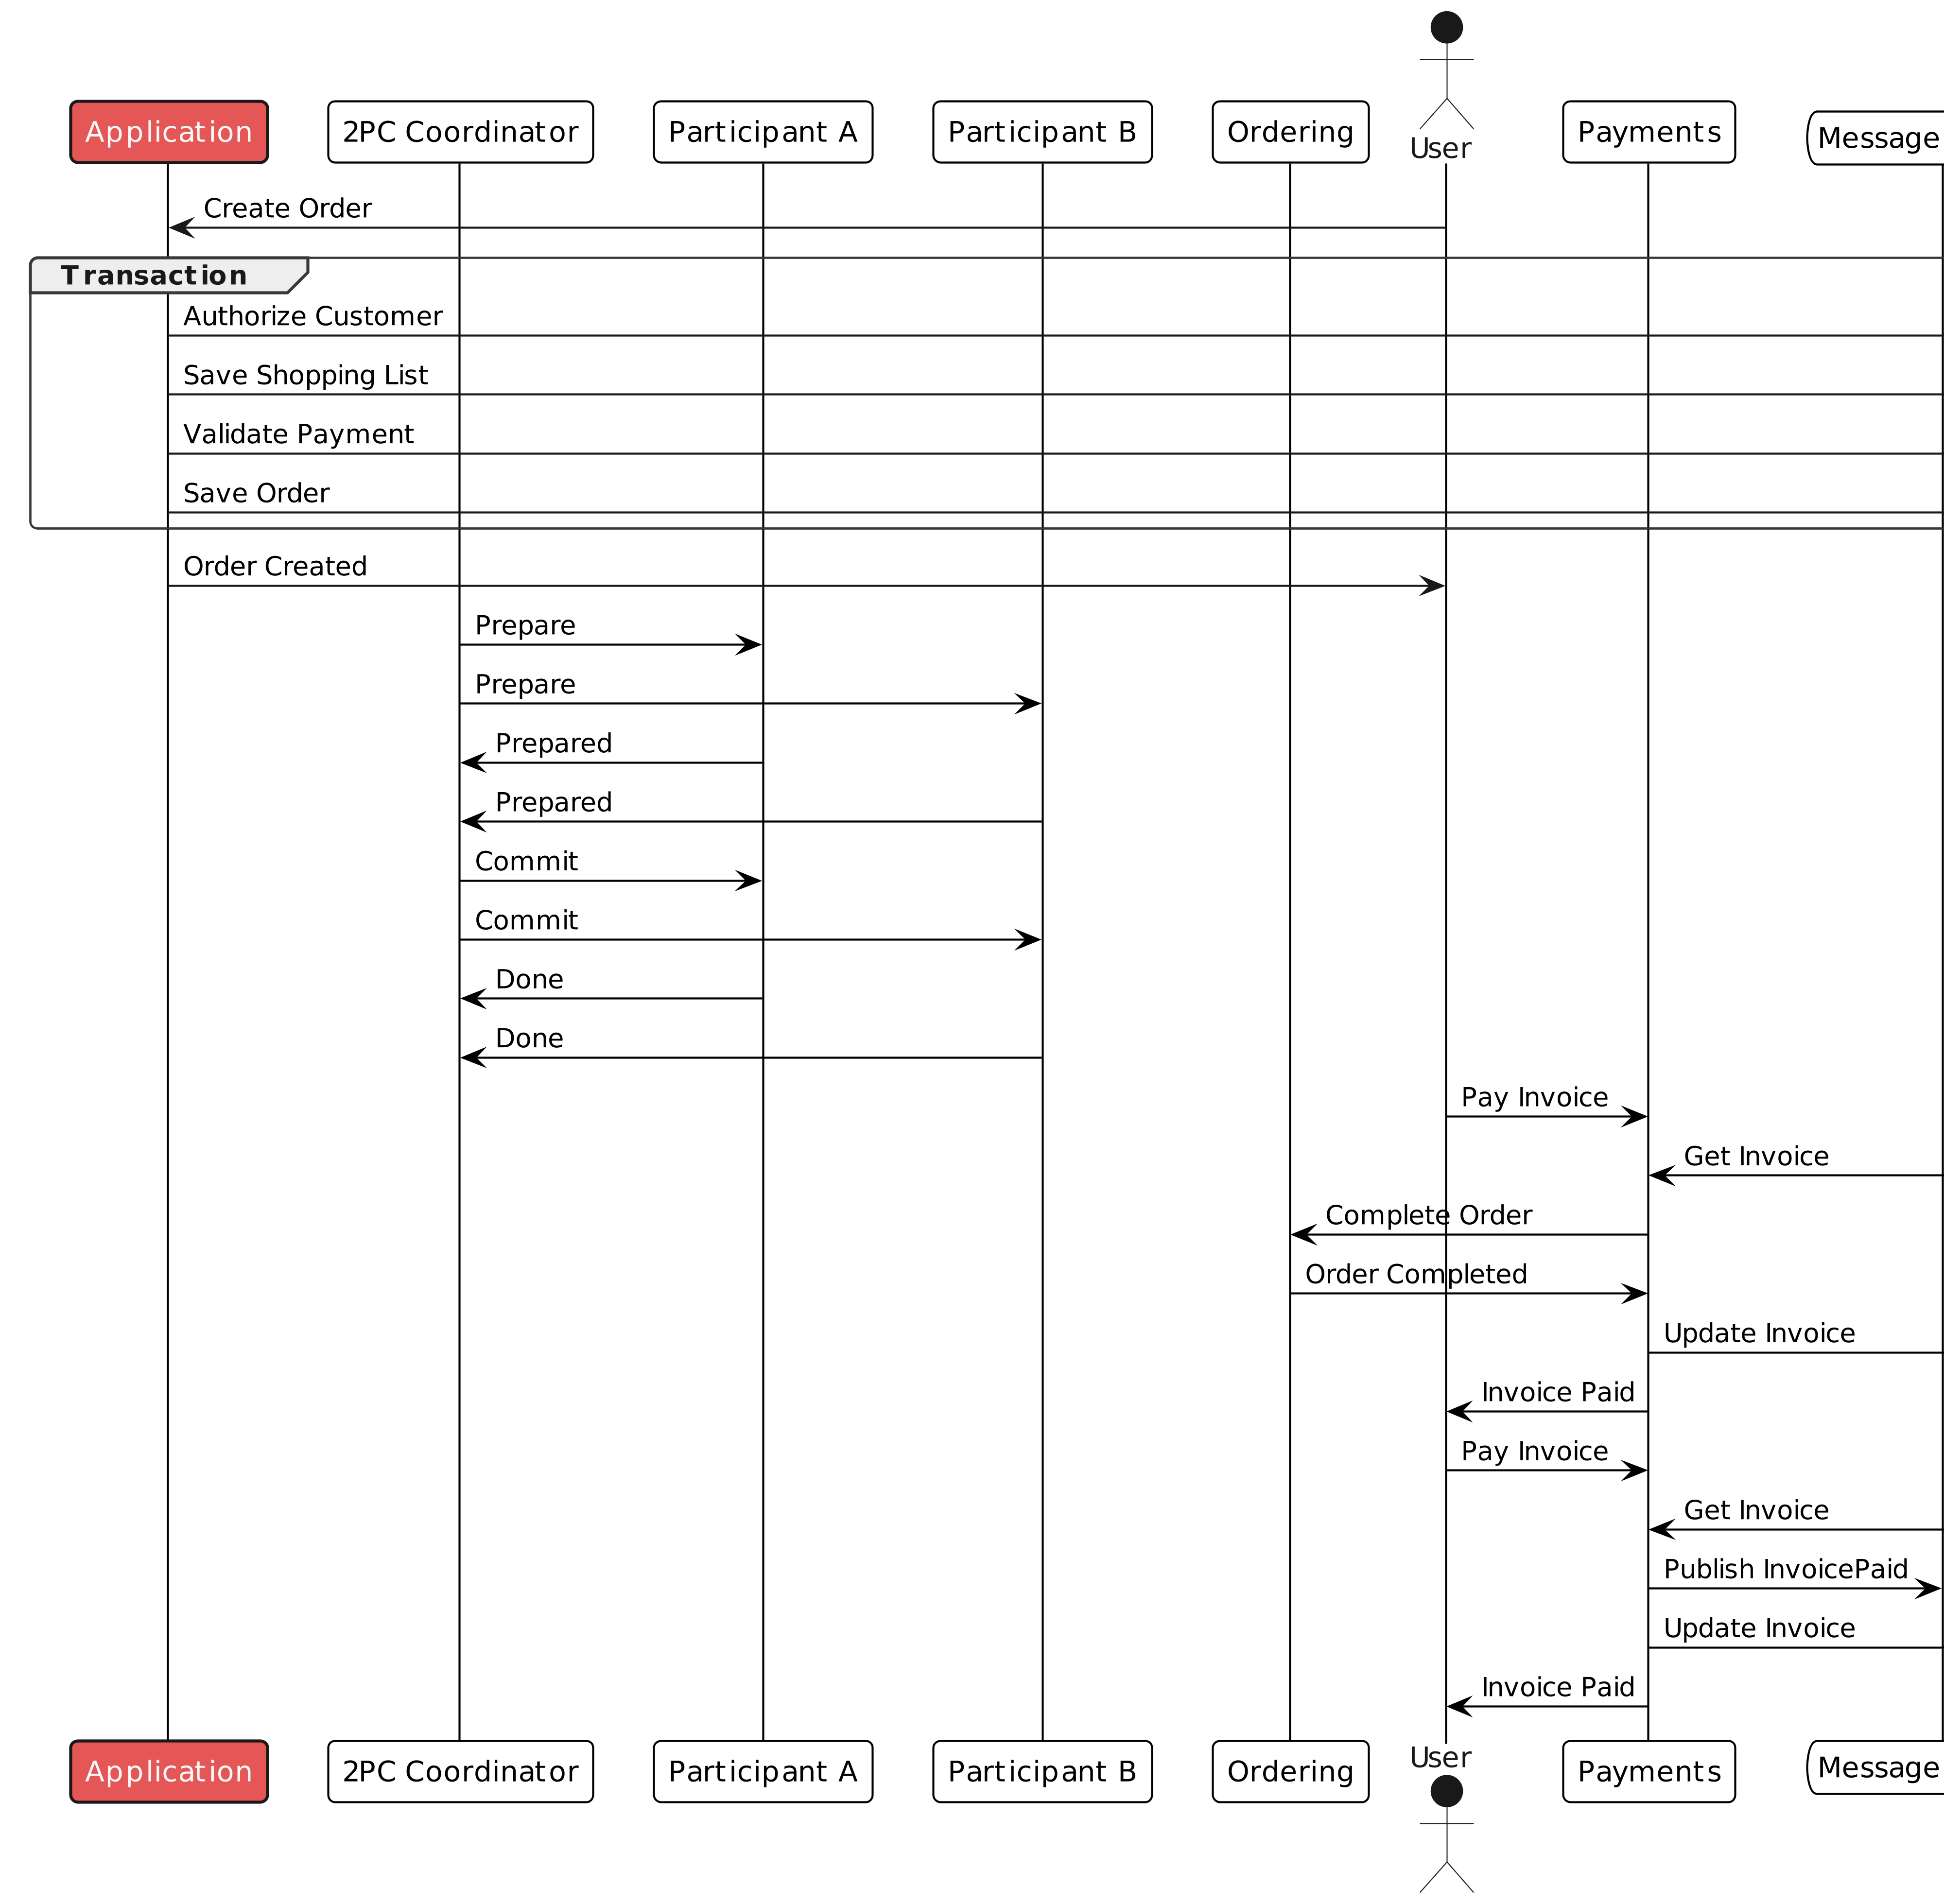
    Business logic flow

    read after write

    read after write

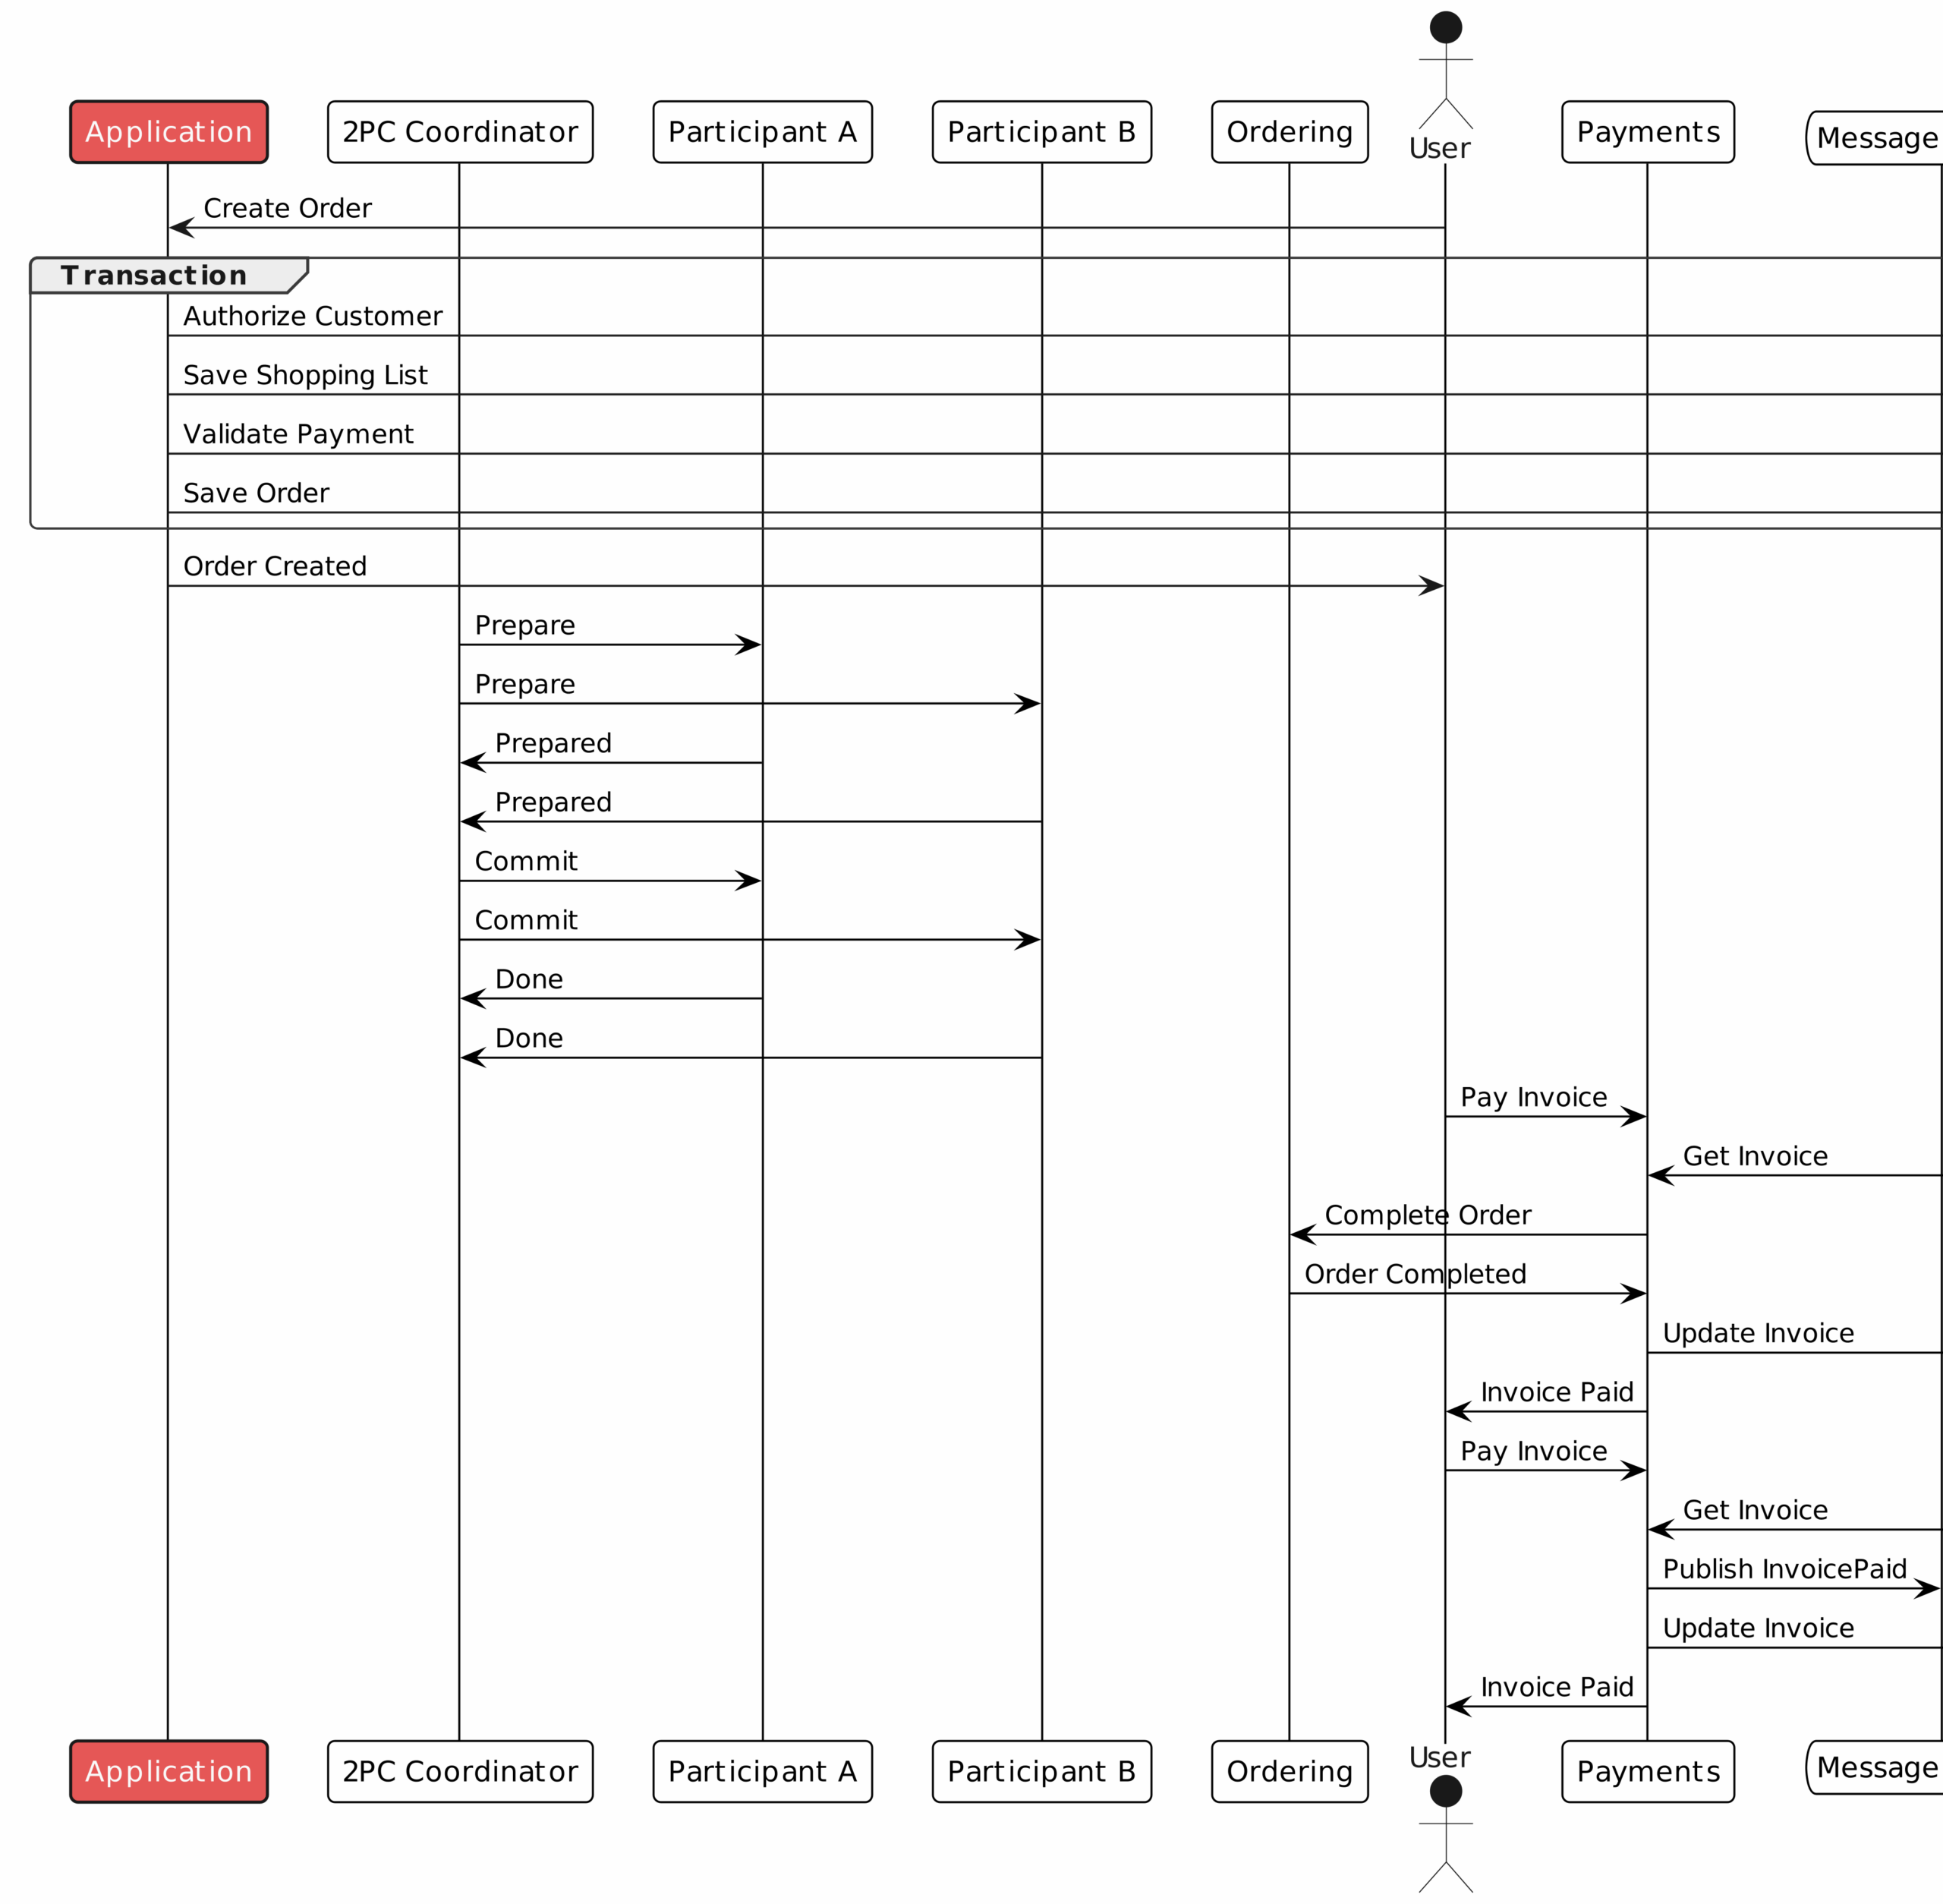
    transactions

    transactions

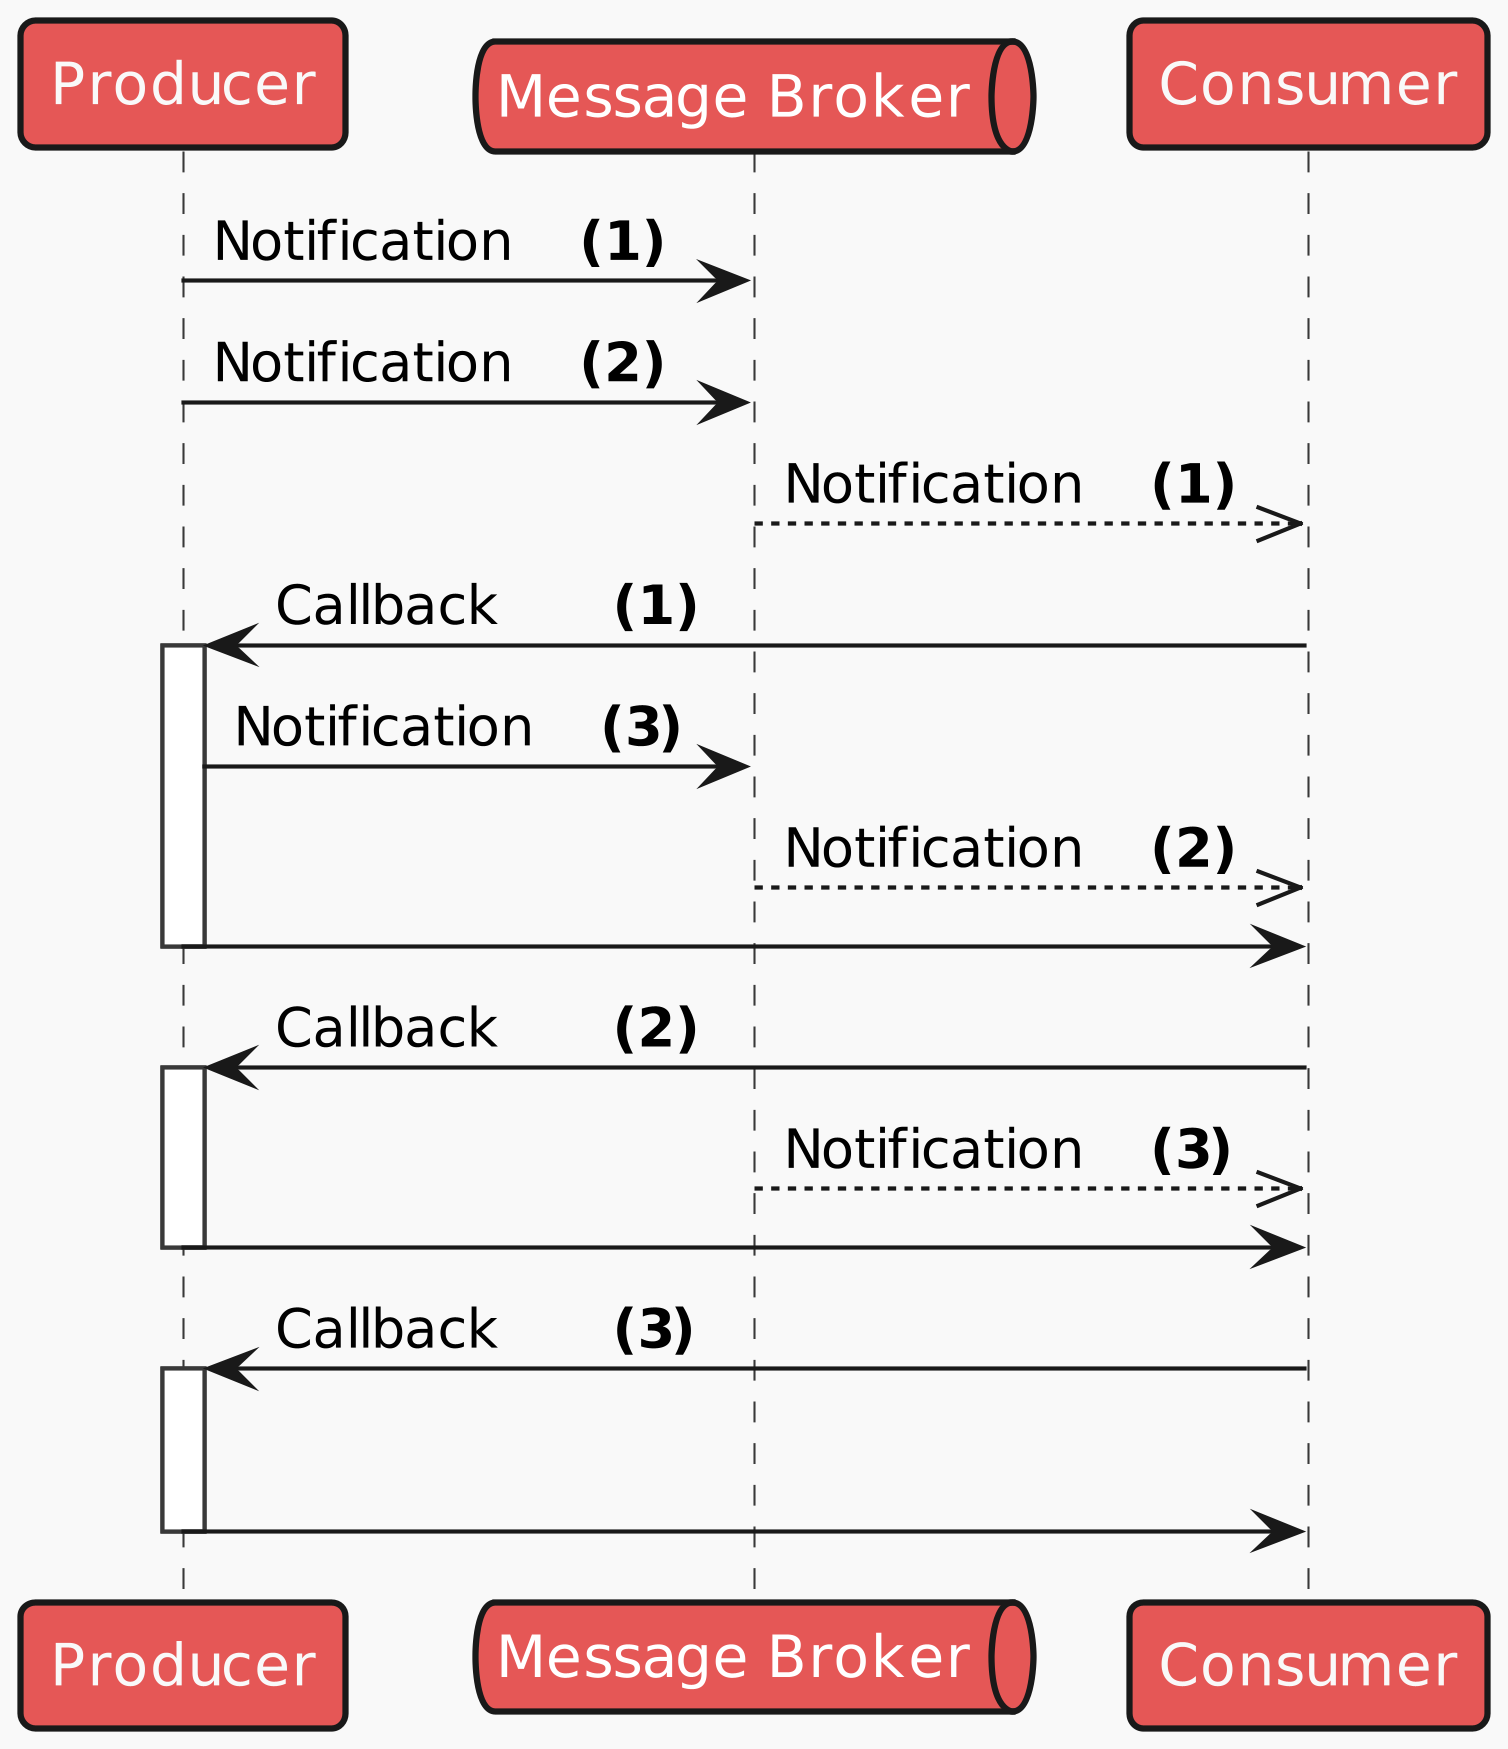
    notification ordering

    notification ordering

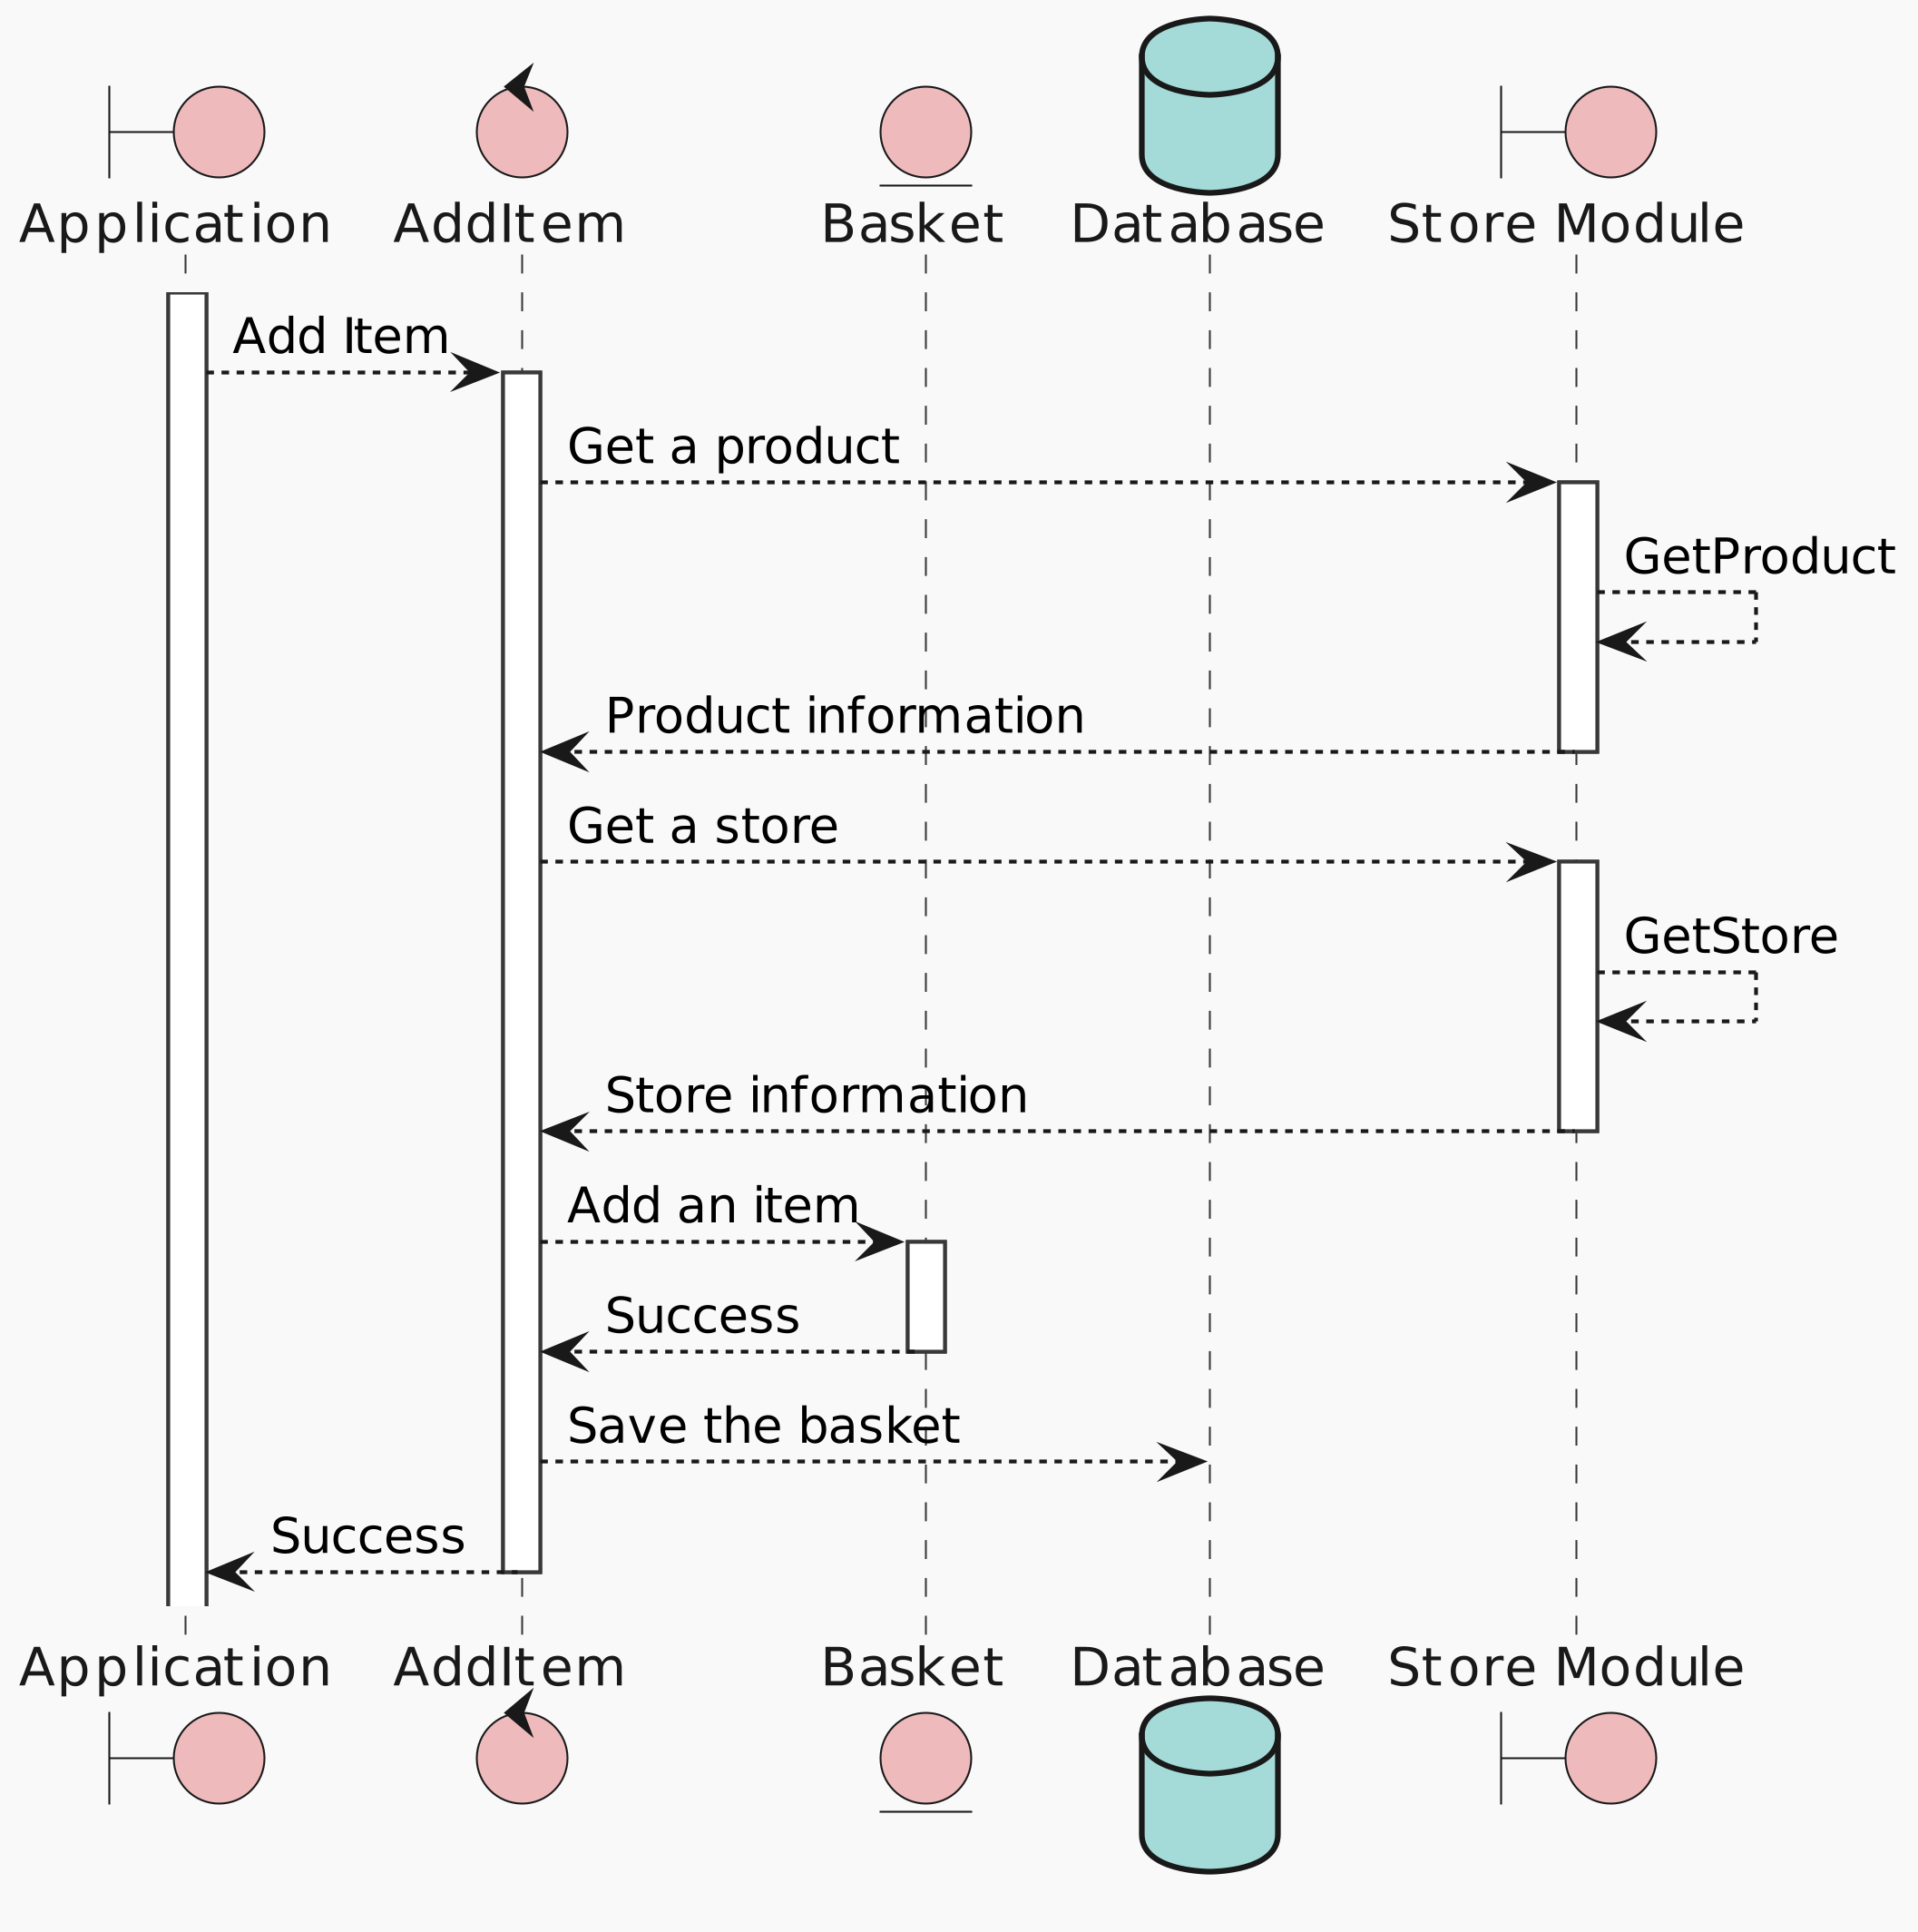
    adding items

    adding items

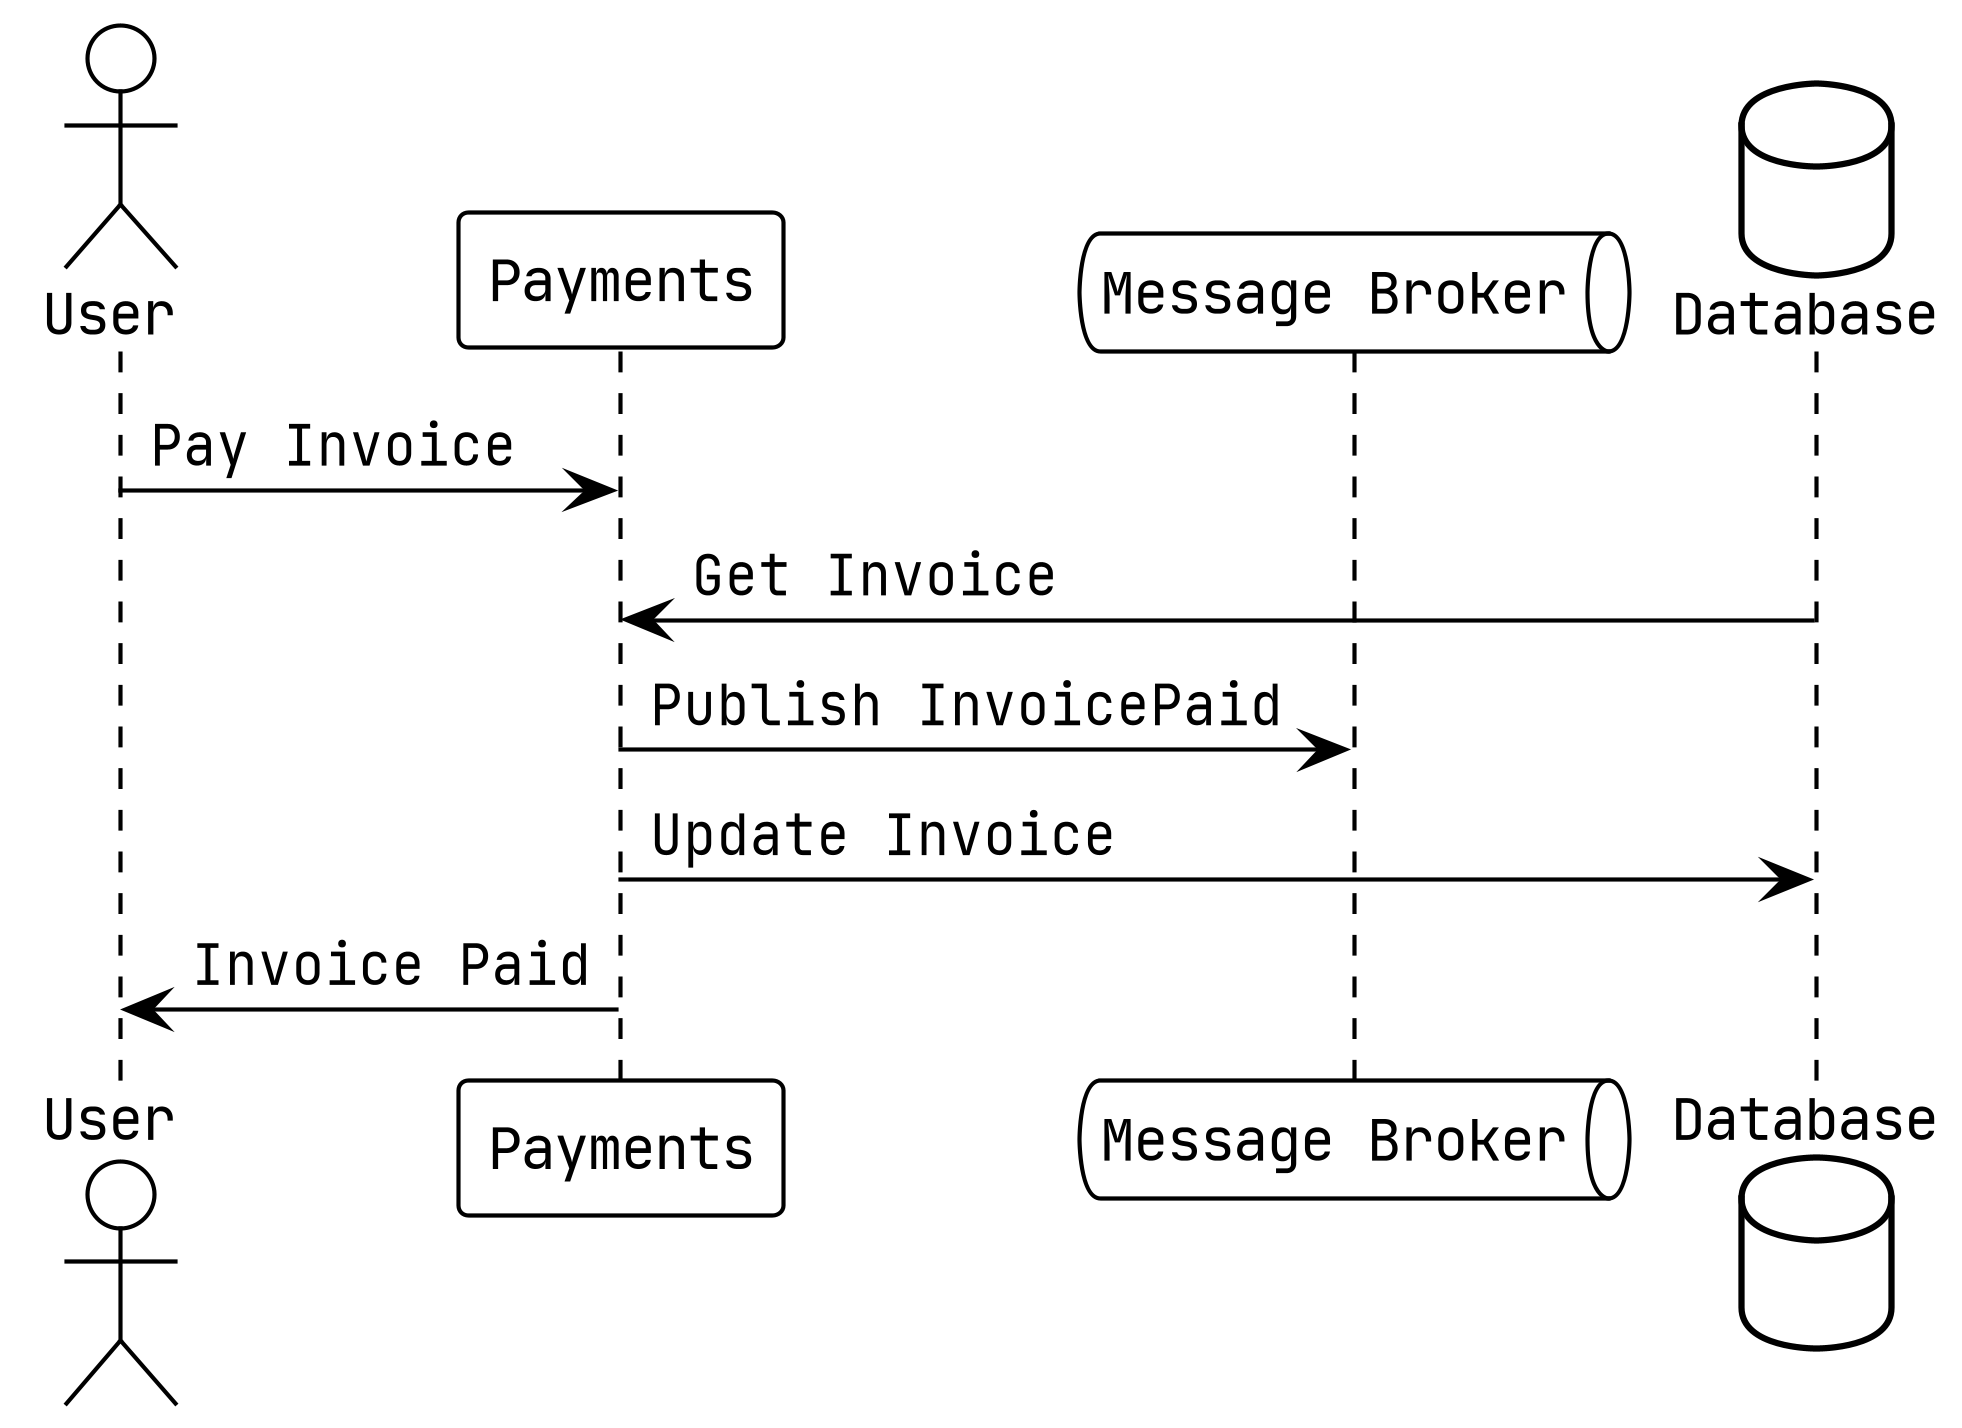
    async pay invoice

    async pay invoice

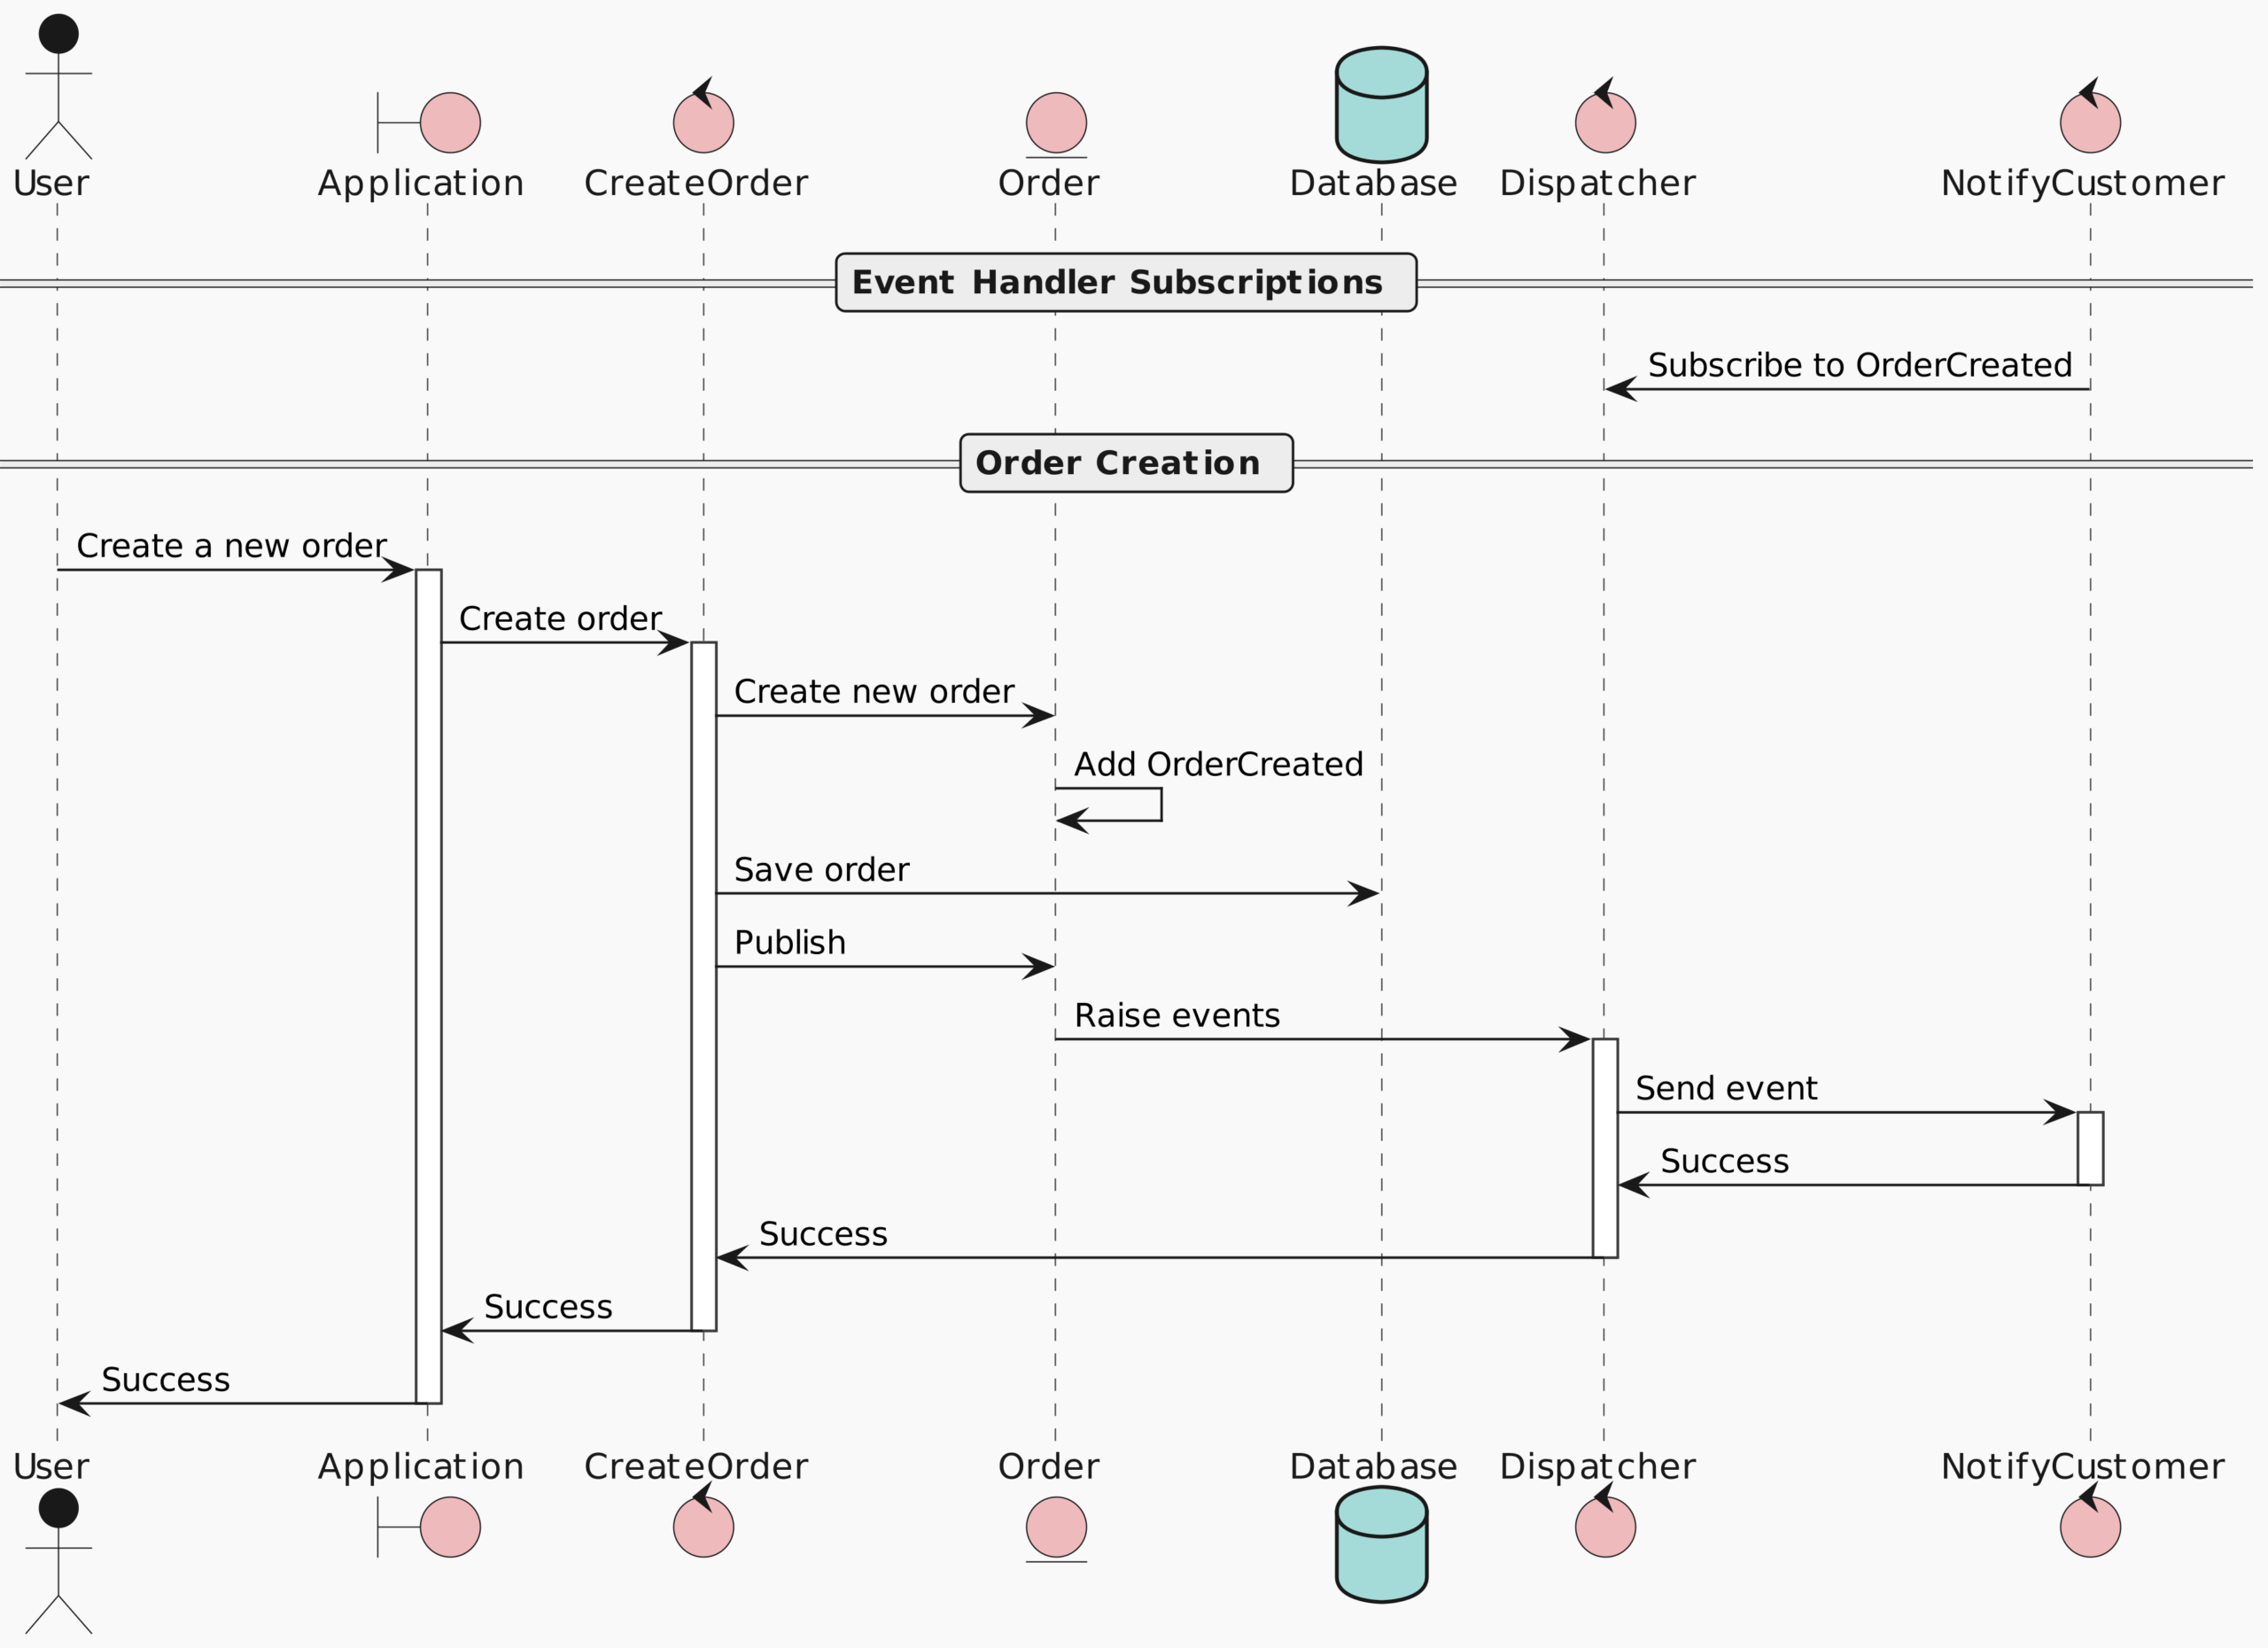
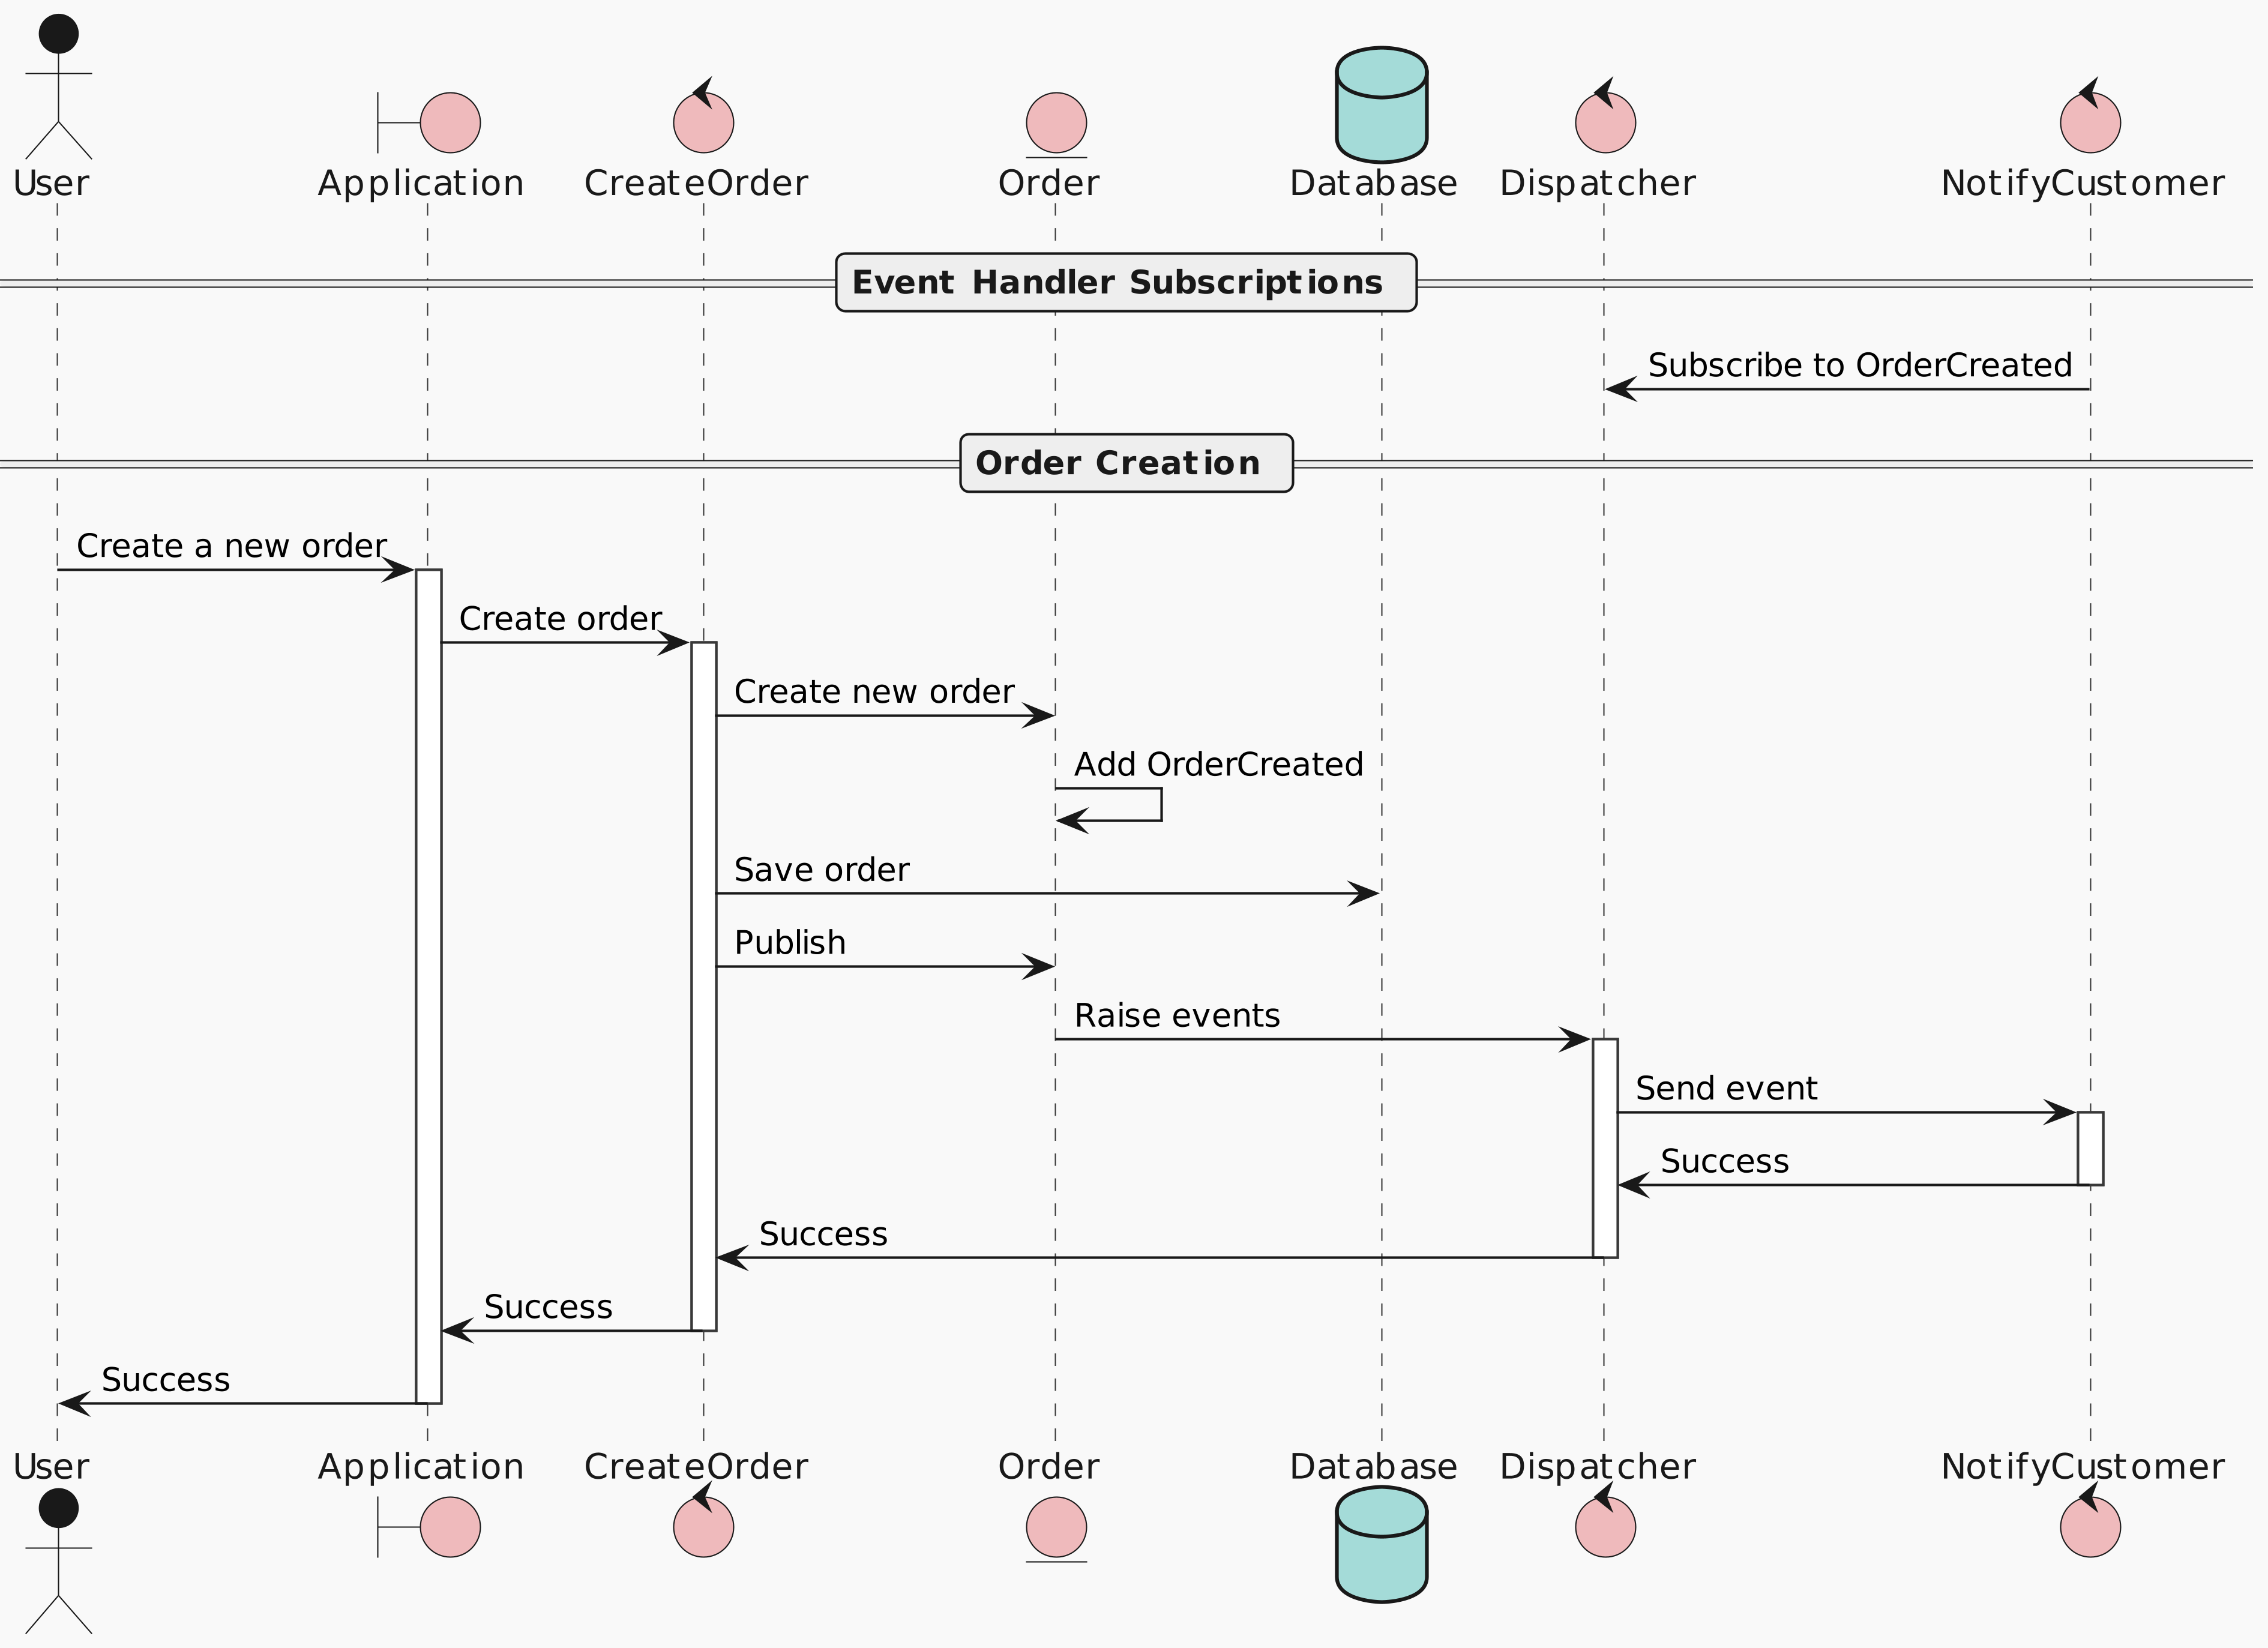
    create order with domain events

    create order with domain events

    Visit original content creator repository https://github.com/LordMoMA/Intelli-Mall
  • Targeting2019-nCoV

    logo

    Targeting COVID-19: GHDDI Info Sharing Portal

    This is a public repo for information sharing portal about nCov/SARS/MERS for drug discovery community, initiated by GHDDI

    We’re continuously releasing scientific materials to help the scientific community fight this COVID-19 pandemic, including curated data, updated research reports, discussions etc. You can find these materials at

    Portal URL: https://ghddi-ailab.github.io/Targeting2019-nCoV/

    Guide for Discussion

    For any discussion please post them at the issue section of this repo. You’re welcome to join our discussion for any scientific subject, feature request and bug report.

    A Short Tutorial for Content Contributor

    You’re also welcome to contribute content for this community info sharing portal. To minimize the cost for layout formatting from our contributors, we use the Markdown format to publish our content.

    Contribute Content

    Write your contents in markdown format and save them in /docs folder, with file extention .md

    Organize Pages

    Specify your content in mkdocs.yml, section nav as follows:

        - COVID:
          - todo I: todo_I.md
          - todo II: todo_II.md
    

    in which COVID will be top level folder, and todo I and todo II will be the second level pages

    Raise Pull Request

    After the content editting is finished, remember to raise pull request for content merging.

    Markdown Format Specification

    https://guides.github.com/features/mastering-markdown/


    Who We Are

    We’re from GHDDI (The Global Health Drug Discovery Institute). GHDDI was jointly founded by Tsinghua University, the Bill & Melinda Gates Foundation, and the Beijing Municipal Government. The Institute is a transformative drug discovery and translational platform with advanced biomedical research and development capabilities. It is an independent, not-for-profit institute with a broad interest in addressing global health concerns, regardless of financial incentives, and intends to focus its efforts on tackling the world’s most pressing disease challenges faced by many developing countries.

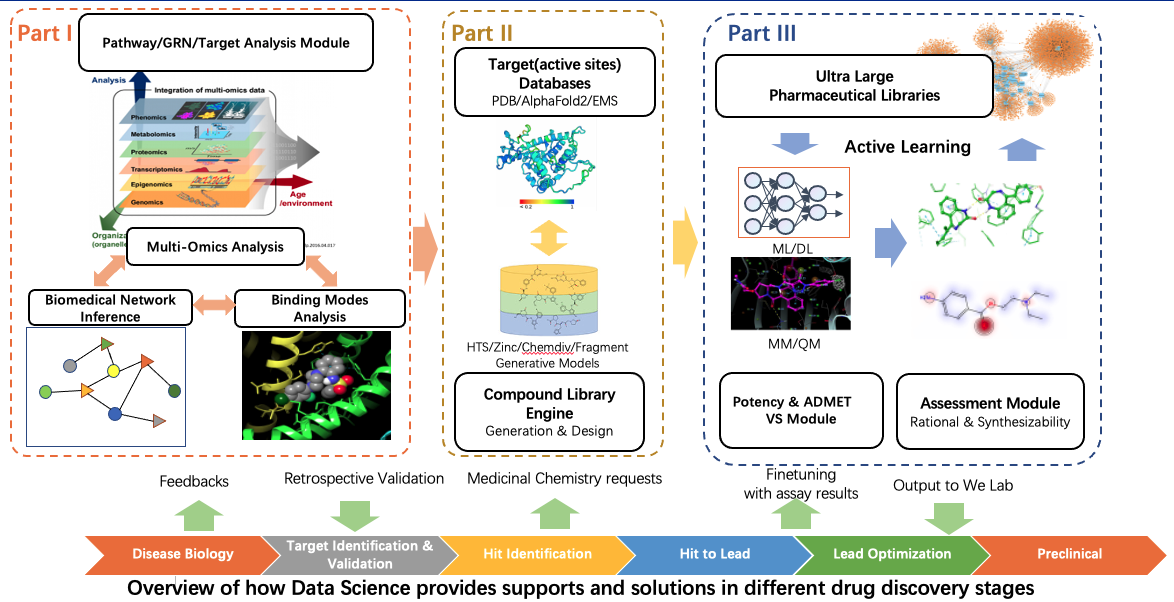
    GHDDI Data Science group consists of 10 scientists, who are Dr. Jinjiang Guo, Dr. Xiaoying Lv, Dr. Han Guo, Dr. Jie Li, Yuan Zhang, Dr. Song Hu, Xi Lu, Chen Liang, Qi Liu and Dr. Yang Li, and 2 engineers who are Zhuo Tang and Luyao Ma. We are from cross-disciplines: computational chemistry, bioinformatics, computer science and software engineering. We manage 58 GHDDI local High-Performance Computing (HPC) clusters, over 1 billion chemical, biological and pharmaceutical data. Our mission is to propel drug discovery forward with our cutting-edge Data Science Platform. Combining in-house AI systems, tools, software and partners’ supports , we provide a variety of services to tackle real-world problems in drug discovery pipelines. Our dedicated team is constantly exploring new technological innovations to further enhance the drug discovery process. We are building fundamental technologies to empower our scientists to get smart starts and make better decisions.

    Visit original content creator repository https://github.com/GHDDI-AILab/Targeting2019-nCoV
  • fluent-plugin-out-kaboom

    fluent-plugin-out-kaboom

    A Fluentd plugin for exploding JSON array elements

    Configuration Options

    Argument Description Required? Default
    key The key of the array to explode Yes N/A
    tag The tag to use for emitted messages No Defers to add_tag_prefix or remove_tag_prefix
    remove_tag_prefix The prefix to remove from the tags of emitted messages No N/A
    add_tag_prefix The prefix to add to the tags of emitted messages No N/A

    If you do not specify tag, you must specify remove_tag_prefix, add_tag_prefix, or both. remove_tag_prefix will be applied before add_tag_prefix.

    Example Usage

    Consider a Fluentd message with the tag users and the following contents:

    {"user": {"first_name": "John", "last_name": "Smith", "favorite_movies": ["John Wick", "Robocop", "Blade Runner"]}}

    If you need to run analytics on this data via a database like Redshift, which does not support Arrays, favorite_movies needs to be exploded. We can use a Fluentd configuration like this:

    <match users>
      @type kaboom
      key user.favorite_movies
      add_tag_prefix exploded.
    </match>
    

    This will result in three new messages being emitted:

    1. {"user": {"first_name": "John", "last_name": "Smith", "favorite_movies": "John Wick"}}
    2. {"user": {"first_name": "John", "last_name": "Smith", "favorite_movies": "Robocop"}}
    3. {"user": {"first_name": "John", "last_name": "Smith", "favorite_movies": "Blade Runner"}}

    Each new message will be tagged exploded.users adhering to the add_tag_prefix configuration value. This tag can then be matched on later enabling processing of the messages individually. To complete the use case mentioned earlier, they can be put into Redshift so that the userbase’s favorite movies can be analyzed.

    Visit original content creator repository
    https://github.com/PaeDae/fluent-plugin-out-kaboom

  • go-utls

    go-utls

    Utilities for Go

    GitHub tag (latest by date) GitHub last commit GitHub issues GitHub

    go-utls is a small Go repository where I put all the useful stuff I regularly need in my projects. Feel free to use at your discretion with the appropriate license mentions.

    NB: I’ve developed the same kind of libraries for TypeScript and Python.

    Usage

    go get github.com/cyrildever/go-utls

    This repository contains the following modules:

    • crypto: a proxy to Go-Ethereum’s ECIES library and to my ecies-geth JavaScript library (including the Path type) as well as a small SSHPublicKey2String() utility;
    • io: a light REST client utility on top of fasthttp with Delete, Get, Patch, Post and Put methods;
    • model: a list of types I frequently use in my projects (such as Base64 or Hash types) all implementing my Model interface;
    • normalizer: the adaptation of my Empreinte Sociométrique™ patented work for normalizing contact data (see its specific README or use its TypeScript equivalent on NPM: es-normalizer);
    • a few utility sub-modules:
      • caller: to get information about the location of the calling function (file name and line number);
      • concurrent: to handle concurrent maps and slices (with faster slice appending when its length is set at instantiation through the concurrent.NewSlice function);
      • email: my “quick-and-dirty” SMTP client (including examples in tests for use with AWS SES or Gmail);
      • env: to know if an environment variable is set and cast it as either a boolean, an integer or a string (potentially setting it with a default value);
      • event: a simple event bus manager;
      • file: to find, truncate, know existence, delete, get line count or read all lines from a file;
      • logger: a wrapper to the log package to output logs to stderr and optionally a file;
      • ntp: another small wrapper to handle time with NTP;
      • packer: to marshal/unmarshal data (JSON, MessagePack, MongoDB’s Bson, …);
      • utils: a bunch of useful utility functions (Capitalize(), Chunk(), DateFormat() from Java notation, EuclideanDivision(), Flatten(), FromHex()/ToHex(), back-and-forth conversions of byte arrays (to string, number, etc.), IsPointer()/IsValue() test methods, PrettyPrintJSON(), Reverse() for strings, ToUTF8() string formatting, …);
      • xor: to apply XOR operation to strings or byte arrays.

    License

    These modules are distributed under a MIT license.
    See the LICENSE file.


    © 2020-2025 Cyril Dever. All rights reserved.
    Visit original content creator repository https://github.com/cyrildever/go-utls